|
Article
& Pictures By Forest Ranger
Last year I was driving down the road
and my engine oil pressure gauge all of a sudden got possessed. After a
few hours in the shop I found that the factory sender switch was bad.
After replacing it and have it go twice more on me since then I decided
I needed to get a real oil pressure gauge instead of relying on that
factory idiot indicator.
So I bought a kit for around $15 at a discount auto parts store and here
is what I got with it.

I
chose this one because it was only a couple of bucks. The way I see it
is that it is cheep insurance. This gauge will allow you to monitor the
oil pressure at a more accurate level then the factory “Ya I have
pressure, crap now I don’t” .
The only other items that are not supplied in the kit is a run tee and
an adapter.
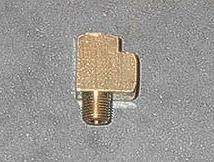
These
too you can also get at the local parts store. I chose brass because
they are cheep also. The tee should be a 3/8 NPT (National Pipe Taper)
thread, and the adapter should be a 3/8-1/4 NPT. Disconnect the wire
going to the OEM sender and remove it with a large open end wrench. The
OEM sender is located on the front of the block on the drivers side,
just above the oil pan mounting flange.
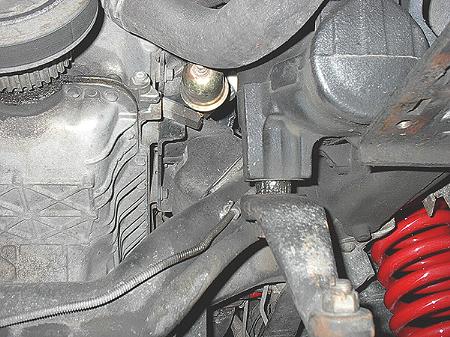
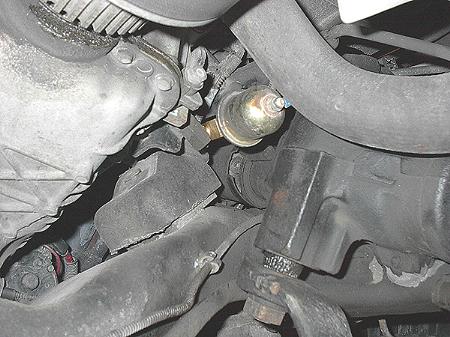
Clean
the gunk off the sender with a clean rag. Then with a bit of pipe dope,
(that is what I used but Teflon tape can also be used), apply it to the
outside thread of the sender and thread it into the brass run tee.
Tighten it down snug. The thread does not have to be all the way in the
tee. Now with a bit more dope (or tape) apply it to the exposed thread
of the tee and insert this into the stem that the original sender went
to. Tighten down and orient other opening in tee to the front of the
truck this way you’ll have lots of room to install the real gauge. Now
with a bit more dope (or tape) apply it to the new senders thread and
thread on the adapter, now apply some to the other end of the adapter
and insert into the run tee and tighten down snug. With this done the
original sender wire can be re-attached.
Now the fun part. Trying to decide where to mount the new gauge. I chose
to mount mine in the middle of my new console I just made.
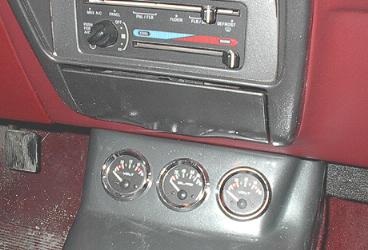
With
the kit there is also an L bracket that can be screwed to the bottom of
the dash and the gauge can be mounted in that. Finding a positive
ignition wire in that area is easy. I just tapped into the radio
ignition wire. I gather by now you have been smart enough to disconnect
the battery otherwise you could be in for a shock of a lifetime. If you
wanted to be crafty you could wire it up to the fuse block and then have
a singular fuse for it. I chose the easy way. While I was there behind
the radio I tapped into the radio light wire so that I had light to the
gauge when I turned the lights on, and the radio ground wire. With these
three wires in hand all I needed to do was attach them to the gauge.
There is a positive terminal, a negative terminal, and the sender
terminal. The hole in the gauge is for the light. The black wire from
the light I connected this to the negative terminal on the gauge along
with the ground wire from the radio. I then attached the positive wire
to the positive terminal on the gauge and crimped the light wire to the
white wire from the light. With a fair size length of wire I attached it
to the sender terminal on the gauge. Now with every thing attached to
the gauge it can be installed with the supplied U bracket and hard ware.
If you want the pro look take some wire loom and wrap it around the
wires to make a nice looking harness. The last wire to hook up is the
sender wire. Find a nice place to route the wire through the fire wall.
Right next to the main harness is a good spot. If you have to drill a
hole then make sure you have a grommet in there to protect the wire from
the exposed metal. Hey, make sure that the hole is small enough, you
don’t need a 1 inch hole for one 18 GA wire. Using zip ties where
possible, run the wire to your new sending unit.
Now that the gauge is installed it is now time to hook the battery back
up and fire up the engine to see if it is working. Also check to see
that the light comes on with the light switch. If it is working then it
should read about 40-45 PSI at idle. Take the truck for a run around the
block to get all the air out of the sender. At a cruising speed I found
mine to jump to 60 PSI.
You can now sit back and relax knowing that your oil pressure is being
monitored with a more accurate number rather than L or H.
|