
Introduction
By now you’ve probably realized that the replacements of the 1998-2000 Ranger hubs suck. Not only are the parts expensive, but you need “special tools” to replace them, hopefully this article will help make that replacement a little easier.
Step 1 – Locating Replacement Parts
After realizing that the hub bearing units are not serviceable, I began my search for replacements. After days of searching I came up with these numbers as of 1/07.
AutoPartsDirectToYou.com $159.99
AutoZone: $377
Advanced Auto: $275
Ford Dealer: $277
I was surprised to see that the Ford dealer’s price was actually lower than the aftermarket stores. That would have been my top choice if I had not found AutoPartsDirectToYou.com. Of course, I’d look into seeing if the Ford unit came with all the parts if you are going to pursue that avenue. I was told by the associates at AutoPartsDirectToYou.com that this unit comes with a mfg. lifetime warranty.
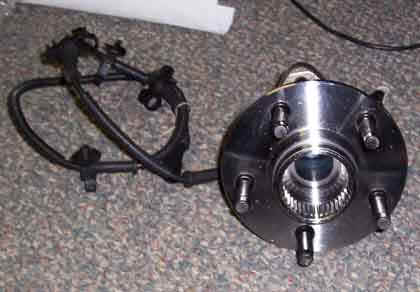
Here’s the picture of the bearing from AutoPartsDirectToYou.com
Step 2 – Removal
Remember this is just a rough guide on how I replaced the bearings using bits and pieces of info from my repair manual, on the Internet, and from Ford. I’m not sure if this is the correct repair procedure, but it worked for me.
Tools
For those of us without the special 6-piece Ford hub removal tool you will need to locate:
(6) jig saw blades or similar size steel strips.
A roll of tape. (You’ll see why in a little bit).
You’ll also need standard hand tools, metric wrenches & sockets, a few hammers, screwdrivers, snap ring pliers & a large c-clamp.
Directions
1.) Loosen the front lug nuts and secure the front end of the truck up on jack stands.
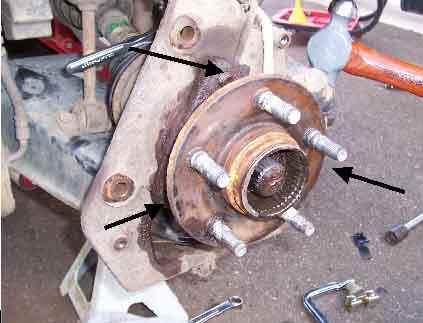
2.) Remove the tires and brush any mud or debris off the hub assembly.
3.) Remove the dust shield
4.) Compress the disk brakes with a c-clamp and remove the caliper.
5.) Remove the rotor
6.) If you have the hub removal tool, remove the hub and move on to step 8?
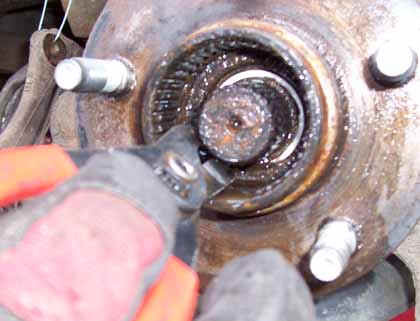
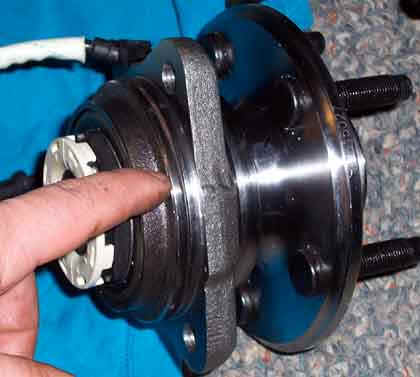
6a.) If not, take the 6 jig saw blades and gently insert them in the hub hold down tabs. After you’ve inserted them carefully pry up the tabs by pushing down on the blades, I found it helpful to tape over each blade a few times holding it securely in place, as seen in the picture below.
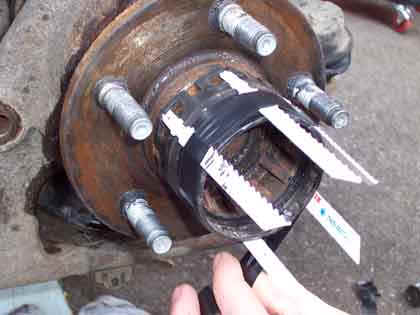
7.) Now that you’ve released the hub clips you will need to pull off the hub. I found the easiest way was to take a medium size standard screwdriver and twist between the tape on the metal hub and the plastic. If you’re lucky it will move about 1/16th of an inch or so. If it does, rotate the hub and continue with this process in the 5 other slots. I also found it helpful to keep constant pressure on it by pulling away; this kept the hub from sliding back into the original position. Again, as you can see in the picture below.
7a.) Once you’ve cleared the clips, you can pull it out the rest of the way, just make sure you are pulling perpendicular to the hub as it will reduce binding and make the removal easier.
7b.) If the hub doesn’t move use a pair of needle nose pliers to remove the outer cap of the PVH system. A 1/8″ turn CCW will disengage the pins and allow you to pull out the guts of the hub system. Don’t worry if they all come apart, I’ll show you later how to clean them and put it all back together. Once the guts have been removed you can spray some penetrating oil inside to help loosen things up.
Another Tip: The day I did this job it was 13 degrees F out and I found that since everything was frozen, heating up the hub with a hairdryer helped loosen things up.
8.) Remove the dust shield and the three bolts holding the bearing assembly on.
Tip: Use that penetrating oil generously, it’ll only help loosen things up & the longer it sits on the parts the more effective it will work
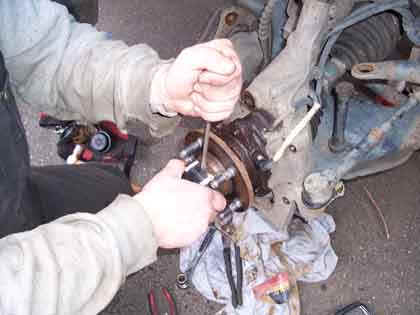
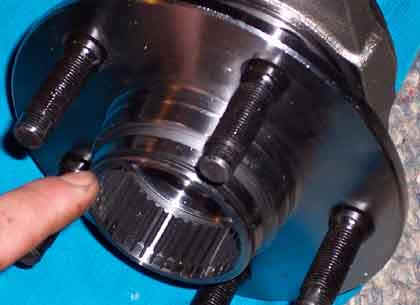
9.) Now that you’ve got the bolts loosened up, tap the bearing assembly around with a hammer; hopefully it’ll loosen up. Remember though it’s still connected to the drive axel so don’t just pull it out.
10.) You might have to clean out all the grease, but there is a plastic and metal snap ring inside, use the snap ring pliers to remove it.
Tip: I found that every time I went to pull out the snap ring it would fall off the pliers, to solve this problem I would open up the snap ring and rather than pull the snap ring out, I’d push in the drive axel until it was over the shoulder.
11.) After you’ve removed the snap ring and the hub is loose, you should remove the ABS wire (if your truck has front ABS). Then just pull the hub/bearing assembly out.
PVH Assembly
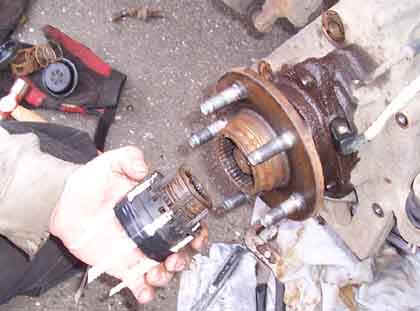
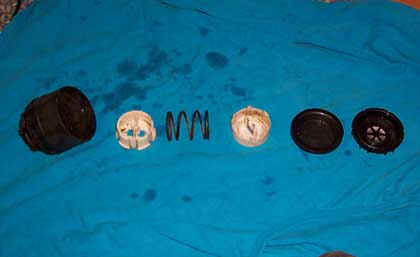
I decided that now would be a good time to clean out the PVH. You’ll notice that the system contains just 6 major parts: the hub body, 2 white pieces, a spring, the rubber diaphragm and the cap.
How It Works
To engage the hubs, the system puts a vacuum on the rubber diaphragm which compresses the white assembly about ¾ of an inch. This releases the spring and puts pressure on the ring gear which connects the hub to the drive axel. It takes an average of 45 seconds to pull enough of a vacuum to engage.
To disengage the hubs, the system puts less of a vacuum on the diaphragm only pulling it down about ¼ of an inch; this aligns 2 small tabs inside the white assembly and keeps the spring compressed. As a result of the spring being compressed the ring gear disengages from the hub and drive axel, unlocking the hubs.
The whole system works kind of like a click pen.
If the guts spilled all over the place when you removed the cap, here is a picture showing the order they go back together.
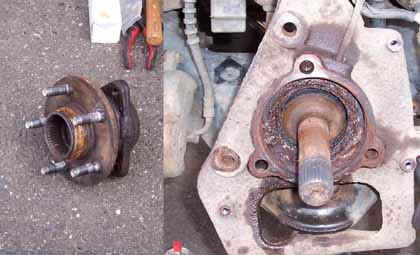
Step 3 – New Hubs
The new hub/bearing assemblies did not come with new O-rings and mine were in pretty good shape, so I decided to reuse them. Note: I’d suggest using new ones to keep the shaky vacuum system in good working order. You can see in the pictures what o rings I’m talking about.
Step 4 – Reinstallation
The reinstallation is pretty straight forward; just reverse the removal process. Remember to put some wheel bearing grease on those O-rings and all mating surfaces; this will help with the install and removal if you ever have to take them out again.
Related Articles
1998-2011 Ford Ranger 4×4 Dana 35 SLA Front Axle
1998-2000 Ford Ranger PVH Hub Swap To Live Axle
Convert Ford Ranger Live Axles To Manual Hubs
1998-2000 Ranger Hub Bearing Replacement
1998-2000 Ford Ranger Manual Locking Hubs
Permanently Lock Your ’98-’00 PVH Hubs
Adding Manual Control To Your 1998-2000 Ford Ranger Pulse Vacuum Hubs
Troubleshoot / Fix Your PVH Hubs
1998-2000 PVH Hubs Diagnose & Repair TSB
Co-Author
This article was written by TRS forum member ‘Valley Customs’ and submitted to the author for publication at The Ranger Station to help other Ford Ranger owners.
Last Updated:
About The Author
Jim Oaks is the founder of TheRangerStation.com, the longest-running Ford Ranger resource online since 1999. With over 25 years of hands-on experience building and modifying Ford Rangers — including magazine-featured builds like Project Transformer — Jim has become one of the most trusted authorities in the Ford Ranger off-road and enthusiast space.
Since launching TheRangerStation.com, Jim has documented thousands of real-world Ranger builds, technical repairs, drivetrain swaps, suspension modifications, and off-road adventures contributed by owners worldwide. TheRangerStation.com has been referenced in print, video and online by enthusiasts, mechanics, and off-road builders looking for practical, and experience-based information.