
By Zedmaster
WARNING: NEVER WORK ON THE FUEL SYSTEM WITHOUT FIRST RELIEVING THE PRESSURE!!!!! ALWAYS WEAR GOGGLES, A LIFETIME OF EYESIGHT IS NOT WORTH THE 30 SECONDS IT TAKES TO FIND YOUR GOGGLES. KEEP SOME EYEWASH HANDY, GOGGLES AREN’T FOOLPROOF. I HOPE IT GOES WITHOUT SAYING THAT YOU SHOULD NEVER SMOKE OR HAVE ANY OPEN FLAME NEAR GASOLINE.
I wrote this short article because I had a terrible time changing the fuel filter on my ’98 4-Banger, at least at first. Turns out it can be pretty easy, no thanks to Haynes and my local parts store. I tend to do a lot of preventative maintenance, in the hope that my baby will eventually go from being a highly reliable rig to an extremely reliable rig.
A Word on the Importance of Having the Right Tool for this Job:
So I go to my Haynes, and look up the fuel filter. The instructions refer to a Quick Disconnect fitting, and suggested my local store oughta have an inexpensive tool to… …quickly disconnect it! Now, I bet you can guess… Haynes didn’t bother to include a picture of the tool or the process, and the directions were contained in 6 six separate chapters. I Go down to the auto parts store and ask for the tool. First I get some dumb looks, then somebody shows me a set of rinky-dink plastic rings made by OEM. You got several sizes, and the package said they were for Quick Disconnect fuel lines. They wanted 12 bucks for this crap! Now some of you live in places like CA, NY, and NJ, and twelve bucks is what you pay for your coffee and sandwich in the morning. Up here in Maine, I pay 2.89 for a large Italian (that’s a sub to you folks from Away), and 12 bucks is heck of a lot of money for a piece of plastic crap that doesn’t work!
Fuel Line Disconnects – Plastic (avoid these)
Bit my tongue and bought it. Went home, read the directions again. Relieved the pressure in the fuel system, piece of cake! Crawled under my truck, found the fuel filter, and stuck the plastic things in. Tried every size I could, slipped it in the fitting, felt it bending and squirming in there, and something told me that tool wouldn’t work. Asked a gearhead friend, and he’d never heard of them, and said just use vice grips. Some people are idiots. That might work, but I’m not really into the idea of going down the road with fuel lines that could fail. Some other people said spray some PB Blaster on it for a few days (is there anything people don’t suggest that for?), and I did. No dice. Gave up for several weeks, figuring I’d get it eventually. Finally I’m at a different parts store and I spot a tool from Ampro for Ford Quick Disconnects, made of METAL, and it was only 7 dollars. Something told me it was gonna work a lot better, and let me tell you, it DID!!! Forget PB Blaster, DEFINITELY forget the vice grips, it is all about the right tool for the right job.
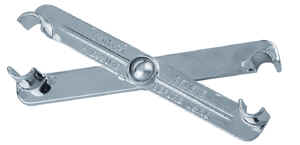
Ampro Fuel Line Disconnect Tool (amprotools.net)
Relieve the Fuel Pressure:
Find your Fuel Inertia Switch down by the panel your passengers might put their feet against, just under the glove box. Mine wasn’t really labeled at all, but you can recognize it from the little recessed button on top of the assembly. It’s about 1 inch square, and has some wires connected to the bottom. Use a small flathead screwdriver to disconnect the wire connector. Now you just put your key in the ignition, and crank the engine for 20-30 seconds. You know you’ve got the switch because it will not start. Now you are ready to take out the old filter.
Remove the Filter:
PUT ON YOUR SAFETY GOGGLES!!! I got a good splash of gas on my goggles, which means it would’ve been in my eyes if I hadn’t been wearing them. I’ll say it again, there is no reason at all to risk your eyesight. How are you gonna drive that Ranger without seeing?
Note the direction your existing filter is facing so that you can install the new one in the same way!!
Raise up the front of the truck to prevent fuel siphoning.
The filter is under the driver’s frame rail, on the inside, about where your seat is. There are some springy things on the Quick Disconnect fittings you have to take off. Just squeeze them and sort of twist them to release the tab and slot that holds them together. The book called them retainer clips or something. I removed my filter from the big spring clips that held it to the frame first. Take your METAL Quick Disconnect tool, put the two halves of the tool around the fuel filter tube, and slide them into the fuel fitting. If there isn’t enough room to slide the tool in, put one half in first, then the other. Slide them in as far as they can possibly go. There might be a click. You can hit the tool lightly with a hammer if it’s sticking. GENTLY hold the fuel line with a pliers, and pull the filter out while pressing the disconnect tool into the fitting. This seems to be the easiest way.
You might lose a half-cup of gas when that filter is unhooked. You can cap it with the caps from the new filter.
Disconnecting Fuel Lines:
If you need more information on disconnecting fuel lines, check out:
Install the New Filter:
This is really, really, really easy. Not a bad idea to take a clean cloth rag and make sure those Quick Disconnects are clean inside. There might be a touch of rust if you live in the Salt Belt, but I wouldn’t sweat that. Make sure your new filter is facing the right way. My FRAM was marked with an arrow, but I don’t think the old NAPA was. Just slide the filter tubes into the Quick Disconnect fittings, give ’em a tug to be sure they’re in there firmly, replace the spring retainer doohickies, and snap the new filter back into the clip on the frame!
Test out the New Filter:
If you’re like me, you’ll put the key in the ignition, put it into the accessory position for a minute, crank it up, and wonder why the heck your truck isn’t starting, then remember you unhooked the Fuel Inertia Switch!
You’ll have to plug that switch back in. The Haynes says you might need to push that little button on top, but I didn’t have to. Put the key in Accessory, and wait a minute. Turn the key, and you’re in business!!! I figure my old filter was slightly clogged, because it does run a bit smoother now, especially at idle. At the very least I can check off one dot on my maintenance list now.
Diagrams:
Fuel Filter Location
About The Author
Jim Oaks is the founder of TheRangerStation.com, the longest-running Ford Ranger resource online since 1999. With over 25 years of hands-on experience building and modifying Ford Rangers — including magazine-featured builds like Project Transformer — Jim has become one of the most trusted authorities in the Ford Ranger off-road and enthusiast space.
Since launching TheRangerStation.com, Jim has documented thousands of real-world Ranger builds, technical repairs, drivetrain swaps, suspension modifications, and off-road adventures contributed by owners worldwide. TheRangerStation.com has been referenced in print, video and online by enthusiasts, mechanics, and off-road builders looking for practical, and experience-based information.