• Welcome Visitor! Please take a few seconds and Register for our forum. Even if you don't want to post, you can still 'Like' and react to posts.

Nathan's "The Rangebe"


-Nathan-

Well-Known Member
Article Contributor
V8 Engine Swap
Solid Axle Swap
TRS Banner 2012-2015
Joined
Jun 6, 2009
Messages
1,922
City
Saskatoon, SK, Canada
Vehicle Year
1993 / 2001
Transmission
Manual
Well Ive been on the forum for sometime now, and figured I had better finally make a build thread. I am including all of my older posts, as so people may see the progression of my truck.
 
Hey guys, I've been lurking for a while, and have finally got my hands on a ranger. It is a 1994 XLT 4X4 4.0, it has a 6" suspension lift (NO body lift) and 33X12.50 firestone destination M/T. I live in Saskatoon, and drove to Lethbridge, Alberta to get it. I guess I'll let the pics do the rest. Let me know what you think.

27755d_20.jpg


DSC00719.jpg
 
Hey guys, so as my truck came from California, and here in Saskatoon its gets to -50 celsius, I figured I'd put a block heater in. I didn't see a DIY anywhere so I decided to make one.

First things first, remove the air box assembly.

IMG00032-20091107-1136.jpg


Then, remove the inner fender. Honestly, this was the hardest part of the job, haha.

IMG00033-20091107-1202.jpg


Here you can see the freeze plug you have to remove.

IMG00035-20091107-1203.jpg


Now, before you remove it, open your rad cap (make sure the engine isnt boiling hot) and then drain the coolant via the lower rad hose...this makes a big mess.

IMG00036-20091107-1215.jpg


Then, take a punch or screw driver, and beat in the edge of the freeze plug. Afterwards, just haul it out with a set of pliers.

IMG00037-20091107-1219.jpg


After the last of the coolant has spewed out, give it a wipe clean, and grab your block heater. Here is the motorcraft one I bought from ford for 35$

IMG00039-20091107-1220.jpg


Now, take a little bit of NON-petroleum based grease and lube up the o-ring.

IMG00040-20091107-1223.jpg


Take it, press it into the hole, make sure its seated in the whole way around. Tighten the screw...this opens up the wing nut and makes sure the plug stays in place.

IMG00042-20091107-1238.jpg


Then plug the end of the cord in and run it through the grille or where ever you like. Put the inner fender back, and then the air box.

IMG00045-20091107-1312.jpg


Make sure to refill the rad until full, turn on the engine, and let it run WITHOUT the cap on in order to get some of the air out. Top up and then youre ready to go :)


IMG00046-20091107-1609.jpg
 
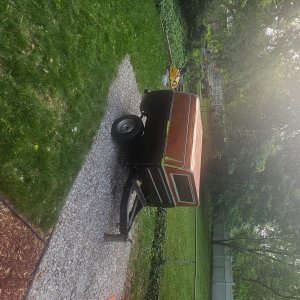
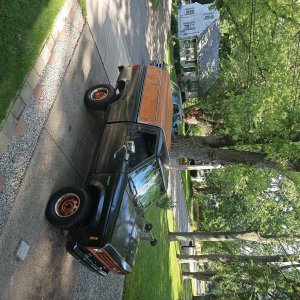
Original Poster: -Nathan-

Difficulty:
4 out of 10

Time to install: 0.5-1 hrs.


Disclaimer: The Ranger Station.com, The Ranger Station.com Staff, nor the original poster are responsible for you doing this modification to your vehicle. By doing this modification and following this how-to you, the installer, take full responsibility if anything is damaged or messed up. If you have questions, feel free to PM the original poster or ask in the appropriate section of The Ranger Station.com forums.

Brief Explanation: For those of us without tow hooks, this is a great alternative for a place to pull on. The Hidden Hitch receiver is no longer in production, but this Drawtite one is readily available.

Tools Needed:

- jack/stands
- various wrenches/sockets

Parts Needed:
- Drawtite 65017
- 2 – 2.5” X 0.5” grade 8 bolts (optional)
- about 12 – 0.5” washers (optional)

Steps:

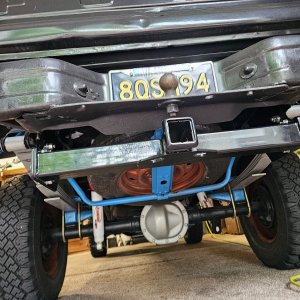
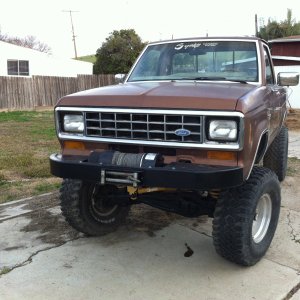
1. First you need to get your front mount hitch, I purchased this Drawtite 65017 from hitchesonline.com

IMG_1012.jpg


2. This is the hardware that comes with the hitch, I opted to exchange the grade 5 bolts that pass through the frame rails with grade 8 bolts.

IMG_1018.jpg
IMG_1017.jpg


3. The rearmost bolts pass through the frame rails, utilizing the existing sway bar mount holes. There are nuts welded inside the frame rails. I removed my sway bar previously, but if you still have your sway bar, remove the bolts these bolts.

IMG_1015.jpg


4. Now if you’re doing this yourself, as I did, balance the hitch on a jack, and raise it into position.

IMG_1019.jpg


5. It is easiest to start the rear bolts, just to align it, as the nuts are already there in the frame rail. This is where those washers come into play…the hitch is designed to be place over the sway bar mounts, but if you no longer have your sway bar (like me) just place 2 – 0.5” washers in between the hitch and the frame to make up for the difference. *Note – the washers aren’t in place yet in the picture.

IMG_1020.jpg


6. Next pass the bolts ( I used grade 8 instead) from the inside, towards the side of the truck. I used a washer in between the hitch and side of the frame to make sure it fit snug.

IMG_1021.jpg


7. Now pass those “nuts on a stick” up into the frame, and thread the bolt into them. They are the middle holes, just for reference.

IMG_1014.jpg


Below is a picture from the front, you can see the bolt passing from the inside – the hitch – washer – frame – and nut.

IMG_1021.jpg


8. Now tighten everything up, and happy towing…or getting towed :icon_cheers:

IMG_1028.jpg
 
look what the mail man brought me :)

Behold...

IMG_1044.jpg


and also did my one piece driveshaft swap

IMG00068-20091229-1341.jpg


cut out carrier bearing cross member

IMG00071-20091229-1347.jpg


and trimmed the gas tank skid

IMG00080-20091229-1500.jpg
 
Last edited:
hey, had a quick run to the pit, not too many pics sorry, but at least its something to look at. The other rig is a 250 on 35s.

18666_279799045785_517360785_512122.jpg


18666_279799115785_517360785_512123.jpg


18666_279799100785_517360785_512122.jpg


18666_279799055785_517360785_512122.jpg
 
got er done....extremely happy :D

IMG_1072.jpg
 
Alright here are the pics...here is what I started with...a 2 inch block STACKED on top of a 3 inch block. It had HORRIBLE axle wrap, and my springs were inverted (stock ranger springs).

IMG00110-20100215-1140.jpg


Here you can see the "shackles" ie.... pieces of flat bar with holes...they got replaced with belltech 6400's.

IMG00115-20100215-1627.jpg


Heres the new set up...explorer 4 leaf pack with a 3 inch block. I double nutted the u bolts just to be safe.

IMG00112-20100215-1613.jpg


IMG00113-20100215-1613.jpg


IMG00114-20100215-1613.jpg


Overall Im quite happy, i have little if no lift, but I managed to get rid of the 2 inch block. There is no more axle wrap, and it drives so much nicer, the ride is quite a bit softer. I think it will flex out quite a bit more as well.

-Nathan-
 
Rant...

So I have recently swapped out my 3 73s for 4 56s, and put a locker in the rear as well. I was surprised to find out that when I drained my diff oil, that the cover was made of some sort of composite or fiberglass. I am NOT comfortable covering up hundreds of dollars of investment back with a plastic cover.

Solution...

Well, after a suggestion from a good buddy of mine, I ordered a new diff cover, and figured Id show you guys. It is from GreatLakesOffroad, and is STOUT. The mating surface is 1/2 inch thick, and the rest is 1/4. The strip up the middle you see is an ADDITIONAL 1/2 inch strip of steel added on top of the cover as added protection. It also has drain and fill holes.

Im pretty stoked to get it painted up and installed, give me some ease of mind.

Cover....

IMG00120-20100218-1545.jpg


Drain hole...

IMG00119-20100218-1545.jpg


Fill hole...

IMG00118-20100218-1544.jpg
 
Hey guys, regeared my rear a while ago, but didnt have time to do the front, so I tackled that this weekend, heres a couple of pics.

carrier with old bearings off and ring gear removed...you can visually tell the difference between teh 4 56 and 3 73 ring gear eh?

IMG00124-20100227-1426.jpg


oh and this thing is tits for removing carrier bearings ;)

IMG_1057.jpg


the case is there empty with new seals, along with teh pinion and a bunch of new bearings:

IMG00125-20100227-1426.jpg


everything installed temporarily, backlash checked and ran a pattern. I used my dana 35 skid as a holding jig ahaha. (decent drive pattern too eh?!)

IMG00126-20100228-1753.jpg


while the axle shafts were out i swapped in new SPICER 5-760x u joints.

IMG_1053.jpg


IMG00128-20100228-1757.jpg


Oh, and just for comparison, here is a Dana 35 u joint next to a Dana 28 u joint...

IMG_1052.jpg


peace
 
hey, snapped a few pics, let me know what you think


IMG_1087.jpg


IMG_1090.jpg


IMG_1092.jpg


IMG_1093.jpg


IMG_1095.jpg


IMG_1096.jpg
 
Hey guys, so while I was regearing and had the front tore apart, I bolted up a skid that plumcrazy had made up for me....anyways here they are, enjoy :)

0124101812.jpg


IMG_1098.jpg


IMG_1092.jpg
 
Hey guys, got it all done.

Made up a battery tray from 3/16 1" angle. Just cut the 45, bent it up and made sure it was square, and ran a bead.

IMG00008-20100417-1110.jpg


here is the square base all welded up.

IMG00009-20100417-1207.jpg


then i welded nuts to it, so i could use my hold down i purchased from princess auto...and of course a test fit.

IMG00011-20100417-1232.jpg


then i had to add a bracket to attach it to the truck, used more angle.

IMG00013-20100417-1315.jpg


here is the battery tray all finished (minus paint). I drilled two holes in the bottom bracket for bolts, and welded two studs on the side to attach it.

IMG00014-20100417-1349.jpg


Here are a couple pics of how i mounted the tray in the engine bay. I used the space in front of the washer fluid/overflow reservoir. Almost like a second batt was made to go there.

IMG00015-20100417-1448.jpg


IMG00016-20100417-1448.jpg


these are what i used to connect the 1/0 welding cable between the batteries, as well as attaching the pre-existing wires. They are called termination lugs, work AWESOME.

IMG00019-20100417-1631.jpg


IMG00020-20100417-1631.jpg


Here is the second battery installed and wired up.

IMG00021-20100417-1646.jpg


and here is the first battery, i added a hold down because for some odd reason mine didnt have one. I also rewired everything using the new connectors. Oh, and i also used new gold plated terminals

IMG00018-20100417-1603.jpg


And here is the money shot, both new batteries, 1/0 welding cable connecting them, gold terminals, and new hold downs.

IMG00024-20100417-1647.jpg


IMG00022-20100417-1647.jpg


almost as if it came that way from the factory :)
 
I added another ground cable today, just for good measure, and in case youre wondering if the cable I used was big enough, heres what 1/0 welding cable looks like to my thumb, and an olfa knife. cheers. Oh, also cleaned my MAF for good measure.

IMG00025-20100418-0907.jpg


IMG00027-20100418-1130.jpg


IMG00029-20100418-1157.jpg


IMG00030-20100418-1219.jpg
 
finally got around to installing my diff cover, and setting up my cb/antenna

IMG00055-20100424-1843.jpg


IMG00056-20100424-1843.jpg


IMG00059-20100424-1944.jpg


IMG00053-20100424-1415.jpg


IMG00050-20100424-1357.jpg


:icon_thumby:
 

Sponsored Ad


Sponsored Ad

TRS Events

Member & Vendor Upgrades

For a small yearly donation, you can support this forum and receive a 'Supporting Member' banner, or become a 'Supporting Vendor' and promote your products here. Click the banner to find out how.

Recently Featured

Want to see your truck here? Share your photos and details in the forum.

Ranger Adventure Video

TRS Merchandise

Follow TRS On Instagram

TRS Sponsors


Sponsored Ad


Sponsored Ad


Amazon Deals

Sponsored Ad

Back
Top