• Welcome Visitor! Please take a few seconds and Register for our forum. Even if you don't want to post, you can still 'Like' and react to posts.

Bedside wheel arch repair


chrisser

New Member
Joined
Jan 4, 2013
Messages
106
Reaction score
0
Points
0
Location
Cleveland OH
Vehicle Year
1987
Make / Model
Ford
Engine Size
2.9
Transmission
Manual
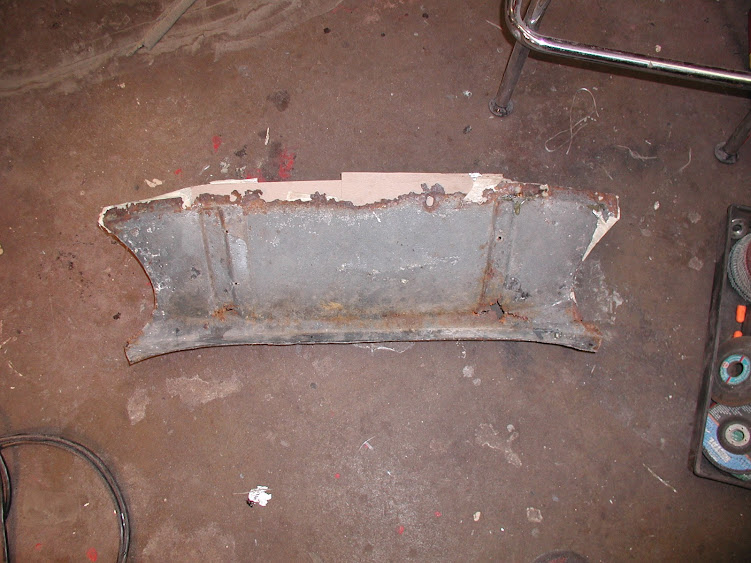
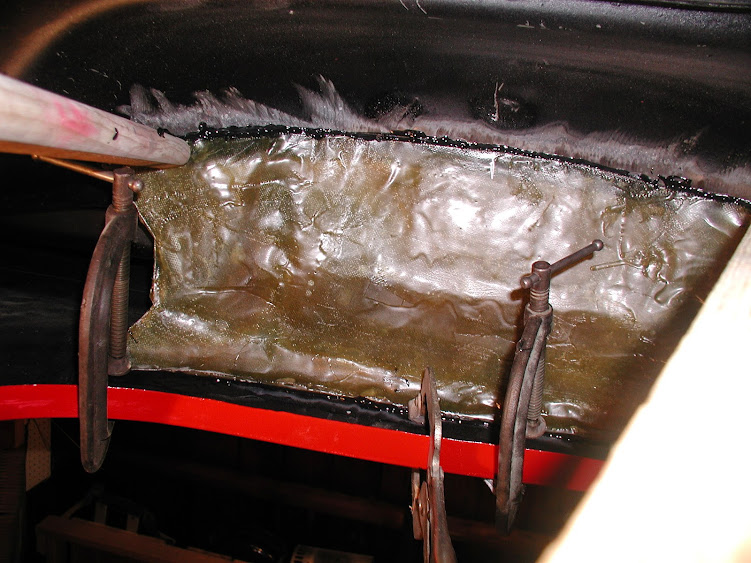
Wheel arches on the bed of my '87 are pretty rusted.

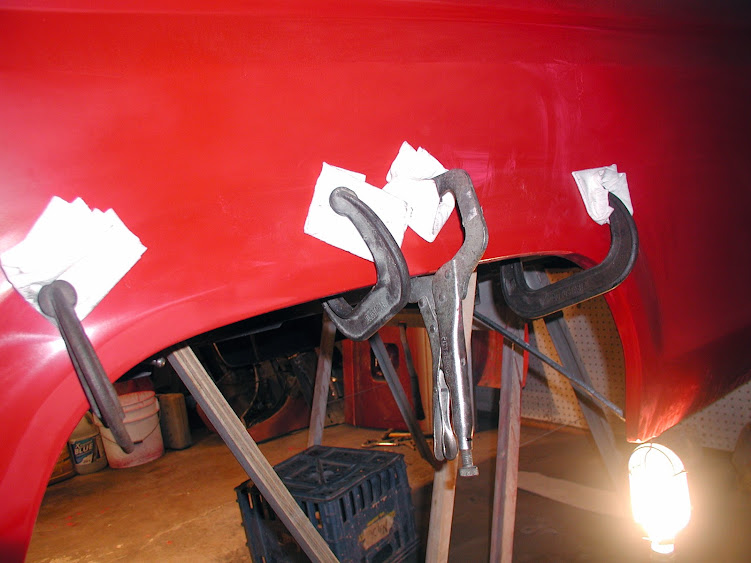
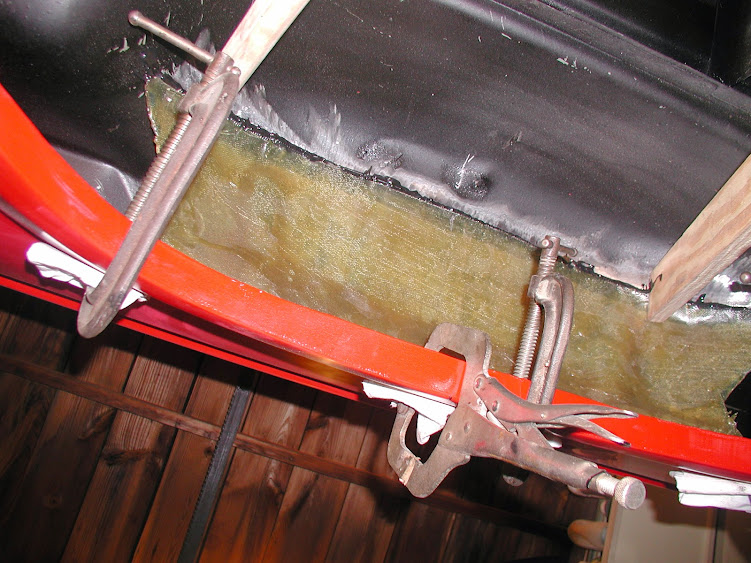
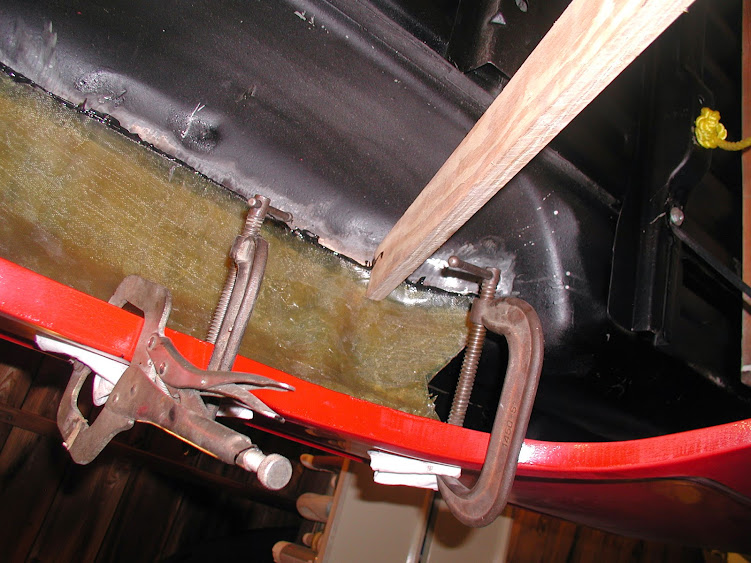
Got some repair panels from LMC to weld in. That will take care of the outside.

But the inner liners are also rusted away and they don't seem to be available anywhere.

I could probably fabricate something, but since that seam is what originally caused the rust, I'm thinking maybe there are other options.

Can I leave the fender liner out, or will that make the bed side too flimsy?

How about some sort of tubular support instead of the liner that's less likely to accumulate crud? Could bend it in the same arch as the liner and then run a piece behind the wheel lip to strengthen that edge. Maybe use panel adhesive to keep water out.

Just curious what others have done. I can't be the first to go down this road.


chrisser

New Member
Joined
Jan 4, 2013
Messages
106
Reaction score
0
Points
0
Location
Cleveland OH
Vehicle Year
1987
Make / Model
Ford
Engine Size
2.9
Transmission
Manual
Well, I have next week off. Going to try to patch the bedsides and at least get some epoxy primer on them. If I'm lucky, I may get paint on them too.

Really won't know what I'm dealing with until I cut out the rust.

Even though I'll probably end up with ghost lines, I think I'm going to panel bond the patch panels in. It's easier than welding with no warping to deal with and I know I'll get a water/rust proof joint.

Still have the problem of what to do about the inner liner. The patch panels seem too flimsy by themselves - if someone bumped or leaned against the wheel lip, I think it would dent or collapse.

I think what I may do is clean up the inside of the patch panels and cut the inner liners back until they're solid, and then just rebuild the whole area with fiberglass and resin. Should strengthen the wheel lips and also prevent crud from getting up above, and the fiberglass isn't going to rust in the future. A lot depends on what sort of access I have up there inside the besides.

I'll try and get some pics when I do the work.

If there are any suggestions, I'd love to hear 'em...
 

85_Ranger4x4

Forum Staff Member
TRS Event Staff
TRS Forum Moderator
Article Contributor
V8 Engine Swap
OTOTM Winner
TRS Banner 2010-2011
TRS 20th Anniversary
VAGABOND
TRS Event Participant
Joined
Aug 7, 2007
Messages
32,309
Reaction score
17,753
Points
113
Location
SW Iowa
Vehicle Year
1985
Make / Model
Ford
Engine Type
V8
Engine Size
5.0
Transmission
Manual
My PS wheel arch has no support, you can watch it in the mirror flex in and out going down the highway.

My fix is to find a better box... which is I have yet to accomplish :dntknw:
 

chrisser

New Member
Joined
Jan 4, 2013
Messages
106
Reaction score
0
Points
0
Location
Cleveland OH
Vehicle Year
1987
Make / Model
Ford
Engine Size
2.9
Transmission
Manual
My PS wheel arch has no support, you can watch it in the mirror flex in and out going down the highway.

My fix is to find a better box... which is I have yet to accomplish :dntknw:
I'd jump on a box if I found one, but every first gen I see is just as rusted as mine or worse. Too much salt on the roads here.

Luckily the rest of the truck is OK rust wise other than the rad support (I have a replacement one to put in).
 

85_Ranger4x4

Forum Staff Member
TRS Event Staff
TRS Forum Moderator
Article Contributor
V8 Engine Swap
OTOTM Winner
TRS Banner 2010-2011
TRS 20th Anniversary
VAGABOND
TRS Event Participant
Joined
Aug 7, 2007
Messages
32,309
Reaction score
17,753
Points
113
Location
SW Iowa
Vehicle Year
1985
Make / Model
Ford
Engine Type
V8
Engine Size
5.0
Transmission
Manual
I'd jump on a box if I found one, but every first gen I see is just as rusted as mine or worse. Too much salt on the roads here.

Luckily the rest of the truck is OK rust wise other than the rad support (I have a replacement one to put in).
I think you about have to travel or have one trucked in.

My brother just got back from Wyoming and said there were a ton of mint older Rangers out there.

Mine needs rear rockers too so it would be more than just the patch to fix it, and I think the PS has already been patched once too. After that and the cab corners mine is pretty straight.
 

chrisser

New Member
Joined
Jan 4, 2013
Messages
106
Reaction score
0
Points
0
Location
Cleveland OH
Vehicle Year
1987
Make / Model
Ford
Engine Size
2.9
Transmission
Manual
I'd like to visit Wyoming someday, but it's a bit of a hike.

I already have the patch panels and it'll be good experience putting them in.

Worse case, I can always get another bed later if it comes up and I'm not happy with my repairs.


I did get lucky a few weeks ago at the junkyard and got a tailgate that did not come with the aluminum panel covering the FORD embossing - so no holes to fill. Probably the first one I've seen after checking out a dozen or so early Rangers over the last year or two.

My wife really likes the "old school" look of the FORD in the back, so I had intended to fill all the holes in the tailgate that's on there now - which would have been a pretty decent amount of work. Now I just have a few dings and some surface rust to take care of and the tailgate is ready for paint.
 

det107

Active Member
TRS 20th Anniversary
Joined
Mar 3, 2011
Messages
1,333
Reaction score
23
Points
38
Location
Vails Gate, NY
Vehicle Year
2002
Make / Model
Ford
Engine Size
3.0
Transmission
Manual

85_Ranger4x4

Forum Staff Member
TRS Event Staff
TRS Forum Moderator
Article Contributor
V8 Engine Swap
OTOTM Winner
TRS Banner 2010-2011
TRS 20th Anniversary
VAGABOND
TRS Event Participant
Joined
Aug 7, 2007
Messages
32,309
Reaction score
17,753
Points
113
Location
SW Iowa
Vehicle Year
1985
Make / Model
Ford
Engine Type
V8
Engine Size
5.0
Transmission
Manual
I see a lot of tractor trailers hauling pristine beds up north on I-87-
Yeah, I priced it a few years ago and it was about $500ish to get a clean one hauled up. That is the bed and freight.

For me that needs box sides that is a better deal than fixing mine.
 

chrisser

New Member
Joined
Jan 4, 2013
Messages
106
Reaction score
0
Points
0
Location
Cleveland OH
Vehicle Year
1987
Make / Model
Ford
Engine Size
2.9
Transmission
Manual
Spent the last two days on the radiator core support.

Got the old one out and the new one welded in, with a little bit of sidetrack to the junkyard for the brackets on the frame.

Haven't put the fenders back on or any of the stuff that attaches to the core support yet. We have rain forecast off and on all week so I can work on that stuff when it rains.

In the meantime, I started on prepping the bedside for the arch patch panels.


Drivers side ahead of and around the arch was heavily bondo'd. Spent the last few hours grinding it off - up to 1/4" thick in some places. I kept expecting to find a crease that was filled, but it turns out that that part of the bed must have been dented up. Someone drilled about 10 holes, presumably to pull out the dents, then flattened it out more or less straight, and then coated it with Bondo. They didn't fill the holes, so they're all rusting. I'm covered in Bondo dust. On the plus side, other than the arch, the rest of the bed is pretty darned solid, at least for this part of the country. I have some phosphoric acid on the rusty areas I cleaned up - maybe 1/3 of the bed is down to bare metal. Basically the arch and the whole lower section below the lower crease so I can see what sort of work needs to be done.

Not sure why they went crazy with the bondo. I think a little hammer and dolly work and some blocking would get it straight enough that I could just skim coat it to finish.

I turned the truck around, so when I pull it in the garage, the side I just worked on will be against the wall. Have a bit of cleaning to do to get the truck in, but with the oncoming rain, I have to plan on working on it inside for the rest of the week.

So, hopefully tonight, I'll have the garage cleaned enough so I can at least pull the whole bed and part of the cab in and I'll start on the other side of the bed. That one has way more rust on the arch, but hopefully less bondo to grind off. I'll work on that side when it's raining, and go back to the other side when I can pull it out of the garage into the driveway.

I took a few pics - will try to post them up after it gets too dark to work.

I also pulled the inner wheel well off. I'm still not sure what to do with it. It's too rusted to put it back, but I'm not sure I want crud thrown up into the inside of the bedside. Probably going to fabricate something, but not quite sure what yet. I think there's enough of it there that I could duplicate it in fiberglass, and it appears that the same pattern works for both sides. May make a junkyard run and see if I can modify something from the later model Rangers.
 

chrisser

New Member
Joined
Jan 4, 2013
Messages
106
Reaction score
0
Points
0
Location
Cleveland OH
Vehicle Year
1987
Make / Model
Ford
Engine Size
2.9
Transmission
Manual
Thought I'd post an update of what I've done, specifically with the wheel housing extensions.

I wish I had taken more photos, but the process was actually pretty simple.

This is the better of the two wheel housing extensions. You can see where it's rusted away where it was spotwelded to the inner bedside.

The part where it was attached to the wheel lip was also rusted away - which seems to be the reason the wheel arches were rotted. I trimmed that part completely off so only the portion that touches the bedside above the wheel lip is sill there.


So, what I did was use masking tape and cardboard. Cardboard to sort of reconstruct the missing parts, and then I covered the whole thing in masking tape. I also bent/pounded it back into shape as close as I could.

After the inside was coated in masking tape, I sprayed it with some general purpose adhesive I had on the shelf - nothing special. I think I got it from Staples awhile back for another project.

I then covered that whole surface with aluminum foil. That formed to all the contours and gave me a solid, smooth and clean surface. I covered that with three or four layers of car wax, buffing between layers.

Then I put on four layers of fiberglass. First was woven cloth, soaked in resin, then two layers of mat, and then a final layer of cloth. All that was purchased at Home Depot. I overlayed all the fabric about an inch on all sides and soaked it in resin too, just so I'd have some extra to trim to fit.

When it hardened, I separated it from the metal part, did a little grinding and trimming and marked the underside where I needed to grind to bare metal.

Some of the foil came off - car wax isn't the greatest mold release, so I had to repeat the adhesive, foil and waxing again for the other side.

Sorry I don't have any pics of that process - I wasn't sure it was going to work.

So, to put it on the truck, I ground to bare metal where it touched the inside surfaces, and used 3m 8115 panel adhesive.

I was able to clamp around the wheel well, and used wood braces off the floor to hold it up against the wheel housing in the inner panel. Here are some pics of that...


It's not the prettiest thing, but it's going to be covered in bedliner or undercoating.

Here's the result after the adhesive cured enough to remove the clamps.


So tomorrow, after the adhesive is fully cured, I'll be smearing a bunch of seam sealer above the new pieces, then slathering a bunch of epoxy primer to cover any bare metal I ground off, and then some spray on undercoating or bedliner.

This has significantly stiffened the bedsides, btw.

I used a whole tube of 8115, which is about $50. I already had the dispenser. But I've used it before and it sticks amazingly so I'm pretty confident these part will stay in place.
 

saskbill

Member
Joined
Feb 19, 2012
Messages
229
Reaction score
6
Points
18
Location
Saskatoon, SK CANADA
Vehicle Year
1987
Make / Model
Ford
Transmission
Automatic
Wow - thats some dedicated fabricating and fitting! Looks like you've went to some length to recreate the factory inner arch.

Just wondering if anyone's gon the other direction, make a framework of tubing or rebar or something that'll let mud and crud blast right up in between the inner and out bedsides and (hopefully) fall back down again, or at least drain dry. Worst case blast it clean inside once in awhile with a pressure washer.

Just picking the collective brains out there - gotta figure this out myself once I fetch my patch panels back from the farm and get around to putting them on my rsted out arches!
 

Mark_88

Well-Known Member
Joined
Aug 11, 2007
Messages
18,554
Reaction score
240
Points
63
Age
68
Location
Ontario, Canada
Vehicle Year
2007
Make / Model
Dordge
Engine Size
3.3 Fuel Injected
Transmission
Automatic
My credo
Love Thy Neighbor
Yeah, nice work on the inners...

I saved a set of the plastic wheel wells from the front of a 92 and was going to cut them down and mount them inside...they should give my bed good protection from the flying stones...if I ever actually drive it again that is...

I also cut out as much of the rusted old panel as I could and doused the edges in rust converter...I was going to also spray them with rubber guard before putting the new panels on but haven't gotten to that just yet...

Don't forget to post picks of the finished product...and if you figure out another way to actually protect the metal on the inside that would be a nice to know...
 

chrisser

New Member
Joined
Jan 4, 2013
Messages
106
Reaction score
0
Points
0
Location
Cleveland OH
Vehicle Year
1987
Make / Model
Ford
Engine Size
2.9
Transmission
Manual
Thanks guys.

I've rebuilt both outer bedsides with patch panels. One side I welded, the other side I used panel adhesive. I know there's a potential problem with ghost lines with the panel adhesive, but it's a lot faster and I need to get this truck done and back on the road. One side's in paint, although it needs a few more coats, the other is still in filler - hoping to primer this weekend.

The inside of the bed is all done and coated with spray on bedliner, plus I have a Ford plastic liner to go on top of that. All the rust repair on that is done.

I pondered how to do the liners for a long time. I settled on the fiberglass because it wouldn't rust again. I was originally going to make them exactly like original and meet the wheel lip, but then figured that water would still get trapped in there. To compensate for the lips only having one layer of metal, I panel-adhesived a thicker piece of metal behind the lips to strengthen them.

I got my arm up there with seam sealer and filled in the gaps the best I could without being able to see what I was doing. When I epoxy primer the bedside I'm bondoing now, I'll go up there, probably with a sponge, and go to town to cover up any bare metal that might be showing (and probably get it all over me). Then I'll get some spray-on bedliner up as far as I can get the can and then cover the bottom with the same.

I've managed to put together a full set of the plastic extensions that screw to that liner and protect the front and back. That should keep the spray pretty well controlled. I had a fair amount of surface rust at the top inside of the bedsides when I had them off, which I attribute to spray getting all the way up to the top inside of the bed once the liner rusted away. I don't want that to happen again, although I've done a better job than Ford of protecting everything.

The rest of the truck should be a breeze comparatively. Just dings and one small rust spot on the hood.
 

Sponsored Ad


Sponsored Ad

Members online

Member & Vendor Upgrades

For a small yearly donation, you can support this forum and receive a 'Supporting Member' banner, or become a 'Supporting Vendor' and promote your products here. Click the banner to find out how.

Truck of The Month


Shran
April Truck of The Month

Recently Featured

Want to see your truck here? Share your photos and details in the forum.

Follow TRS On Instagram

TRS Events

25th Anniversary Sponsors

Check Out The TRS Store


Sponsored Ad


Sponsored Ad

Sponsored Ad


Amazon Deals

Top