- Joined
- Feb 22, 2018
- Messages
- 30
- Reaction score
- 2
- Points
- 0
- Location
- Baltimore
- Vehicle Year
- 1999
- Make / Model
- Ford
- Engine Size
- V6 3.0 FFV
- Transmission
- Automatic
- My credo
- You are what you do when it counts
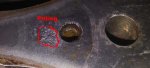
Ok so this was the first sign of a couple pending issues for me and my truck.the coolant is a nasty rusty brown and looks like it's never been changed so that might have played a role.. I haven't changed that yet because I figured I would do that when I dealt with the compression issue. I know my heater core is probably plugged because my heater is pathetic, defroster still clears the windows though.
That nasty brown coolant? I had it too, I flushed that sonuva*%$#@ within an inch of it's life twice within six months trying to chase it out. Several mechanics told me "it's probably just rust from the block, no worries, it's an old truck"
Welp, turned out that it was my water pump. The fins on these bad boys will literally rust away to nothing essentially turning your 'pump' into a water 'saw'. I would strongly recommend taking a look at the water pump, make sure it's not rusting and getting ready to give out on you. Also the rust caused my sending unit to go bad, so after watching your video I have a feeling it might be similar.
As to cylinder heads/valve seats I solved my problem with both of them when I changed my head gasket recently. I bought a pair of reman'd cylinder heads off ebay from a company called "DoverCylinderHeads".
For $450 flat (free shipping) I received two reman'd heads that had hardened valve seats as well as a set of head bolts and a full gasket kit. Considering that the gaskets and bolts alone cost ~$100 and you need them anyway, it was a good price. All told it matched or beat the quotes I was getting for similar work on reconditioning my old heads.
Loss of compression: Look to the heads my friend, could be deeper but start simpler. Be sure to get that coolant issue straightened out first though.
Last edited:

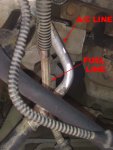
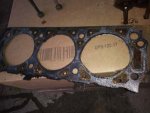
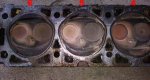
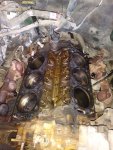
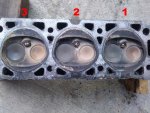
 ). 2 Exhaust manifold fastners broke but I was kinda expecting that.. Def an exhaust valve problem on Cylinder 6. What concerns me though is Cylinders 4 and 5 don't look any better and infact they all failed the water test tho Cylinder 6 it was pouring out of the exhaust ports so apparently it is the only one bad enough to cause a misfire but the others aren't far behind. 4 and 5 didn't leak AS bad but there still was some leakage. All intake valves appear fine, no water came out of the intake ports so they're sealing at least. On the up side it did not blow a head gasket and I think the bottom end is ok none of the pistons appear clean like they've been steam cleaned all have the usual carbon buildup. Tomorrow the passenger head comes off, i'm curious to see how well the exhaust valves on it are holding up, we shall see.. I'm honestly surprised 4 isn't misfiring or leaking even worse then 6 as it looks like its recessed into the valve seat even further..