• Welcome Visitor! Please take a few seconds and Register for our forum. Even if you don't want to post, you can still 'Like' and react to posts.

Josh's Bronco II Body Restoration Thread


88B2EB

Well-Known Member
Joined
Mar 26, 2012
Messages
175
City
Detroit, MI
Vehicle Year
1988, 1994
Transmission
Manual
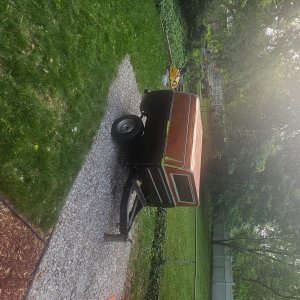
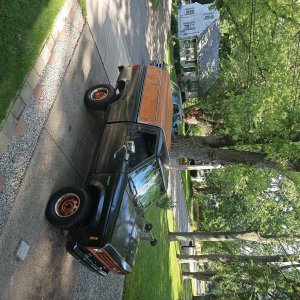
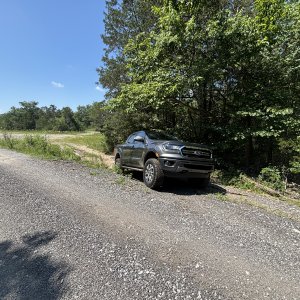
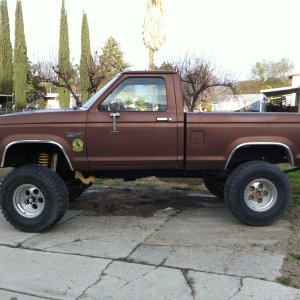
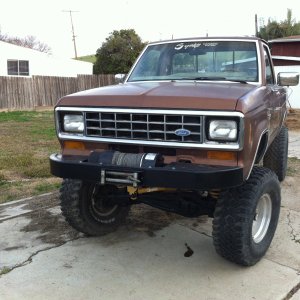
I bought the Bronco back in March to replace my '94 Ranger. It's got quite a few less miles and more importantly a back seat for my kids. I've always liked the first gen's and this particular year carries an added attachment for me as my first vehicle was an '88 Ranger. Had some good times in that truck. The Bronco II looks good in the 1st picture but has some rust starting that I promised myself I'd take care of before driving it and before it gets too bad to fix. The Ranger still runs like a champ and I've been driving it for 10 years already so what's another few months, right? This is my first experience with bodywork so bear with me and no doubt there will be questions.
88BroncoIIEB.jpg


115_0602.jpg


115_0599.jpg

Already collected are new fenders, bumper, & door pins from Jeff's Bronco Graveyard, lund visor, spare tire cover, 4x4 Off Road decals ($70 each direct from Ford and I almost cried), and pinstriping. Ford OEM pinstriping has long since been discontinued but 3M makes a large variety of sizes and colors. The closest match for the high double stripe is 3/16" Elite Tan (72017). The lower one has to be made from 2 stripes: 1/4" Bright Gold (72699) and 1/2" Bright Gold (72799). They come in 150' rolls so I'll have extra in case the truck needs bodywork in the future. (edit: The 1/2" striping could not make the turns around the wheels so I ended up using 1/4" for both.)
115_0726.jpg

The 4x4 Off Road and Eddie Bauer decals actually aren't stock per the original sales brochure (they were added by a previous owner) but I like them so much that they'll be incorporated into the restoration. I would highly recommend that anyone interested in restoring their B2 try to source a sales brochure. It's got loads of useful information like color swatches, factory options, etc.
115_0729.jpg


Update: 6 months later and it's all finished!
SDC13181_zps34d8a3dc.jpg


Here's the list of what I did:
- Complete body restoration
- New bumper and fenders from Jeff's Bronco Graveyard
- New emblems/decals/pinstriping
- Added Lund Visor
- Added luggage rack
- Fuel sending unit
- Battery
- Trailer wiring package
- Reconditioned interior
- Rebuilt original driver seat
- Pioneer sound system
 
Last edited:
That looks like a real good start for a restoration.
Good luck,

Richard
 
I'll try and check in and this to see if you have any questions.

I always use a single stage paint. What you see is what you get. I've only shot a base coat - clear coat once, and that was just because the shop that did the paint job didn't finish the roof!

It seems like every spring the car mags come out with articles on painting your own car, so you might want to look for some. If they're not online, check your local library.

I think the biggest mistakes I've seen in peoples paint jobs are:

Fisheyes (craters - separation) in the paint caused by contaminants either on the vehicle (grease, wax) or in the air. Make sure you don't have any armoral bottles in the garage or open oil containers.

Debris in the paint caused by dust stirred up by the air in the paint gun. I actually hose out my garage and leave it a little wet before I spray so my gun and air hose aren't stirring up dust off the floor. Also get a disposable paint suit to keep lint from your clothes off the paint. Most of this can be buffed out.

I've seen runs from either too much paint coming out of the gun at one time, applying to much paint in an area before it gets tacky, or getting to close to the panel with the gun. You always spray a light coat and let it get tacky before applying your second coat.

I've seen cracks in paint caused from someone applying bondo to thick. I use Bondglass with fiberglass fibers in it if I have to apply filler more than 1/8" thick, and then regular filler as a final coat when I smooth it all out. Bondoglass is very strong, and hard to sand when it cures.

Sanding scratches are from not using a fine enough sandpaper on your final sanding. Some articles will tell you to sand with 320 before you topcoat it. You'll see sanding scratches if you do. Use at least 600 grit.

Keep us posted and good luck.
 
Paint the frame and undercoating with either a rustoleum or tractor paint, it's real cheap and it will look amazing with a new paint job!
 
Single stage urethane, I use Kirker paint. Use all of the products from the same manufacturer, primer, sealer and paint. Follow the manu's directions on ratios and recoat times. clean with wax and grease remover before you tack rag. I bought a great little HVLP gun from Eastwoods, uses 4 CFM and 29 psi at the gun, works with the typical home compressor. Filter and dry the air from the compressor. Have fun.
 
2nd installment: New tools! I went out yesterday and bought a die grinder, sanding discs, respirator, in-line air filter, and some other misc tools that will be needed. The used tools shown I borrowed from my dad and haven't been used since he was younger than I am now! Their last project was the family's gen1 Dodge Caravan if that helps date it. Anyway they're free and every bit helps.
115_0731.jpg


All the pinstriping has been removed and the surface cleaned with goo-gone and I was able to remove the rust from the rear passenger side wheel well's front area. The sand blaster works magic on rust but not so much on stripping paint which is where the die grinder really comes in handy.
115_0734.jpg


I think I'm still in a bit of denial that I'll need to have a shop weld in some new panels. I would REALLY prefer to use fiberglass/resin and fiber reinforced filler. Doing it right is important though and the general rule is if there's a hole it's got to be cut out, right? Thoughts welcome as I'm still a bit undecided.
115_0736.jpg


Here's a shot of the area sprayed with "Duplicolor Rust Fix". I'll be making my way around the body removing the rust and spraying this to protect the bare surfaces as I go. Once done I'll sand it smooth to prep for the surface filler.
115_0737.jpg


Thanks guys for the comments. Keep em comin! Just a warning too, I work SLOW. I have a full time job and 10 month old twins that don't allow me much time in the garage.
 
Just remember to clean the back of the panel up and apply the fiberglass mat there. Cut the mat, hold it in place, and apply the resin with a brush over the mat. If you apply it to the outside you'll end up building up the surface and it'll be noticeable. Tap those edges in so and it will allow the bondo-glass (filler with strands of fiberglass in it that you'll apply to the outside to fill in the spot) to overlay the metal so it sticks, but not bulge out from the surface. Sort of like filling in the low spot from a dent. The final coat should be a thin coat of regular filler to smooth it all out.

Here you can see where I applied it to the back side:

ds_patch-9.JPG


Used Bondo-Glass on the front side:

ds_patch-5.JPG


Added regular filler:

ds_patch-6.JPG


Sanded with a long sanding board:

ds_patch-7.JPG


You can see in the lower right of the panel in that last pic where it still needed a little more filler.

Remember, if you apply regular filler more than 1/8" thick, it may crack over time.
 
Last edited:
Hi Jim, How in the world did you get the fiberglass into that 1" space between the two panels (from the interior?) and if you don't mind me asking how long has the fiberglass repair lasted for you?
 
I just did this on my B2 last fall, but I first did this with my 1983 Ranger (TRS-1) around 1994. About 6 or 7 years later I was repainting TRS-1 and wanted to cut out the fiberglass and weld in a new cab corner. It was a much stronger repair than I thought and was a job in itself to remove it. Had I known how strong it was, I would have left it.

The strength is dependent on how many layers of fiberglass you use.

You can actually get inside that panel from inside the B2, but it involves removing the interior side panel. I completely stripped the inside of the B2 out before painting, so it wasn't an issue.
 
That truck looks familiar :icon_cheers:, as a guy who was constantly taught "do it once, do it right" I got to ask if you have a welder? Because that bondo will hold moisture and cause rust down the line, nothing beats good ole sheet metal!
 
Because that bondo will hold moisture and cause rust down the line, nothing beats good ole sheet metal!

The bondo can't hold moisture if it's not exposed to moisture.

If he blasts out the rust, sprays it with the rust converter for extra protection, and fiberglass's the backside, the filler isn't going to absorb moisture. He just needs to make sure he coats the backside that he fiberglass's to make sure it's all sealed up.

this.

fiberglass and bondo is plenty strong and is just fine repair. its stronger than most people think for sure.
 
I agree that welding in metal is the best way, but what if you don't have the ability to do that.

When I first got my '83 Ranger, the dealership painted it and patched holes with bondo. The bondo wasn't sealed on the back and swelled up and pretty much fell out. I eventually replaced that bed.

I've also seen rust from bondo that was applied to thick (not by me), cracked, and let moisture in.

Bondo (filler) can be a good fix, but like everything else, it has to be used correctly.

Filler is just that, filler. It's used to help smooth out minor dents/dings. It's really not intended for repairing holes, that's what fiberglass is for. Filler with the fiberglass strands in it such as bondo-glass makes it stronger and can be applied a little thicker than regular filler.
 
I agree fiberglass can be done right and is perfect for a budget build, like he said be reallllly careful about sealing it all because water has an annoying tendency to find its way in places it shouldn't. Other then that great build so far man! Keep it up!
 

Sponsored Ad


Sponsored Ad

TRS Events

Member & Vendor Upgrades

For a small yearly donation, you can support this forum and receive a 'Supporting Member' banner, or become a 'Supporting Vendor' and promote your products here. Click the banner to find out how.

Latest posts

Recently Featured

Want to see your truck here? Share your photos and details in the forum.

Ranger Adventure Video

TRS Merchandise

Follow TRS On Instagram

TRS Sponsors


Sponsored Ad


Sponsored Ad


Amazon Deals

Sponsored Ad

Back
Top