CraigK
Well-Known Member
- Joined
- Nov 17, 2007
- Messages
- 293
- Reaction score
- 2
- Vehicle Year
- 1987
- Make / Model
- Ford
- Transmission
- Automatic
Thought I’d share this with this forum, as it seems to be a somewhat common issue with older RBV’s . . .
The Problem:
The passenger-side exhaust manifold to Y-pipe flange on my 1987 Bronco II 2.9L engine is leaking badly. As in “found dead in vehicle” bad. As I can’t afford to have hundreds of dollars of exhaust work done on this old B2, but can’t continue to drive it with the leak, I needed to find a low cost, do-it-myself fix.
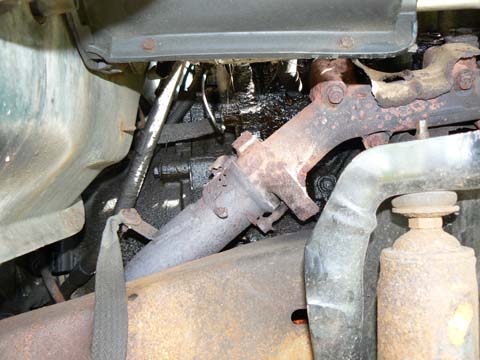
Although the Y-pipe itself still appeared to be intact (no holes), the flange piece had mostly rusted/rotted away, and the flange bolts (what’s left of them) could not be unscrewed (believe me, I tried). The VERY limited access to the flange area compounds the problem. I did NOT want to remove the exhaust manifold itself, as I’m sure that I’d be in even DEEPER crap with broken manifold studs, and I’d still have to get the darn manifold flange bolts out. Also, my solution had to NOT require the use of expensive or esoteric tools, or an external contractor (auto repair shop).
So, I drank beer and thought about it.
Then I drank more beer.
And this is what I came up with . . .
The Solution:
Use of a 2” split flange, coupled with two long stainless steel U-bolts, with access to the area by removing the plastic fenderwell, and removal of the old flange and studs with a good ole’ hacksaw.
Steps
First, I got all the split flange and U-bolt parts together. I bought the 2” split flange at NAPA. They actually have two different types, the type I used being the more expensive (~$13). I also choose to use 1 ¾” stainless steel U-bolts, ~6” length (local hardware store), at about $6 each (the non-SS units were about $2 each). See images.

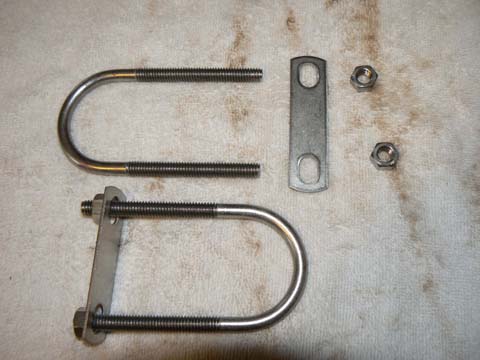
Then, I modified the split flanges by grinding four notches, two on each side, to fit the U-bolts, such that they would be held in place on the split flange when tightened down. See images.


Then I used a couple of huge gobs of silicone to hold the U-bolts in place, thinking this would be needed. (I eventually had to take one U-bolt out of the silicone goop.) See image.

Then, I jacked up the front right wheel, placed the vehicle safely on a jack, removed the wheel, and removed the plastic fenderwell piece. (Got this access idea from another post on TRS – thanks!) This required removal of various screws, nuts and bolts, but really wasn’t either rocket science, or even very difficult. Several very rusted and seized screws did have to be ground off though.
Now comes the miserable part.
With reasonable access to the problem, I used a hack saw blade holder saw with a nice high-quality steel cutting blade to saw through the old rusty manifold bolts as close to the flange as possible. This was a bit of a $#@!)(&#!%&!* chore, but was do-able in about 20 minutes, with pauses (no beer yet). The good news is that there was no need to drill out the rusted-in bolts from the manifold flange. See images.
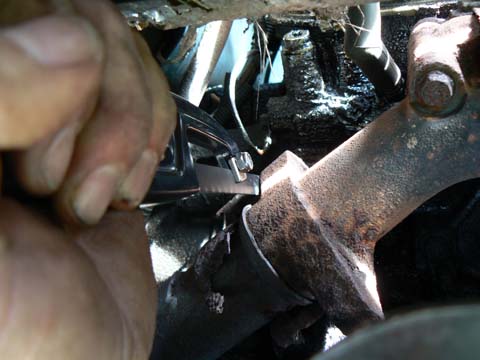
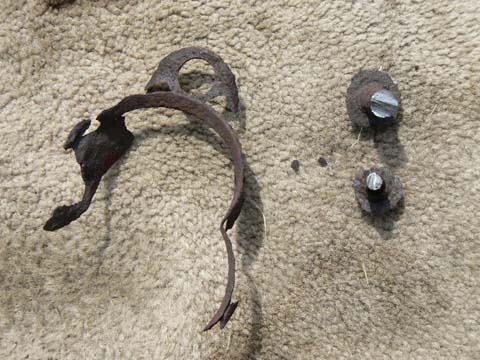
With the old crap removed, my idea was to simply fit the split flange around the Y-pipe and slide it up to the manifold joint, bolt it together (SS bolts), run the U-bolts past the manifold flange, place the U-bolt cross pieces on, then the U-bolt nuts, and tighten it all up. Sound like a plan?
Yeah . . . . WRight . . . . . . . CRAP!
Because of the very close proximity of the exhaust flange to what appears to be the oil filter base, the !#@$%^*!# split flange would not fit around the Y-pipe. So, back to the garage. And no beer yet.
The way I solved this new issue was to again modify the split flange in three ways.
#1: This time I used a grinder to grind down the split flange bolt tubes on the one side (the side that was hitting the oil filter base) to about half their original length. This required the use of a much shorter and smaller diameter 5/16” bolt, but still left plenty of metal to hold the two pieces together. (shown in red on image)
#2: Then I inserted a 5/16” bolt through the split flange bolt tubes (which have a diameter big enough for a much larger bolt) and pounded the tubes flat against the 5/16” bolt, leaving just enough clearance to slide the bolt through. (shown in dark green/black)
#3: Then I cut off one end of the split flange, just past the grooves cut for the U-bolts. (shown in red)
The end result of these three modifications was to allow the split flange to fit around the Y-tube close enough to the joint to allow the U-bolts to hold the split flange and manifold flange together. Unfortunately, in the throes of making this work, I did not get a picture of the final modifications to the split flange, but have included an artists rendering of the mods. See diagram image.

Then, once again, I fit the two sides of the split flange together around the Y-pipe, slid it up as far as possible towards the manifold flange, inserted the split flange bolts and tightly bolted the flange together, and to the Y-pipe.
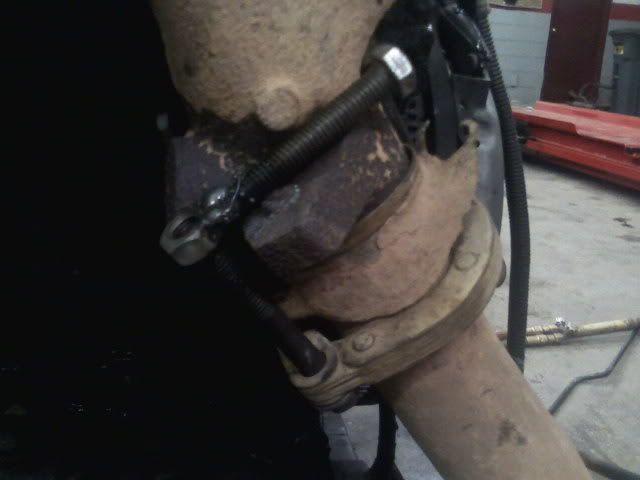
Then, one at a time, I positioned the two SS U-bolts such that the U part hooked on the special grooves I had cut into the split flange halves, and the threaded ends extended up on each side of the manifold flange. Then I put the rectangular cross pieces on the U-bolts on the top side of the manifold flange, put some SS lock washers and SS nut on the bolt threads, and tightened to please. See image.
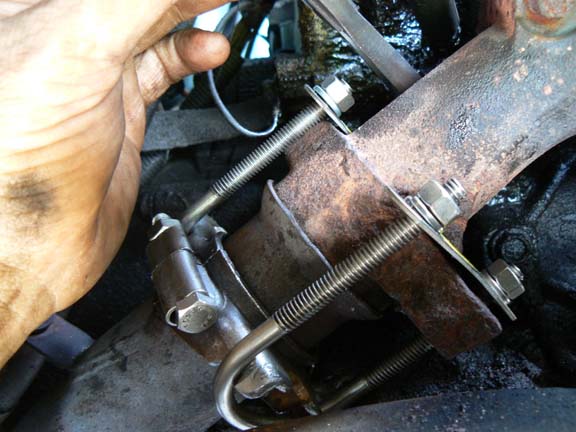
I found that the SS U-bolt cross pieces bent somewhat when fully tightened, but they seemed to be strong enough to do the job, and the U-bolts very firmly pulled the Y-pipe up and held it to the manifold flange.
At this point, I started the engine and checked for leaks.
A-OK.
Then a replaced the plastic fenderwell. As I had to grind off a few rusted screws on removal, I had to replace these, and used SS screws as replacements with the re-installation. (Warning: never use SS bolts with anything but SS nuts.)
Then I put the wheel back on and went for a drive.
VERY quiet.
Then I had a beer.
Three.
This procedure seemed to fix the leak, at a very low cost, with one afternoons work (after parts preparation), and with no special tools except a grinder and hacksaw blade saw.
I did this on Saturday 4/21, so I’ll report back if it holds. So far, so good.
While I’m sure this method can be improved upon, I hope this post helps those with this problem, or at least provides some ideas to think about.
And drink beer.
CraigK
If the images do not come through with the post, I’ll try to post them separately.
The Problem:
The passenger-side exhaust manifold to Y-pipe flange on my 1987 Bronco II 2.9L engine is leaking badly. As in “found dead in vehicle” bad. As I can’t afford to have hundreds of dollars of exhaust work done on this old B2, but can’t continue to drive it with the leak, I needed to find a low cost, do-it-myself fix.
Although the Y-pipe itself still appeared to be intact (no holes), the flange piece had mostly rusted/rotted away, and the flange bolts (what’s left of them) could not be unscrewed (believe me, I tried). The VERY limited access to the flange area compounds the problem. I did NOT want to remove the exhaust manifold itself, as I’m sure that I’d be in even DEEPER crap with broken manifold studs, and I’d still have to get the darn manifold flange bolts out. Also, my solution had to NOT require the use of expensive or esoteric tools, or an external contractor (auto repair shop).

So, I drank beer and thought about it.
Then I drank more beer.
And this is what I came up with . . .
The Solution:
Use of a 2” split flange, coupled with two long stainless steel U-bolts, with access to the area by removing the plastic fenderwell, and removal of the old flange and studs with a good ole’ hacksaw.
Steps
First, I got all the split flange and U-bolt parts together. I bought the 2” split flange at NAPA. They actually have two different types, the type I used being the more expensive (~$13). I also choose to use 1 ¾” stainless steel U-bolts, ~6” length (local hardware store), at about $6 each (the non-SS units were about $2 each). See images.


Then, I modified the split flanges by grinding four notches, two on each side, to fit the U-bolts, such that they would be held in place on the split flange when tightened down. See images.


Then I used a couple of huge gobs of silicone to hold the U-bolts in place, thinking this would be needed. (I eventually had to take one U-bolt out of the silicone goop.) See image.

Then, I jacked up the front right wheel, placed the vehicle safely on a jack, removed the wheel, and removed the plastic fenderwell piece. (Got this access idea from another post on TRS – thanks!) This required removal of various screws, nuts and bolts, but really wasn’t either rocket science, or even very difficult. Several very rusted and seized screws did have to be ground off though.
Now comes the miserable part.
With reasonable access to the problem, I used a hack saw blade holder saw with a nice high-quality steel cutting blade to saw through the old rusty manifold bolts as close to the flange as possible. This was a bit of a $#@!)(&#!%&!* chore, but was do-able in about 20 minutes, with pauses (no beer yet). The good news is that there was no need to drill out the rusted-in bolts from the manifold flange. See images.


With the old crap removed, my idea was to simply fit the split flange around the Y-pipe and slide it up to the manifold joint, bolt it together (SS bolts), run the U-bolts past the manifold flange, place the U-bolt cross pieces on, then the U-bolt nuts, and tighten it all up. Sound like a plan?
Yeah . . . . WRight . . . . . . . CRAP!
Because of the very close proximity of the exhaust flange to what appears to be the oil filter base, the !#@$%^*!# split flange would not fit around the Y-pipe. So, back to the garage. And no beer yet.
The way I solved this new issue was to again modify the split flange in three ways.
#1: This time I used a grinder to grind down the split flange bolt tubes on the one side (the side that was hitting the oil filter base) to about half their original length. This required the use of a much shorter and smaller diameter 5/16” bolt, but still left plenty of metal to hold the two pieces together. (shown in red on image)
#2: Then I inserted a 5/16” bolt through the split flange bolt tubes (which have a diameter big enough for a much larger bolt) and pounded the tubes flat against the 5/16” bolt, leaving just enough clearance to slide the bolt through. (shown in dark green/black)
#3: Then I cut off one end of the split flange, just past the grooves cut for the U-bolts. (shown in red)
The end result of these three modifications was to allow the split flange to fit around the Y-tube close enough to the joint to allow the U-bolts to hold the split flange and manifold flange together. Unfortunately, in the throes of making this work, I did not get a picture of the final modifications to the split flange, but have included an artists rendering of the mods. See diagram image.

Then, once again, I fit the two sides of the split flange together around the Y-pipe, slid it up as far as possible towards the manifold flange, inserted the split flange bolts and tightly bolted the flange together, and to the Y-pipe.
Then, one at a time, I positioned the two SS U-bolts such that the U part hooked on the special grooves I had cut into the split flange halves, and the threaded ends extended up on each side of the manifold flange. Then I put the rectangular cross pieces on the U-bolts on the top side of the manifold flange, put some SS lock washers and SS nut on the bolt threads, and tightened to please. See image.

I found that the SS U-bolt cross pieces bent somewhat when fully tightened, but they seemed to be strong enough to do the job, and the U-bolts very firmly pulled the Y-pipe up and held it to the manifold flange.
At this point, I started the engine and checked for leaks.
A-OK.
Then a replaced the plastic fenderwell. As I had to grind off a few rusted screws on removal, I had to replace these, and used SS screws as replacements with the re-installation. (Warning: never use SS bolts with anything but SS nuts.)
Then I put the wheel back on and went for a drive.
VERY quiet.
Then I had a beer.
Three.
This procedure seemed to fix the leak, at a very low cost, with one afternoons work (after parts preparation), and with no special tools except a grinder and hacksaw blade saw.
I did this on Saturday 4/21, so I’ll report back if it holds. So far, so good.
While I’m sure this method can be improved upon, I hope this post helps those with this problem, or at least provides some ideas to think about.
And drink beer.
CraigK
If the images do not come through with the post, I’ll try to post them separately.

