Original
Article By Glenn
These spring
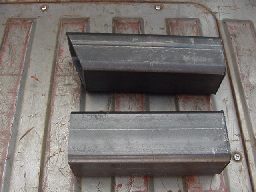
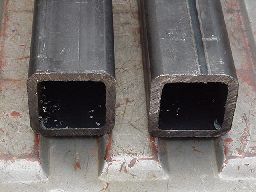
perches are made from 2-1/2" square tube, 1/4" wall thickness. I cut them 5" long and then marked center lines for the leaf spring bolt hole (it holds the spring pack together and locates the spring on the pad) and for a reference point on where to make my "C" notches for the perches to sit on the axle.
The axle I built these perches for have 3" tubes off of the pumpkin. Some axles have smaller tubes, some larger. I found a 3" outside diameter socket that I used to mark the "C" notches. The easiest way that I could come up with to cut out the c-notches was a torch. If you have a plasma cutter, or access to one, it would probably be a little cleaner. I made the flat bottom cuts with a porta band. Its a portable band saw. The side "C" notches I then had a friend with a torch cut for me. I was going to clean up the cuts with my 4" grinder, but they fit very good without grinding so I left them alone.
|
|
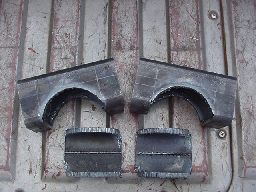
|
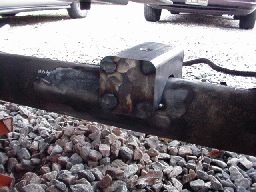
Next, after cutting out the notches, was drilling the locating holes in the center of the perches. Some leaf springs have bigger bolts than mine and some have smaller ones. On my particular springs I have 7/16" bolts and the head that locates the spring in the perch has a diameter of 5/8". I marked the center and punched it, drilled a small pilot hole and then enlarged it to 5/8". Then I set the new perches on the axle next to the old perches to make sure everything lined up and that they were the right height.
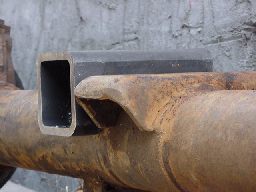
After confirming that everything was cut out right and lined up, I then boxed the ends of the perches with 1/4" plate. Welded them up on the outside and ground down the welds to look a little better, then put a nice big spot weld on all 4 inside corners of each end. After letting them cool off, I took them back and put them on the axle and spot welded them in the proper location and at the proper angle. Depending on what you drive and how much lift you did, your location and angles will probably differ from mine.
After a test fit and jacking up the axle to put it under the full load and weight of the truck to make sure the pinion angle was set where I wanted it, (either my math is getting better, or my Luck is! Got it on the first try), I then let the axle down and welded the new perches onto the axle. The new perches get a weld across both ends as well as the sides for added strength. With the 1/4" thick wall tube and the ends boxed. I do not think these perches will ever fail me.
I hope that this gives you some ideas on how to build your own spring perches, if you decide you need to make some changes or you swap axles and need to install new ones.
***NOTE*** After installing these and new Tom Woods
driveshafts, I had a harmonic driveshaft vibration that came when rolling in an unloaded coast. What I mean to say is that the engine was not pushing the axle and the axle was not pushing the engine, they were just keeping up with each other, which made for a horrible sound. I took it to the shop I had install the gears and the Mechanic there said that with a rear locker and lower gears this was very common. Well it may be common for him, but I don't like it a bit. I shimmed the rear pinion up 2.5 degrees and this almost eliminated the noise. It is quiet enough now that I have to really listen hard to catch it.
|