| By
Craig T. Evers
Elsewhere
on this site I told about my experience replacing the sway bar bushings
and the springs and suspension bushings.
Every step along the way, I got a better handling, better riding
truck. With 130k miles on
it, the Ranger needed to have all of this done, and as I got closer to
done, I saw major improvements. I
also had a couple of problems that popped up and got worse as I
continued.
Before
I started, there was a lot of suspension noise.
The normal clatter and bumping that was just a part of life with
the truck was one reason I started the project in the first place.
It was especially noticeable when taking a hard left turn at
speed while braking (turning left onto the on ramp through a yellow
light, for instance.) In
that situation, there was a real solid “clunk” out of the front end
as all the loose suspension play was focused on one corner.
That was what got this whole thing going, and as I made progress
I listened for changes in the noise.
The main noise was reduced at each step, but another noise
started and got worse every time I did something to the truck.
At
first, it was a light “cracking” sound, sort of like when you pop
your knuckles. It sounded
like it was coming from below the left rear corner of the cab. But
I hadn’t done anything in that area. It
got more pronounced as I replaced the springs, and when I got the
suspension bushings done, it was a constant “click” and “crack”
every time I hit any bump or jolt on the road. I
had a suspicion that it was the next weak link showing itself. You
see, when the weakest point in the system is strengthened, all the
forces show up at the next weakest, and something that may have been
marginally adequate becomes sadly deficient. Turns
out I was right. The body
mounts were in really sad shape.
The
body mounts are not actually a part of the suspension, but they are
important none the less. What
they do is to float the cab while maintaining its alignment with the
frame. This alignment is
critical to the smooth operation of the steering, for one thing. I
was planning to replace the mounts as the last step anyway. (I
once had an old Land Cruiser that needed body mounts in the worst way. I
could actually feel the body shift when I was braking. Then
I found out that of the 10 mounts, the body was rusted so badly on 7 of
them that there was nothing to hook onto any more! So
I am aware of mounts.)
At
the same time, I planned to install a Duff 2” body lift, for no real
reason except that I wanted to. The
way I drive the truck, it’s not really a functional necessity, but
what the heck. It’s my
truck! (Also, with 130k on
it, I don’t know how long the 4.0 will last, and if it ever dies,
I’m putting a 302 under the hood. The
body lift is advance prep for that day, should it ever come.) Duff
recommends strongly that you replace the body mounts before putting in a
body lift. It’s good
advice!
This
is the right front cab mount. It’s
located on the passenger side of the cab beside the radiator.
Pretty, isn’t it? The
other front mount was about the same.
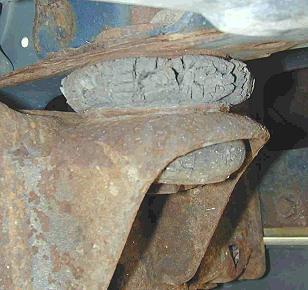
This
is the mount on the other corner, where I could hear the noise coming
from. This is more typical
of what the other four mounts looked like.
Not too bad at first glance, but how many million shock cycles
has it absorbed since the truck rolled off the line in May of 1993,
130,000 miles ago? Look
closely and you will see the cracks of fatigued rubber.
This rubber has just about enough strength to hold its shape, and
that’s it!
Here
are the new mounts from Duff. Note
the steel ring around the neck where it fits through the mounting
bracket. The body will rust
away from these mounts before they fail!
They are designed for a long hard life without complaint.
The same kit is used for regular cab and extended cab Rangers,
because they all have the same mounts.
Explorers or Bronco IIs will need more.
To install these, merely undo the old ones (more on that joyous
task in a minute!) and slap these in their place.
It’s easy. Shouldn’t
take more than a day working alone on it.
|

|
Here
is the lift kit. This is
where the work comes in. Some
of the black blocks go on the body mounts, and the rest go under the
bed. The long bolts replace
the stock bolts, which is a good thing, because you’ll not be able to
reuse the originals. The
washers are used with the bolts as needed.
In the middle of the picture is a steering column extender, some
small bolts and nuts for various places, and a steel tube to use with
the short piece of heater hose. The
4 gold brackets with bolts attached are for the radiator shroud, the
long one in the lower right corner is a ground extender for the engine
electrical grounds, the angle is for the parking brake, and the big
plates are for a 3” body lift and caused me a lot of problems before I
chucked them out and made my own. Note
that a long bed truck has 8 mounting bolts in the bed, so it needs 8
lift blocks. The short bed
uses only 6, but I found a way to use the extra anyway.
And don’t overlook the little tube of lock-tite, which is
essential.
By
far the worst part of the whole exercise was getting the old mounts off.
Ford designed them with a steel sleeve that interlocks from both
top and bottom, and rusts solid. I
got the bolts out okay, but the mounts were locked in solid, so I had to
use an air grinder to cut them out.
This was a royal pain.
|

|
In
this picture you see the left mid mount.
You also see the parking brake cable and its bracket.
When the body is lifted 2”, the cable will pull tight and give
you problems if you don’t relocate it.
The bracket for that purpose works, but I “improved” mine a
bit to make it a better fit. (I
think they gave me the 3” bracket there, too.)
Notice the thick steel washer under the mount. The
nut is welded to it, and it is a formed part with a tube that goes clear
up through the mounting bracket to the body.
This is what I had to cut off to get the rubber off and prepare
for the new mounts. Be
warned in advance! If you
aren’t prepared for this, it’ll kill your time schedule for doing
the job. You can also see a
nice blue radius arm bushing there.
Ain’t it purty?
|

|
Here
is the left front body mount, located below the battery tray..
What you see hanging from the underside of this part is the
rusted remains of the steel washer.
This one took less work to get off than the others, as it had
almost fallen off without my help.
I think this is why Duff recommends that you replace the body
mounts.
The
mounts were not where I started, though.
There are a lot of things to do that all have to be done.
The instructions will walk you through, but you don’t have to
do some of them on order. Just
make sure you do them all!!
The
steering column needs to be extended.
You take it apart before you lift, and put it together after.
The adapter slid in just like it was made for it, which it was.
This task was easy.
I didn’t like the way they mounted the bottom of the radiator shroud,
so I used a piece of aluminum and pop rivets.
The radiator is lifted with the body, but the fan is on the
engine, so there is a 2” displacement that you have to compensate for.
When you lift the body, you have to lower the shroud.
Their hardware was great for the top side, so I’m not even
showing it.
Here
I have extended the heater hose. Only
one needs this treatment. They
recommend emptying the whole cooling system, etc, etc. I
made sure the coolant was cold, then I opened the radiator cap.
With the clamps on the new tube, and the splicing sleeve
installed in the new piece, I
pulled the hose, stuck in the new section, and had it back together in
no time. I only lost about
2 tablespoons of fluid, which is less than I would have by draining the
radiator. When the body is
lifted, the hose lies flat again, as you can see in the next picture.
The
heater hose is flat again, the new grounding block is installed over by
the wiper motor, and it’s ready to go.
Be sure you get a good ground when you add that block.
The first time I drove it after I did the job, I needed my
wipers, and they wouldn’t work because I had loosened the stud that
grounds to the body. Easy
fix, though.
The
shifter will sit 2” lower when you lift the body.
I sprung for the extension kit.
Easy to install, and you don’t need to wait for the lift to
finish this section. The
next three pictures show the stub sticking out of the transmission and
the clamp bolt that holds the shifter on, then the extension mounted,
and finally the shifter ready to put the skirt back down again. I
think the throw is a little longer, but the feel is so close to the same
as before that I don’t notice a difference.
Notice
the roll pin sticking out the extension piece in front (right side of
the picture). There is also
a slot in top of the extension to take the pin in the shifter. This
ensures that you get everything lined up and the way it was before.
This is an easy task, and well worth spending the extra $15 to
do.
Looks strange now, but after the body is lifted, it’s a perfect fit.
Speaking
of perfect fits, measure this gap carefully so you can re-establish it
when you get done. Should
be the same on both sides. If
it’s not for some reason, this is a good chance to fix it.
Lifting
the body is an unnatural act!! It
feels … wrong somehow. Brace
it well, and go slow, looking continually for something you forgot to
disconnect that you are about to ruin.
After you have cut the old mounts loose, put long bolts through
from above on the side you are not lifting so the body doesn’t slide
off the frame. That would
be highly inconvenient!! You
can see I put the new mounts and lift block in before I took this
picture. (I’m not about
to leave it balanced on the jack just to show how it looks when it falls
off!) Be ready and work
smoothly, quickly, and efficiently on this step.
|

|
|
(Click
photo for larger view) |
Here
you can see the front mount is in place, and the bottom of the mount is
on the ground, along with the old pieces and bolts.
This truck isn’t going anywhere for awhile!
Does
that look strange or what?
This
is how you are supposed to use the bumper lift brackets.
Unfortunately, when you only lift 2” and the kit gives you 3”
brackets (which lift 2 ½”), there is a little interference problem.
I drilled extra holes, but got them in the wrong place.
I cut and notched the frame, the lift brackets, the bumper
brackets, and the bumper valance (to clear the frame where it now will
hit the bumper.) Finally I
gave up in disgust, pulled out a piece of ¼” steel plate, and cut a
couple of brackets which I welded onto the bumper mounts.
It fit perfectly. Took
me 10 minutes to install the bumper after I got it done.
And it fits better than it did before I lifted it.
Here
the cab is done and I’ve turned the truck around to do the bed.
Notice a bit more room under the front wheel arch!
|

|
Lifting
the bed is easy after the cab! No
body mounts, just bolts. The
bolts are a T-55 Torx head. They
go from the bed down through the bed frame into clip nuts on the truck
frame. A shot of WD-40 is
essential here! The bolts
are rusted into the clip nuts. They
have also been corroding for years inside the bed frame, which has lousy
drainage. It took a lot of
effort and a couple of T-55 socket wrenches to get the 6 bolts out.
They came out real hard, fought all the way.
When I checked the old bolts, I could see that I was very lucky
none of them broke off inside the frame.
It would have been difficult to get them out then, requiring some
way to reach under the bed (unless I took it all the way off, which I
didn’t want to) and cut them loose.
It also would have been impossible to re-use the clip nuts, which
you are supposed to do. After
you lift both sides of the bed, move it around to where the gap is
right, then put some lock-tite on the bolts and torque them in.
|
|
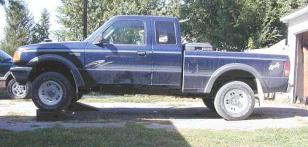
The
truck before I started.
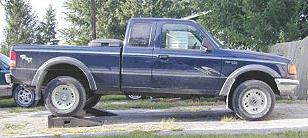
The
truck after I finished.
My
wife went with me for a test ride when I got done.
She had complained before I started this whole project that it
rode too rough and she wouldn’t ride with me any more.
She noticed each improvement along the way. But she was not
prepared for how smooth and quiet it is now!
As I fixed each step, I got a marginal improvement, but the ride
characteristics changed as new places became the weak links and gave
their own problems. So I
was never able to get the full level of improvement from what I had
done, because something else in the system was always going bad.
Now, however, it is complete, and there is no more place to be a
weak link. The ride is
better than stock. She told
me it rides better than her Blazer, and now wants me to do poly bushings
and a lift on it. (I’ll
do the bushings, but I’m not lifting it!!)
The next step here is actually a step – running boards to help
her get in and out.
Was
it worth it? Oh, yeah!
Well worth it!! It’s
a joy to drive now, and a lot of fun.
I am enjoying it all the way!!
Was it a lot of work? Yes,
it was. Would I recommend
you try this at home? Only
if you are reasonably competent and have the tools to handle what you
could run into. I have
tried to point out where the dragons are lurking to eat the unwary.
If you decide to go for it, good luck!!
Pick a time when you can spend a few days on it.
(I did the cab over the Labor Day weekend.
The bed took two hours.)
|