|
|
|
|
Roll Cage Overview |
|
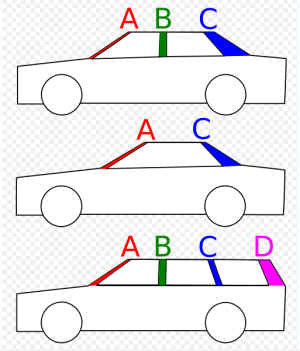
DISCLAIMER: This is an overview to give the home fabricator and anyone looking to hire a shop some in-sight as to what's involved and what to look for. This should not be used by an in-experienced fabricator as a 'how to' for building their own roll cage and should not be performed by an in-experienced welder. OVERVIEW: This page is not intended to be an instruction guide for building a roll cage, but a guide to give you some helpful information for designing and building your own cage. You need to carefully think about why you're building a roll cage for your rig. Is it because a sanctioning body said you have to in order to compete, or is it to protect yourself in the event of an accident? You need to concentrate on building a roll cage that's safe. It might save your life someday. Don't start looking at your roll cage as an art project and start putting a lot of pretty bends in it. Some say that any cage is better than no cage. Don't build your cage assuming you'll only need it when you flop on your side trying to crawl over something. Imagine traveling up or down a steep hill, rolling and picking up speed as the rig rolls out of control. What if the rig comes to a sudden stop against a tree or large rock? Is your cage triangulated and expertly welded to withstand it, or is the cage going to collapse. Worse, is one of the tubes going to break loose at the weld and beat you in your head? If you're building something to be competition legal, you need to get with the sanctioning body to get the rules/requirements for roll cage construction. We've listed the 2007 BITD rules for roll cages further down on this page as an example. DEFINITIONS: Roll Cage - A roll cage is a specially constructed frame built in or around the cab of a vehicle to protect the occupants from being injured in an accident, particularly in the event of a roll-over. A-Pillar is a name applied by vehicle stylists and enthusiasts to the shaft of material that supports the windshield on either of the windshield frame sides. By denoting this structural member as the A-pillar, and each successive vertical support after a successive letter in the alphabet (B-Pillar, C-Pillar etc.), this naming scheme allows those interested in vehicle design to have points of reference when discussing design elements.
Nodes - A node point is a point where roll cage members all meet at one point, making the node a point of very high strength. It's also defined as a connecting point at which several lines come together. Spreader - Is defined as a device for spacing or keeping apart two objects. In roll cages, it is a bar (tube) that cage builders add from side to side in a hoop that adds a measure of resistance to collapsing during a rollover. ROLL CAGE BASIC RULES: There are some rules you should follow when building your roll cage; Tubing - One mistake in cage building involves using the wrong material. Pipe or non-structural or mild-steel tubing should never be used. These materials don't have the right ductility which is the ability to bend and twist without breaking. Pipe is not ductile enough and can snap. Roll cage construction material should be CREW, DOM mild carbon steel or 4130 chromoly. Chromoly requires TIG welding. CREW and DOM can be MIG or 'stick' welded.
Triangles - Triangles are the most stable simple geometric structure. Without triangulation, squares have no lateral support. Triangulate everything you can. This principle should be applied as much as possible to a chassis or cage design. Every tube should be one leg of a triangle whenever possible. This is especially true with the primary structural tubes.
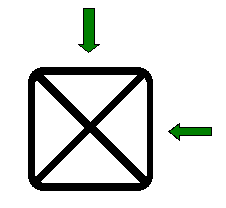
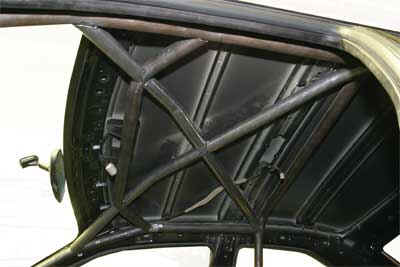
The drawings above represent a top (roof) hoop. The arrows represent force. The hoop with the 'X' could handle the force from various directions. The one with just the straight bars might handle force coming straight at the front, but offers no additional strength from side impacts. Some people look at the straight bars as offering additional roof protection if your top ends up on a rock. Realistically though, we see more rigs roll over sideways then end over end. You're cage is going to end up with forces applied to the sides as it's rolling over on its top. Bends - Avoid bends. The strength of a roll cage is based on compression and tension within the structure. Bending reduces both no mater where you do it. Some are unavoidable in a design but they should be minimized. A straight line is more rigid than a curved one. However, it's not always practical to have your roll bar tubes run in a straight line. The need for strength often conflicts with the desires to have use of your glove box, window handles, vents, etc. Bending the tube results in the reduction in overall strength. If you have to use a bend, add bracing to compensate for the bends. Bends should never be mid-span, or unsupported. The apex of a bend should be a node point or junction for at least one other tube and gusseted unless several tubes meet at the node. One exception to this rule is the halo-bar-type cage. With this type of construction, the bar overhead is one continuous piece and all the down bars connect to it.
The cage shown above has bends in it, but there are tubes welded at the bends that strengthen it. Gussets - You need to gusset corners to strengthen your cage. This can be done with triangular plates welded into the corners. A stronger method is to weld a 6-12” tube diagonally in the corner. Below is some aftermarket gussets.
Here is a sample of a gusset made out of a piece of tubing. Notice that this gusset forms a triangle and instead of putting a piece of triangle plate in the corner of the tubes, it actually supports the tube at the bend while strengthening the whole corner.
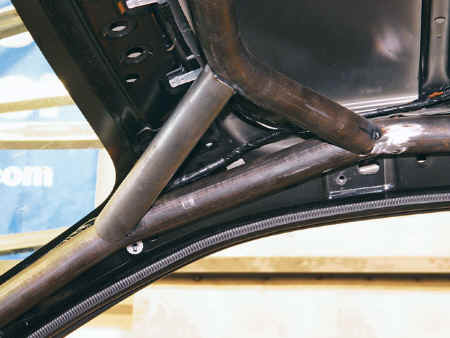
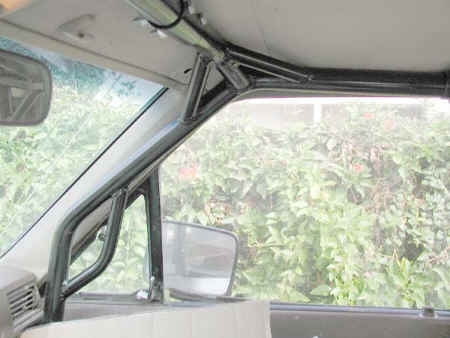
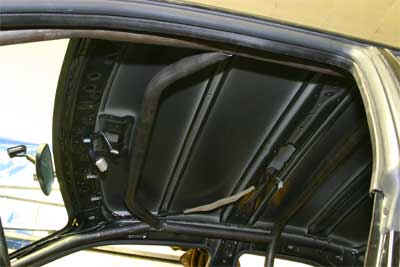
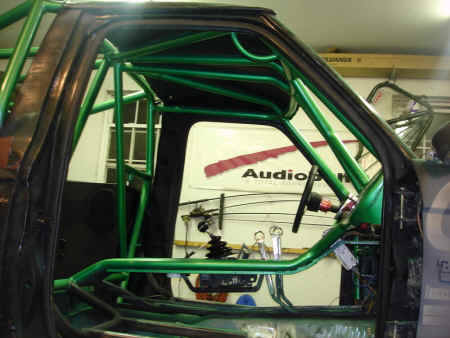
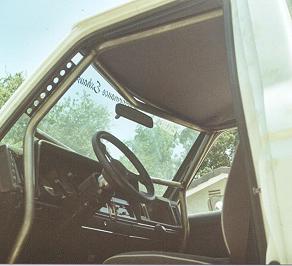
T-Junctions - are when one tube dead ends into another. This should be avoided whenever possible because the dead end tube could apply force to the tube it dead ended into and cause it to bend. Down Bars/A-Pillars - should not lean back too far unless a second bar is added to triangulate it. All cages benefit from a vertical tube in the windshield area. An inverted “V” like this /\ is even stronger.
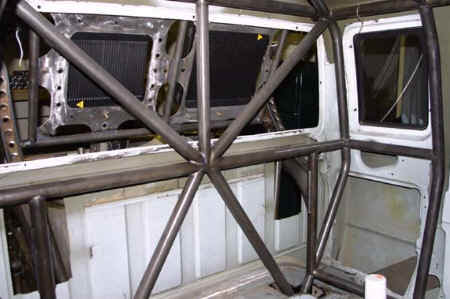
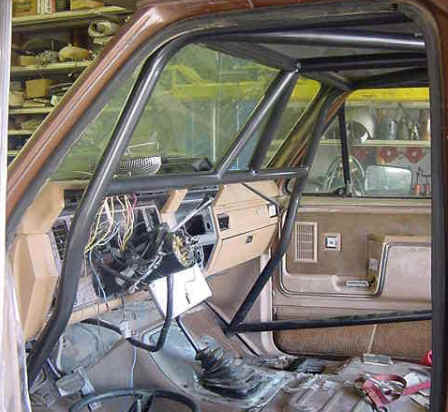
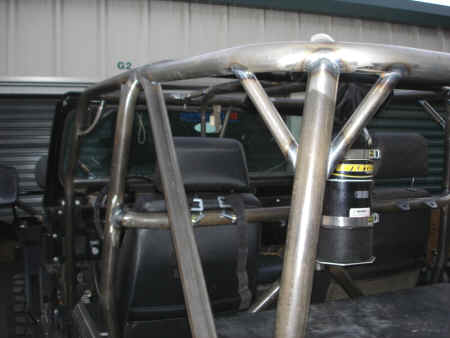
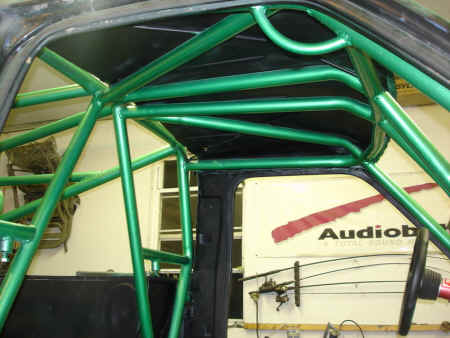
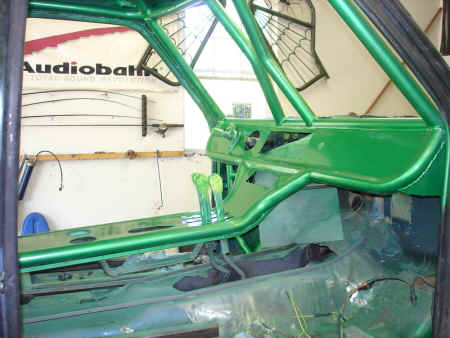
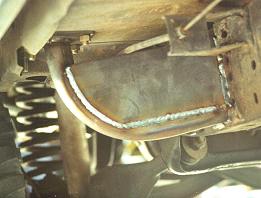
Photo of vertical tubes /\ in the windshield area Roof Hoop - should be triangulated with an 'X' or at the very least a diagonal or a 'V' spreader tube. The spreader tubes should intersect the apex of the bends for greatest strength and should be straight. Kicker Bars - It's a good idea to support the cage with kicker bars that extend from the top of the rear hoop and run back and down toward the rear of the vehicle. Some choose not to do it in pick-ups because they don't want to cut a hole in the back of the cab. In the photo below you'll see how the cage in the bed runs through the back of the cab to attach to the top hoop inside the cab.
Padding - Pad your bars with roll bar padding.
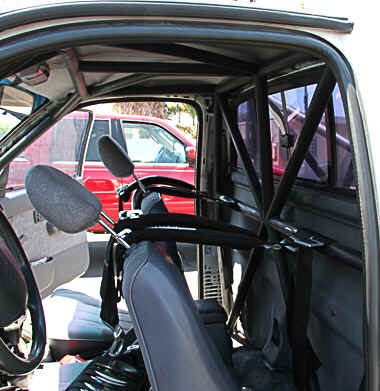
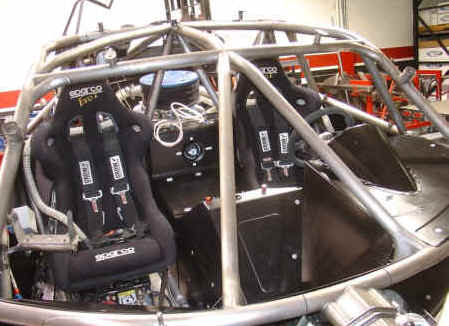
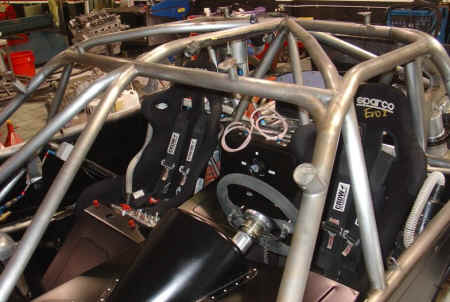
Mounting Your Seats - Your seats should be mounted to the cage. Think of your new cage as a 'safety capsule'. This ensures that even if the cage shifts in a roll, you'll likely remain inside it's protective structure and not have it smacking in to you.
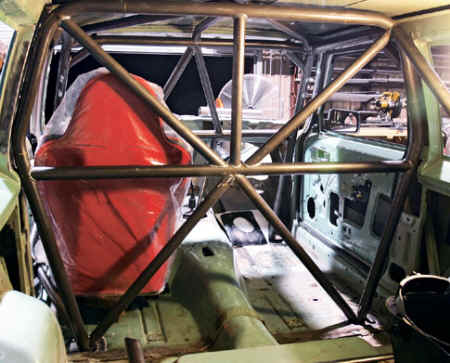
The photo below shows a seat mounted inside a roll cage. It still needs a bar running behind the seat in the rear (main) B-hoop to strengthen the hoop at the bends and provide a point for the safety harness to attach.
The photo above shows the bar we're talking about. It mounts at the bend in the main hoop to strengthen it and is at the right height for the safety harness to attach.
The photo above shows a cage designed for a SUV. It has a location for the seat to mount and the builder chose to leave an opening to gain access to the rear of the vehicle. We would probably recommend an 'X' in the roof hoop going from corner to corner instead of two straight bars. This would comply with the rule of triangulation and strengthen the cage. Some builders like the two straight bars so they can mount a CB radio to it. If that's the case, you should still add in support for a side impact.
This photo above of 'Punisher' shows part of the rear B-hoop in a Bronco II. An opening has been left to gain access to the rear but has been strengthened with triangulation. Type of Seats - Use the best seat you can afford. Your stock seats might be great for comfort, but you'll never see one in a race truck. Adjustable seat backs can move in an accident. A fixed-back full structure bucket seat generally is the best for holding up to the evil forces that attack you in a rollover. You also must pay attention to the seat mounting. It's important to mount the seats so that the occupant's head won't come in contact with the cage bars in a roll or accident. Safety Belts - Mount your belts to the cage when mounting your seats to the cage. Being seated in the cage and belted to the floor/cab is asking for trouble. Mount your belts so that the shoulder belts form a straight line from their mounting points to the lap belt. Mount your lap belt so it crosses your hips and forms a 90-degree angle with the shoulder belts. Never mount the lap belt so that it crosses your gut, or the shoulder belts so they cross your neck.
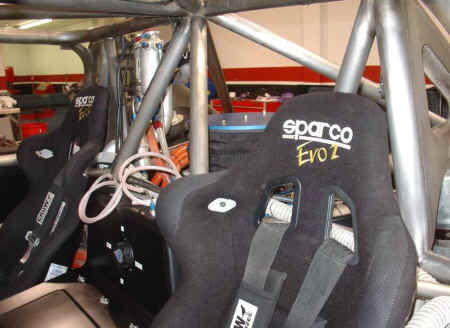
The photo above shows the proper way to mount safety harnesses. They are looped around the horizontal cross bar in the rear hoop at shoulder height.
Above is another example of a safety harness. This is from a SCORE legal desert truck.
In the photo above, the safety harness attaches to the rear hoop (A) that's mounted just behind the cab. The hoop attaches to the top hoop by passing through the top of the cab.
The photo above shows a safety harness attached to the cage along with triangulation and gussets. Grab Handles - Don't use your corner gussets (tubes) as grab handles if they're next to the body. You don't want your hand smashed between the cage and the body in a roll over. Grab handles certainly have their place and are found in better trail cages. These handles are installed so that when you grab one your hand is positioned inside the cage. The photo below shows gussets in the corner and a grab handle further down on the tube. The grab handle below also serves as a reinforcement to strengthen the down bar at the bend.
In the photo above, 'A' shows a tube used for a gusset. Photo 'B' shows a proper grab handle below a corner tube gusset. It's not very clear in the photo, but the handle points in towards the driver to keep his hand inside of the roll cage in the event of a roll. Triangulation, Nodes and Gussets:
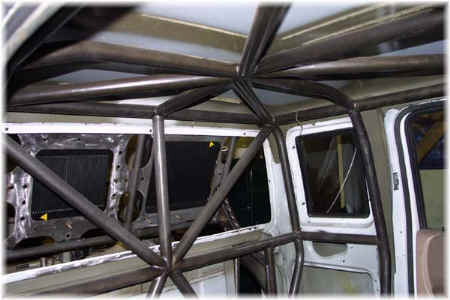
In the photo above is a rear B-hoop, top hoop and A-pillars.
In this photo (Above), the top hoop has been braced (triangulated) and the corner (front of top hoop) has been gusseted with tubes. Notice how the gusset to the A-pillar bar and the top hoop, and the bracing (triangulation) in the top hoop line up. This makes it very strong and also supports the bend.
The cage above is from Gen-Right for a Jeep. They've done a nice job triangulating the cage.
This Bronco II uses a horizontal bar at the bend in the rear B-hoop but cuts it off with a '/\' in the middle. This still provides strength and a point to mount the safety harnesses but allows an opening to the rear.
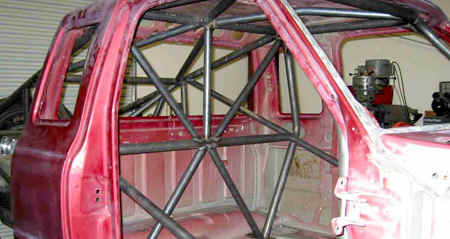
Take a look at the cage shown above. Not only is the top of the cage supported by its down bars but its triangulated in the middle both front and rear. Look at the 'A' in the front (at windshield) and in the rear. Also note the tube gussets in the corners of the top/front.
Above is another look at the same cage. This is a SCORE legal desert truck. Again, notice the triangulation and common nodes where the tubes intersect to maximize strength. MORE . . . . . . .
The 'Punisher' Bronco II makes good use of tubing in the cab. The horizontal spreader bar running between the front hoops is not only used with the down bars at the windshield, but is also part of the dash.
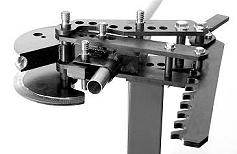
Note how the tubes forming the dash and center console runs back to another spreader bar to tie everything in and make it really strong. Measuring - All measurements are taken from the outside of the tube for proper fitment. Since the tubing bender creates a radius from the center of the tube, all of the equations for angles and tube length should be figured from that respect. Interior obstructions of the cab and multiple angles must also be accurately measured for proper clearances. Don't forget the padding on the cage. It will be a tight fit if not factored in. After the straight sections have been measured and the angles figured, the radius must be measured from the center of the tube. An 8-inch radius is standard on a 2-inch bar. While others can be used, this is the optimum dimension for strength. A smaller radius will become weaker as the outside of the tube is stretched while being bent during construction. One of the biggest problems is starting with the right tube length because every bend will decrease the overall length. This is called the developed length and can be calculated with the formula .0175 x degrees x radius. If this isn't done, the distance between the bends won't be correct and the overall length will be short. Cut your tubes 6-inches longer than needed because it's easier to cut off the excess at the end than to start over bending a new one. Make a full scale layout on your garage floor. This way all the pieces can be checked by laying them on the floor. Bending The Tubes - The first rule of bending tubing is that no deformation is allowed. The bend must be smooth with no scoring or ovalizing of the tube. Do not use a pipe bender to bend tube because the dies do not fit correctly. The Harbor Freight pipe bender is infamous for a terrible bend on tubing.
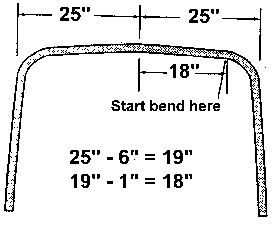
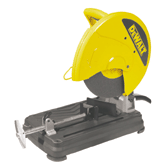
This shows how to determine where to place the tube in the bender to begin the bend. If you want the outside of the bend to be 25-inches from the centerline, first subtract the radius of the die used in the bender. In this case, the radius is 6-inches, so 25 minus 6 is 19. Then subtract half the tube diameter, which in this case equals 1-inch, to get a starting point of 18-inches from the centerline. Want more information on bending tube? Check out THESE instructions for bending tube with a Pro Tools Bender. Cutting The Tubes - Either buy or borrow a good chop saw. More than likely, if you're friends are avid off roaders or fabricators, you know someone who has one.
Notching The Tubes - There are countless methods of notching a tube so it will fit tightly to another tube prior to welding. This is also called a fish mouth. The most common way to notch is with a hole saw which is often done in a Tube Notcher tool. Cheap ones are available from Harbor Freight, and high end models are available from several manufacturers. There are methods of notching on a mill or lathe, and there are also expensive dedicated machines for notching that use end mills or abrasive belts. A proper fitting and tight notch are extremely important for a strong weld joint.
Don't have a tube notcher? Use that chop saw you cut the tube with. Use the chart below as a reference:
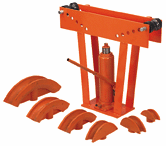
Just match up the tube left to the tube across the top. The number listed represents the degrees to notch the tube at so they'll fit. Example: A 1.5-Inch tube needs to be notched at 26º degrees to fit another 1.5-Inch tube. Want to mount the tube at an angle? Let's say you want that 1.5-Inch tube to mount at 15º. Subtract 15º from one side of the tube and add 15º to the other. You cuts now are 11º and 41º. Pipe Bender VS Tube Bender - Below you'll see a picture of a pipe bender and tube bender. We find that many people that say they have benders have pipe benders. Pipe benders can crush tubing and at the least flattens the outer edges of the bend. Tube benders are not cheap. A manual tube bender can cost several hundred dollars by the time you buy the bender, stand and dies.
Welding - Welds must be fully penetrated. TIG welding is the best and required by sanctioning bodies such as the NHRA. Chromoly should only be welded by a TIG welder and nothing else. MIG and arc (stick) welding are more forgiving and affordable. Cut tubing should be 'fish-mouthed' on the ends so that the tubes fit over the tube they're being welded too. Welds should not be cleaned up with a grinder because it can weaken the weld and tube. If you are not 100% sure that you can make a strong high quality weld, leave it to a professional. In general, TIG welding is considered superior to MIG welding, but a proper MIG weld is completely acceptable and just as strong. Tube splices and repairs should always be sleeved for strength and rosette welded, never butt welded. Most cages that fail are from poor welding, not poor design. Attaching The Cage To The Truck: No tube should EVER terminate into sheet metal like a floor or firewall. The down bars should pass through the floor and connect to the frame. Welding all points to the frame is best for a competition rig. If an OEM frame only had a 4 or 6 point cage welded to it at the cab, it would increase the flex in the unsupported frame rail sections. Welding the cage to a factory frame is going to stiffen it at the junctures but will still be stressed by it trying to flex, not to mention vibration over time. This flex and stress could cause cracks in the welds. Competition rigs extend forward into an engine cage and rearward into a bed cage. These portions are typically welded straight to the frame and limit these stresses and flex.. If necessary, it is acceptable to weld a plate to each tube, above and below the sheet metal, and use four bolts to connect them together. The plate should have rounded corners, be at least 1/8-inch thick and twice the area size of the tube. The bottom plate (under the body) should be tied in to the frame using a brace that connects to the frame rail.
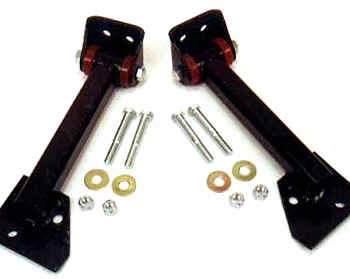
A trail rig which sees road time, would best be served by a cage mounted to the frame with some allowance for flex to keep from fatiguing both the frame and body. Tie-In's like the ones shown above can either be purchases or custom built using bushings.
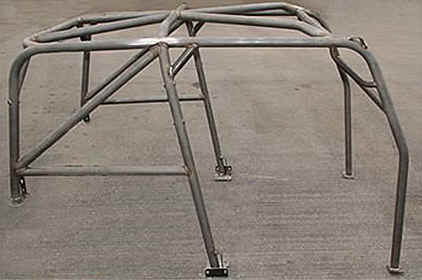
JEGSTER CAGES: Jegs offers some roll cage kits for the Ford Ranger: Specifications:
MISCELLANEOUS PHOTOS: The photos above and below show a roll cage being built for desert duty.
Above is a photo of a A-pillar from an early Ranger. Missing is 'X' bracing in the roof hoop. THINGS TO CHECK FOR:
BITD (Best In The Desert) Roll Cage Rules 2007 All vehicles in competition must be equipped with a roll cage based on seamless mild steel. Minimum design and tubing size for roll cage structure is in accordance with Table below:
Definition Open
cockpit is a vehicle whose roll cage is open to the outside and the main
structure of the passenger compartment with body panels attached to it. Closed
cockpit is a vehicle that has a manufacturer's stock steel passenger
compartment with a roll cage installed in the interior of the passenger
compartment. Material Roll cage construction material may be CREW, DOM, WHR, WCR mild carbon steel or 4130 chromoly. 4130 chromoly is highly recommended for all roll cage construction. Stress relieve all welded intersections by flame annealing. All welds must be of high quality and craftsmanship with good penetration and with no undercutting of parent material. Oxy-acetylene brazing on roll cage is strictly forbidden. All roll cages must be designed and constructed with one front vertical hoop, one rear vertical hoop, two interconnecting top bars, two rear down braces, one diagonal brace and all necessary gussets. The two top interconnecting bars must be placed as far to the outside of the top part of the front and rear hoops as possible. Rear down braces and diagonal brace must angle a minimum of 30 degrees from vertical. Opened-wheeled vehicles built only wide enough for a single seat are excluded from having the diagonal brace (although the diagonal brace is highly recommended for the single seat vehicles). At the bottom of the diagonal brace there must be a cross member of the same tubing material and dimensions as the hoop. All roll cage components (hoops, braces, gussets, etc.) must have a minimum of 3-inch clearance from the component to the vehicle occupant’s helmets when occupants are seated in their normal riding positions. All portions of the roll bar or bracing that might come into contact with the vehicle occupant’s helmets must be padded. All portions of the roll bar or bracing that might come into contact with the vehicle occupant’s helmets must be padded. Roll cages must be securely mounted to the frame or body. All intersecting points must be gusseted and braced. Cab or body mounted roll cages must be bolted through the body structure and be attached by use of a minimum two 0.1875-inch thick doubler plates (one on each side of body structure). Bolts and nuts must be at least 0.375-inch-diameter SAE. Grade 8 or equivalent aircraft quality. Welding of cab or body mounted roll cages to body structure is strictly prohibited. Roll cage terminal ends must be attached to a frame or body member that will support maximum impact and not shear or allow more than 1.5 inches of movement in the cage terminal end. All vehicles including those with stock steel doors must have at least one side bar on each side of vehicle that will protect occupants from side impact. The side bars must be of the same tubing material and dimensions as the rest of the roll cage. The side bars must be as close to parallel to the ground as possible, be located to provide maximum protection to the occupants, and be securely welded to the front and rear hoops. The location of the sidebars must not cause difficulty in entering or exiting the vehicle. Gussets constructed of 0.125-inch x 3-inch x 3-inch flat-plate or split, formed and welded corner-tubing, or tubing-gussets made of the same material and thickness as the roll cage may be used. Gussets must be installed at all major intersections, including diagonal and rear down braces, where single weld fractures can affect occupants’ safety. In the stock classes (3100, 4100, 7300, 8100) on vehicles with rear leaf spring suspension you may add a plate to the front leaf spring outboard mounted hanger if a main roll cage mount is terminated at that point. The plate may only be place in the ―V‖ of the hanger and be welded in place to the hanger only. The plate itself may not attach directly to the frame of the vehicle except for the roll cage attachment bolt that passes through the plate, the roll cage terminal end and the frame. The plate may only be large enough to allow for a good brace for the roll cage mount. Plate design and installation must meet with Best In The Desert Racing Association approval. The rear leaf spring hanger of the rear leaf spring may have a kicker bar attached to the flat horizontal portion of the hanger and extend to the main roll cage down brace. The main roll cage cannot directly mount to the rear hanger. The design of kicker bar must be such that you can unbolt it from the hanger. Kicker design must meet with Best In The Desert Racing Association approval. In the stock classes (3100, 4100, 7300, 8100) you may attach a main roll cage mount to the top of the front spring bucket. Design and installation must meet with Best In The Desert Racing Association approval. All
portions of the roll bar or bracing that might come into contact with the
vehicle occupant’s helmets must be padded.
|
|||||||||||||||||||||||||||||||||||||||||||||||||||||||||||||||||||||||||||||||||||||||||||||||||||||||||||||||||
|
|