What is the TRS-3 Ford Ranger and how did it get its name?
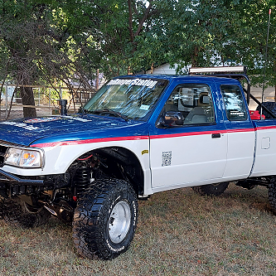
At the beginning of the 1990’s I purchased a 1983 Ford Ranger 4×4 to tow a small watercraft but ended up selling the watercraft because I became interested in off-roading. The more I took the Ranger offroad, the more I modified it to be able to do the things I wanted it to do. In 1998 I began surfing the internet for Ford Ranger 4×4’s, but didn’t find any websites dedicated to them. That inspired me to create this website in 1999. Initially I just referred to that 1983 Ranger as the TRS Ranger, but in 2002 I began calling it TRS-1. The TRS-1 1983 Ford Ranger 4×4 had a white over blue paint job with a red stripe that separated it, and a TRS logo on the bedside. The paint scheme was inspired by the Ford Rough Riders Off-Road Racing Team of the early 1990’s.
The TRS-2 1996 Ford Ranger 4×4 wouldn’t come along until 2004. Journalist/Author Jim Allen had covered one of our trail rides in Wellsville, Ohio and I had mentioned that I wanted to show people how they could build an off-road capable Ford Ranger on a budget, but that snowballed when Jim Allen found out. I bought a 1996 Ford Ranger 4×4 and with Jim Allen’s help I received products from several sponsors. Jim Allen wrote a 6-part series on that build in Offroad Adventures Magazine which was published by 4Wheelparts. The TRS-2 Ford Ranger also had a blue over white paint job with a red stripe separating it and a TRS logo on the bedside. I sold that Ranger in 2014 but bought it back in 2018 for TheRangerStation.com’s 20th anniversary. I still have it today.
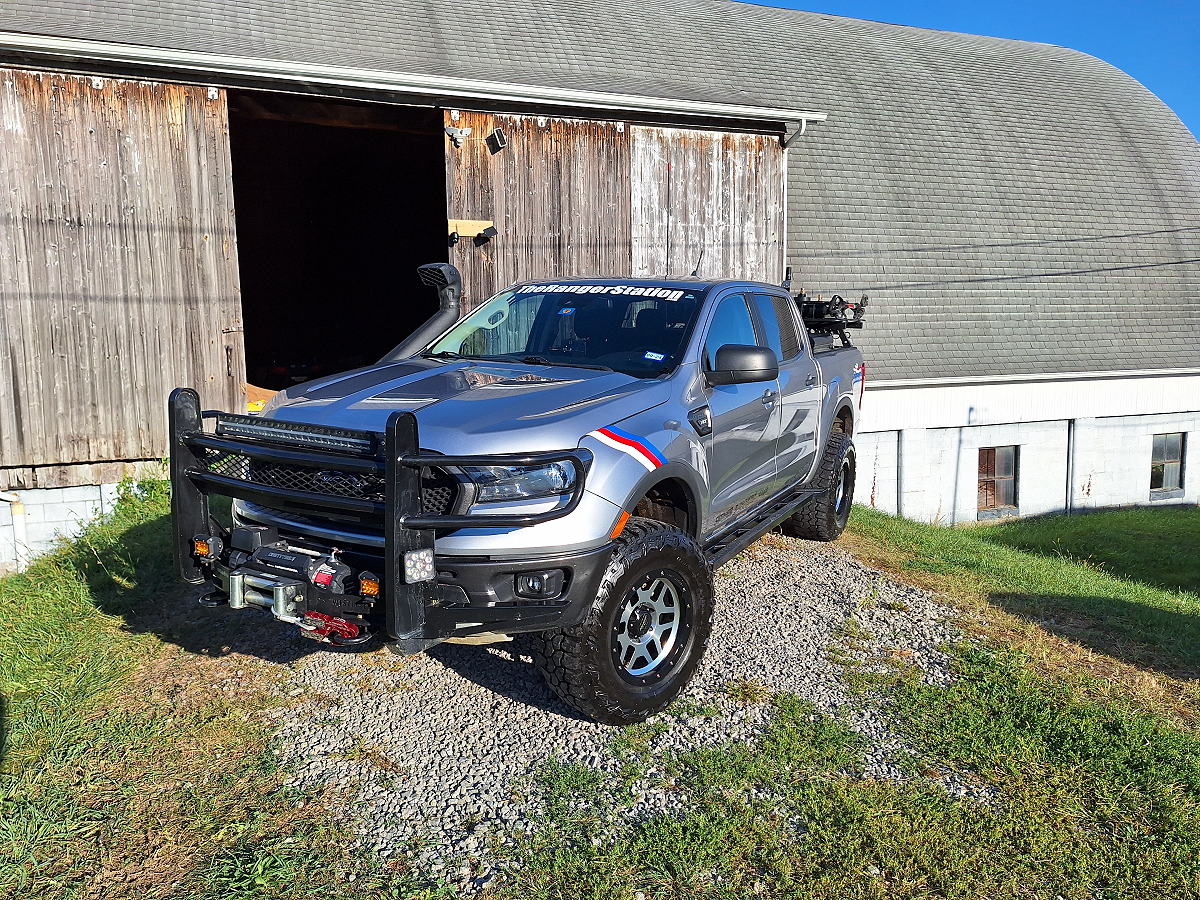
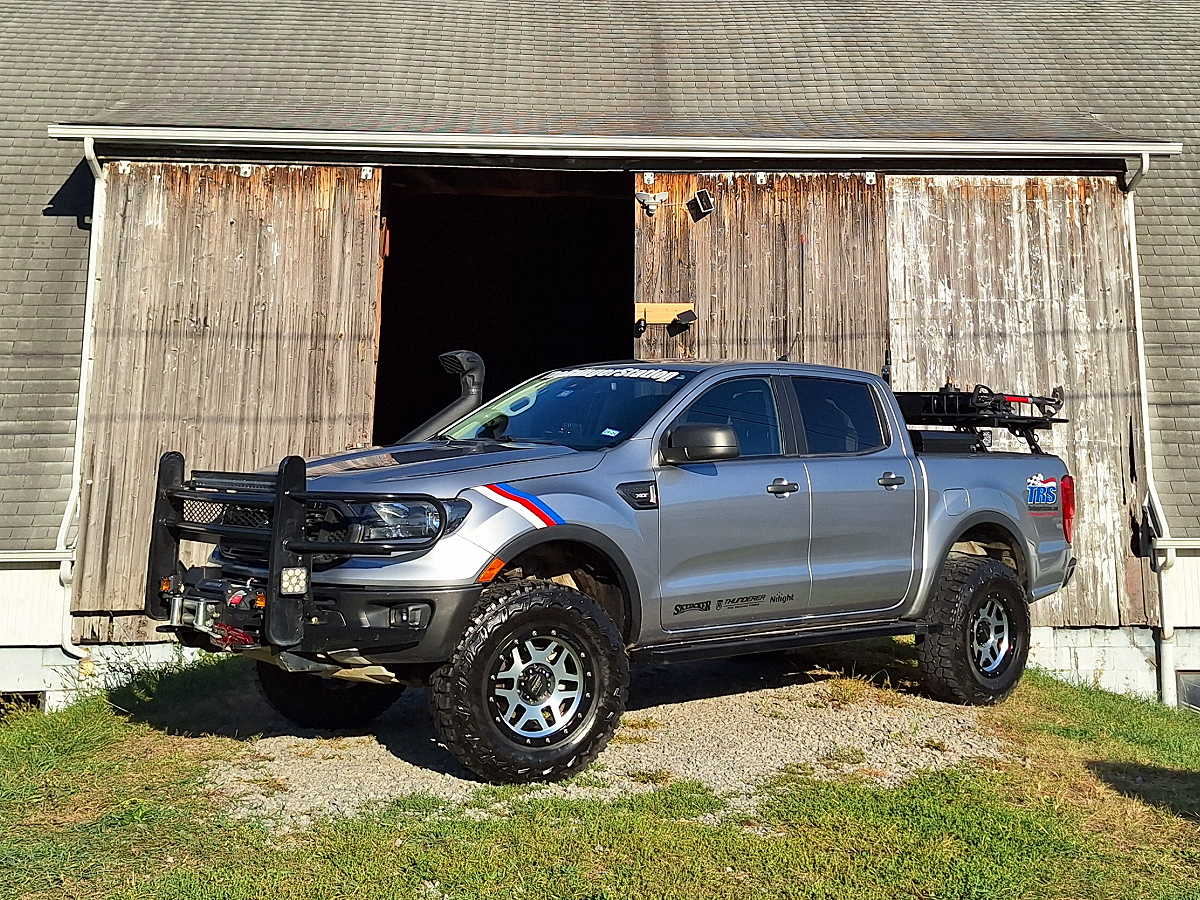
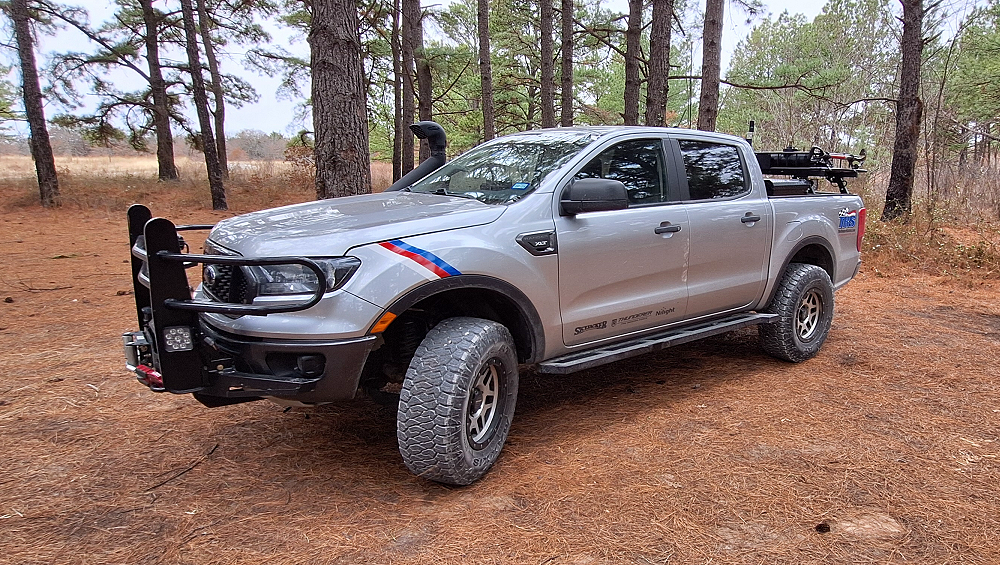
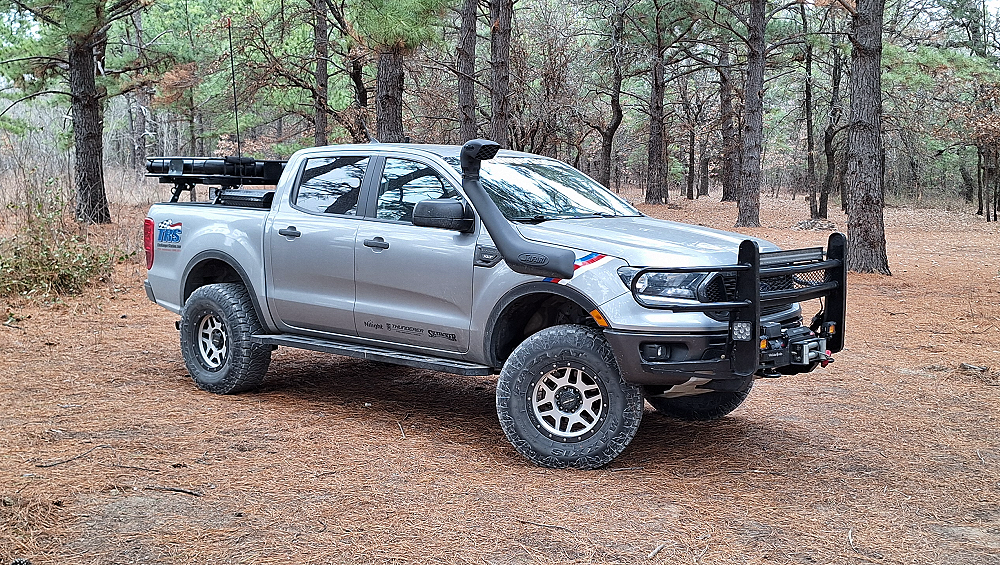
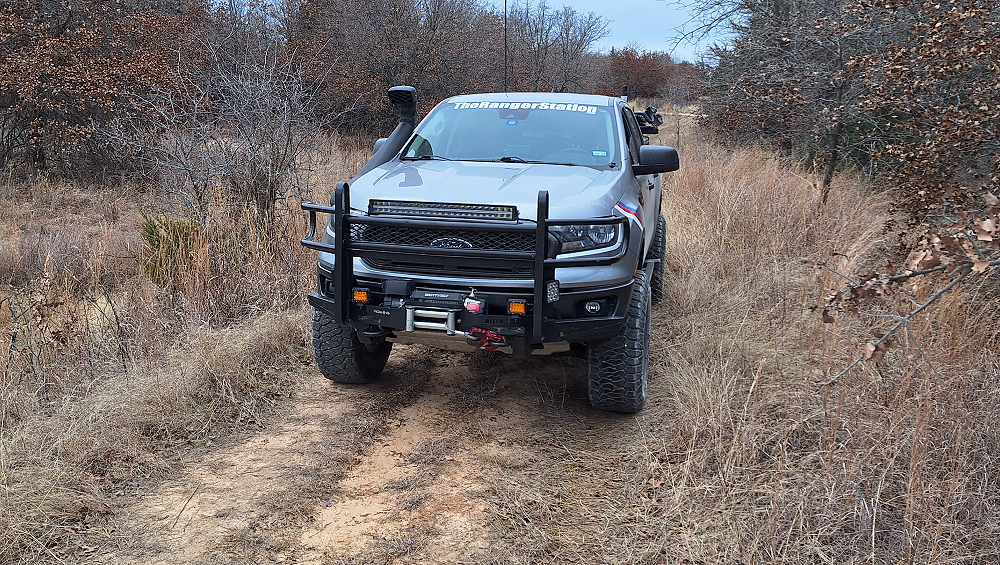
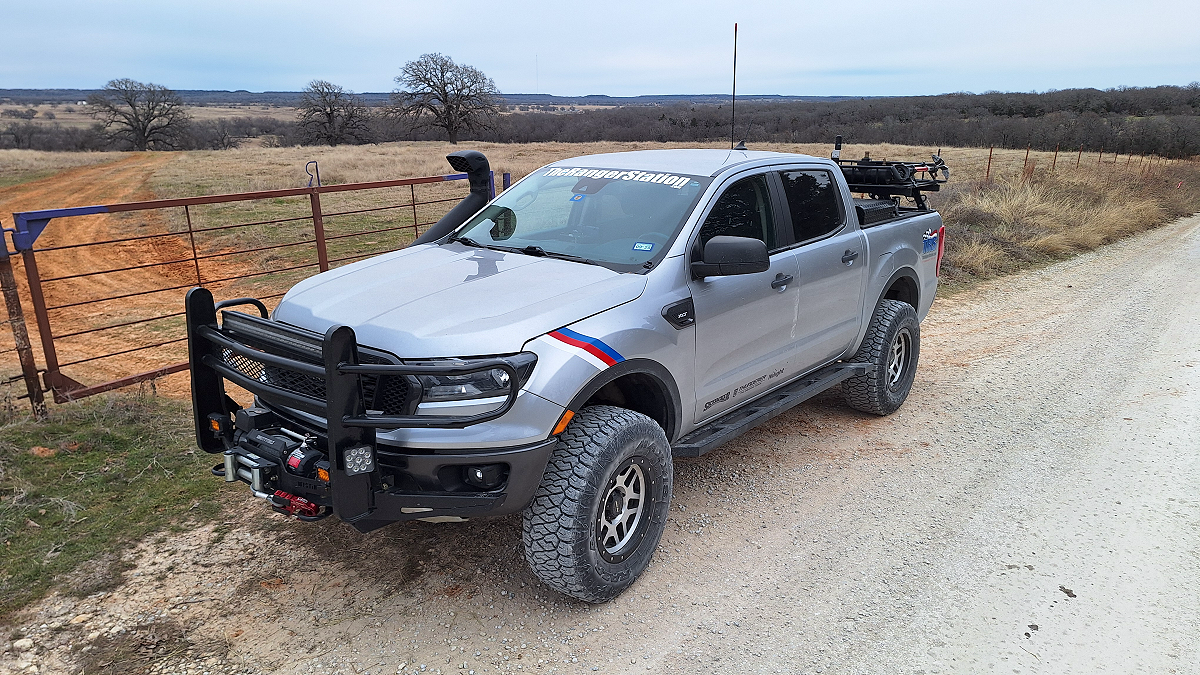
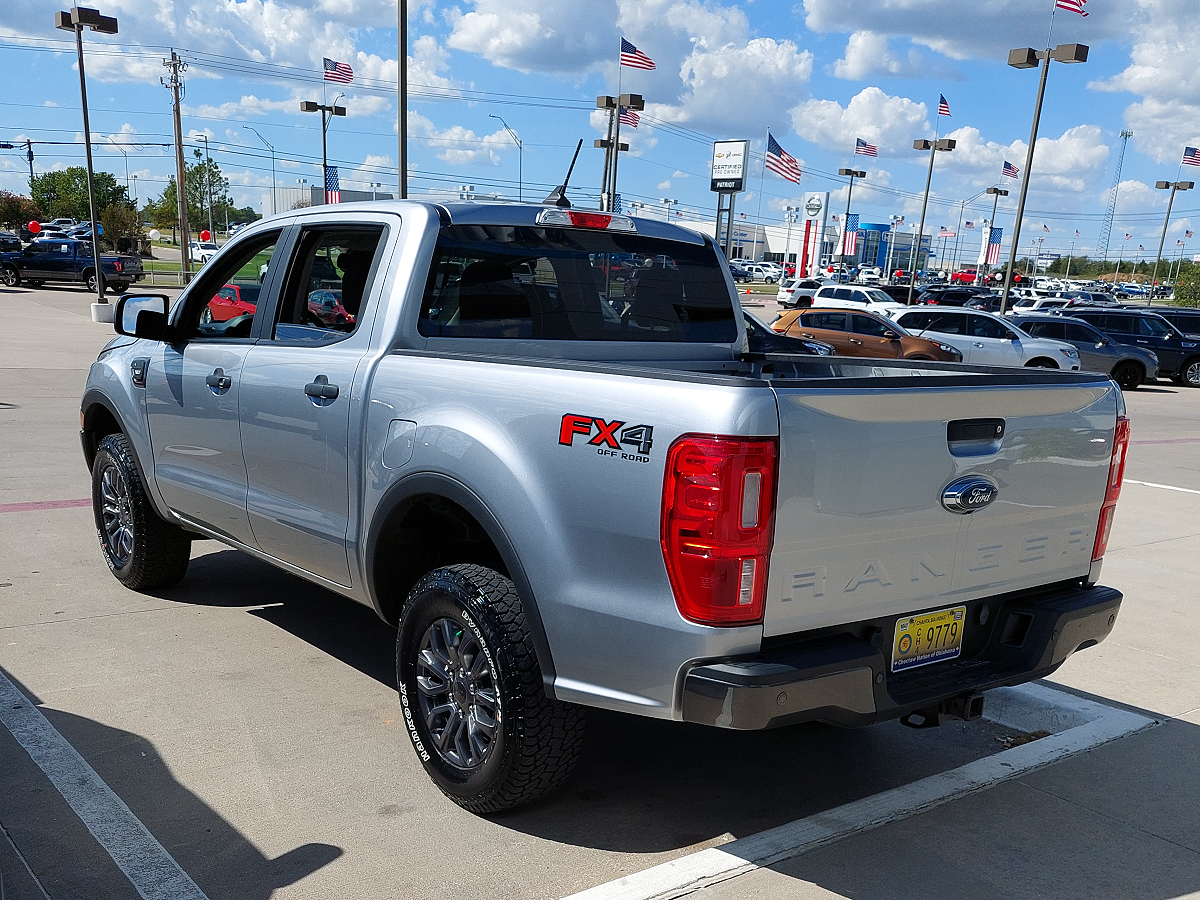
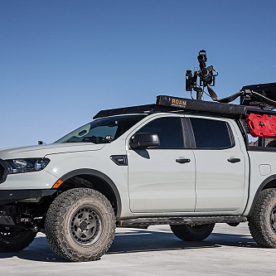
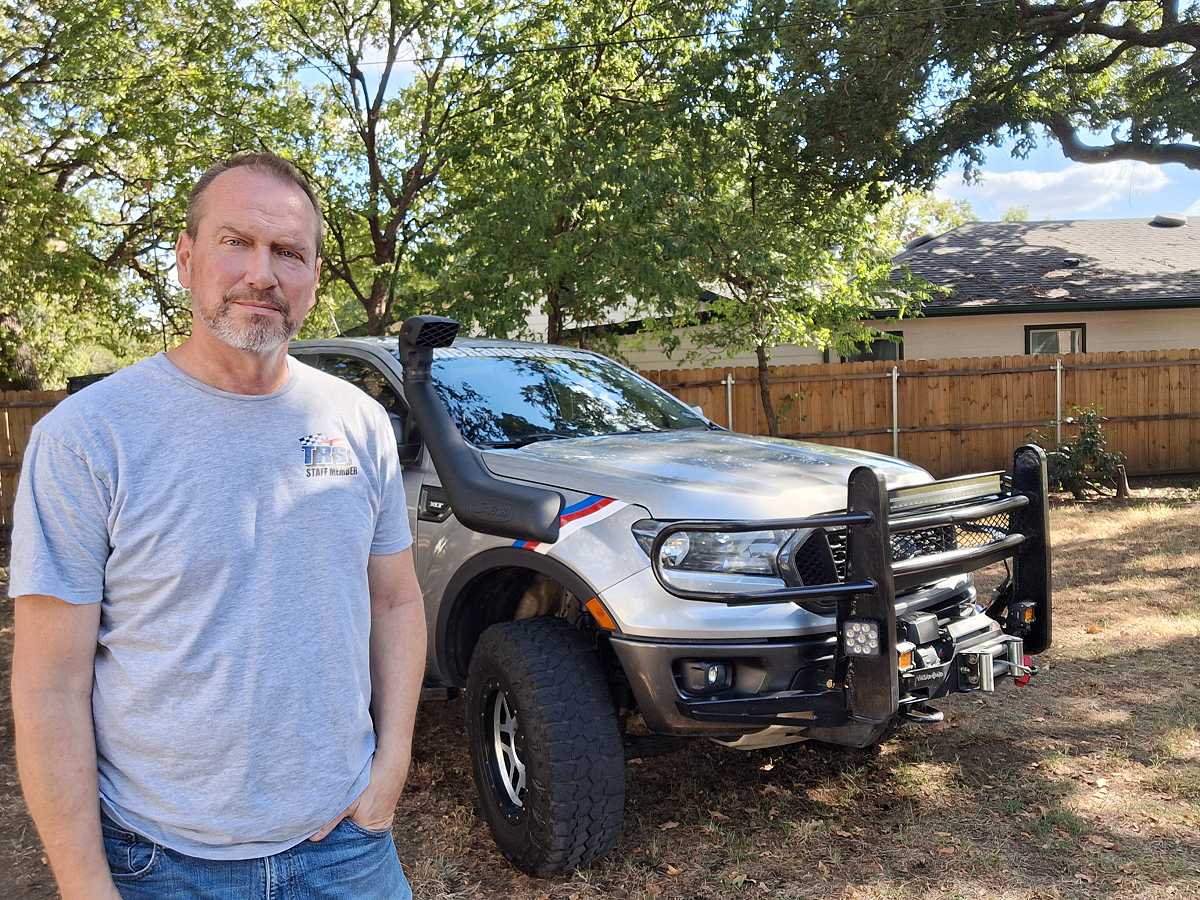
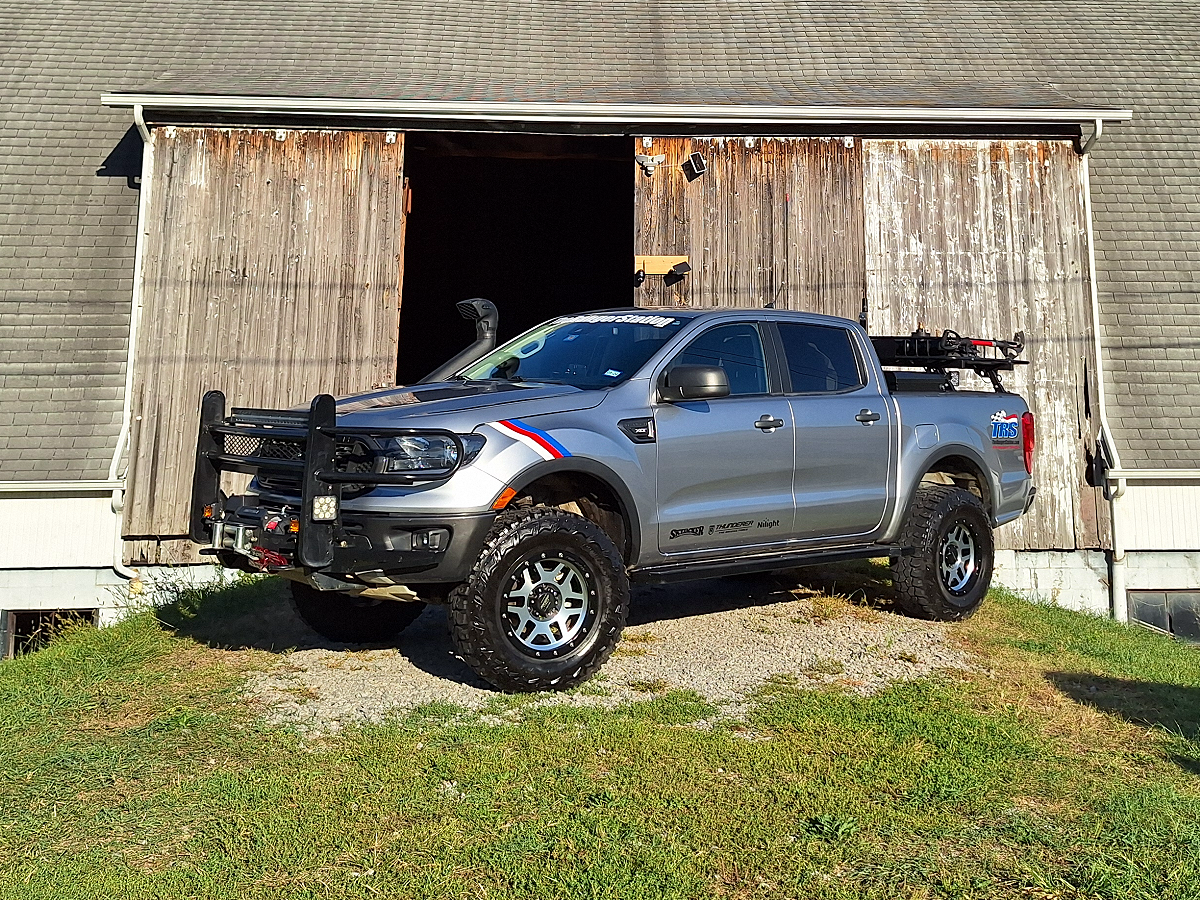
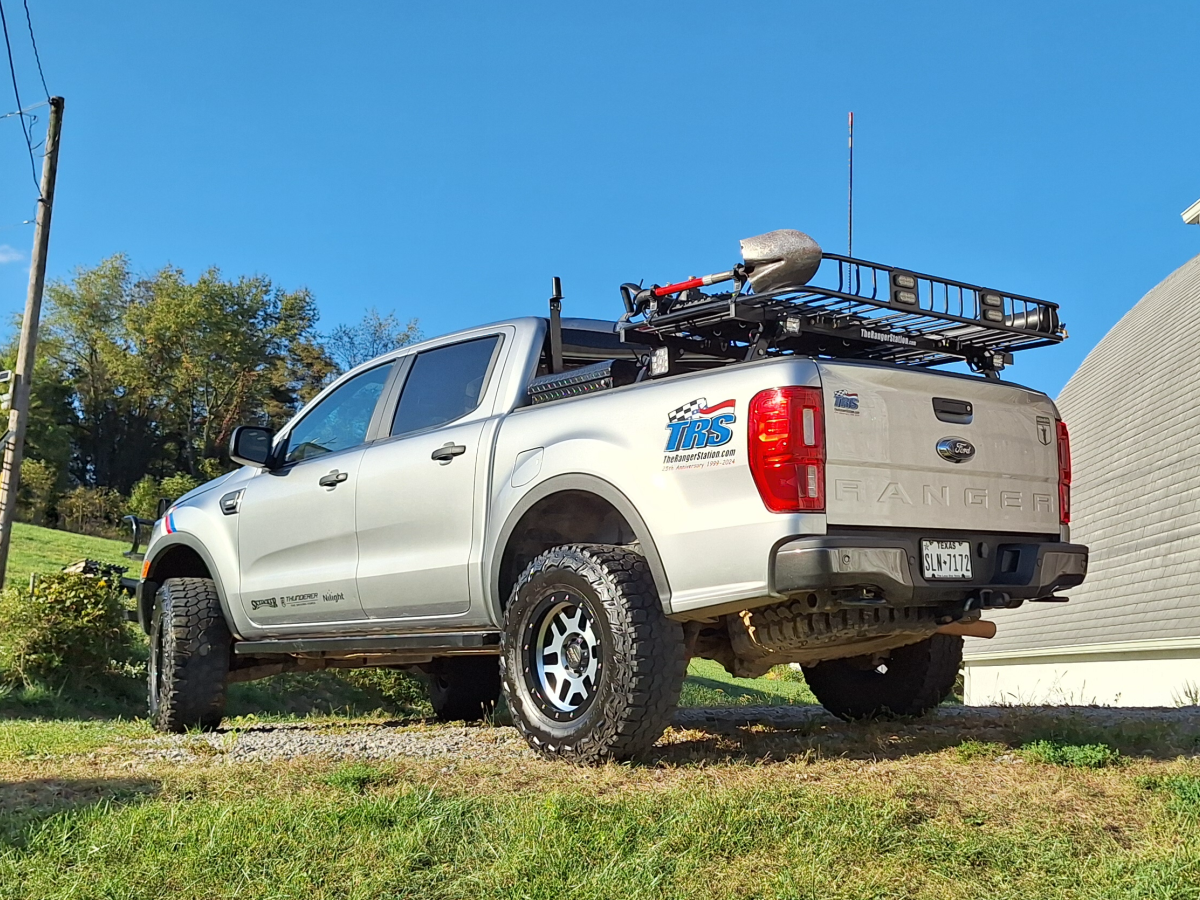
In 2022 I had become tired of trailering TRS-2 from Texas to events across the country, and decided it was time to build a new Ranger that could serve as a daily driver as well as an off-road adventure vehicle. After some searching, I traded my 2016 Ford F-150 for this silver 2021 Ford Ranger FX4. I purposely looked for a silver Ranger since this truck would also celebrate the 25th anniversary of TheRangerStation.com. When I introduced the new Ranger to the forum, I told the members that it would be called ‘TRS-3 The Vagabond’.
The TRS-3 Color Scheme & Graphics (Livery):
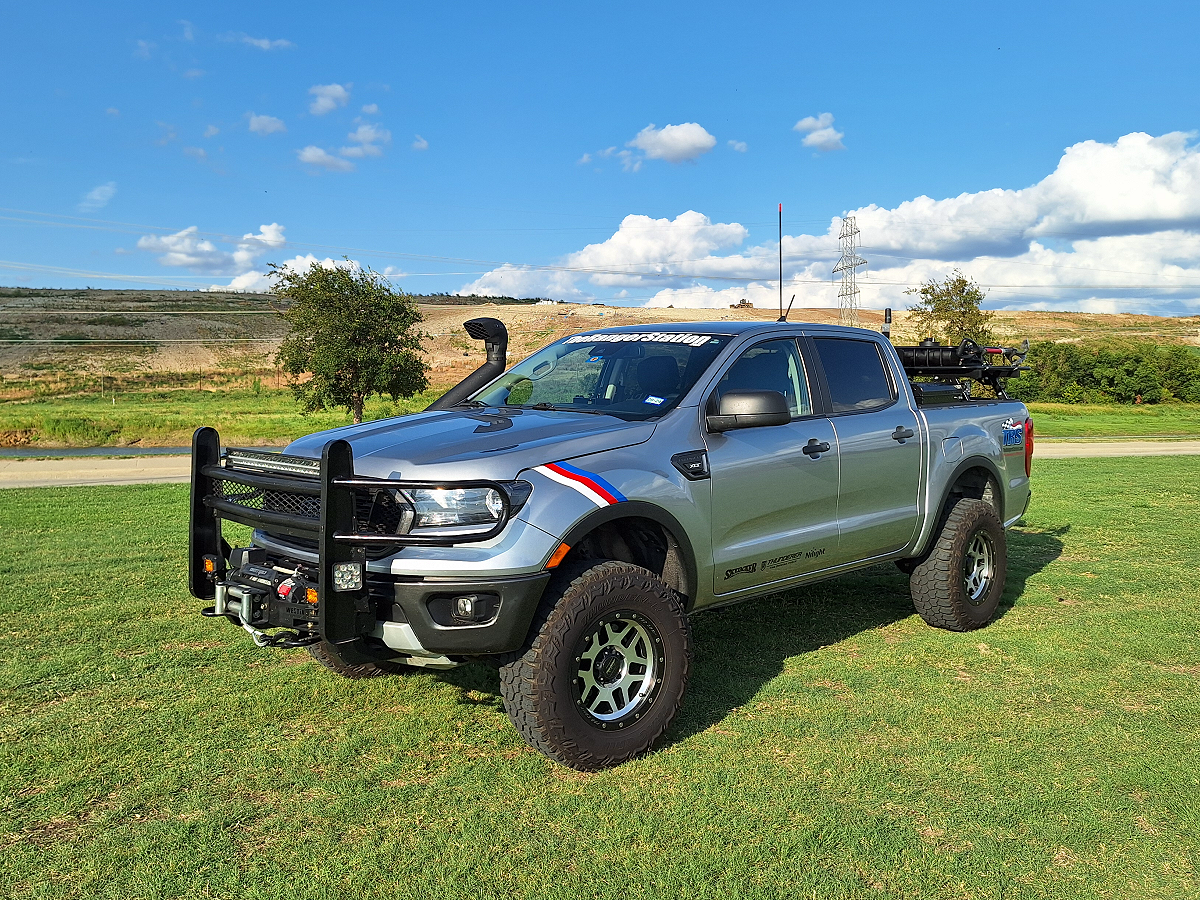
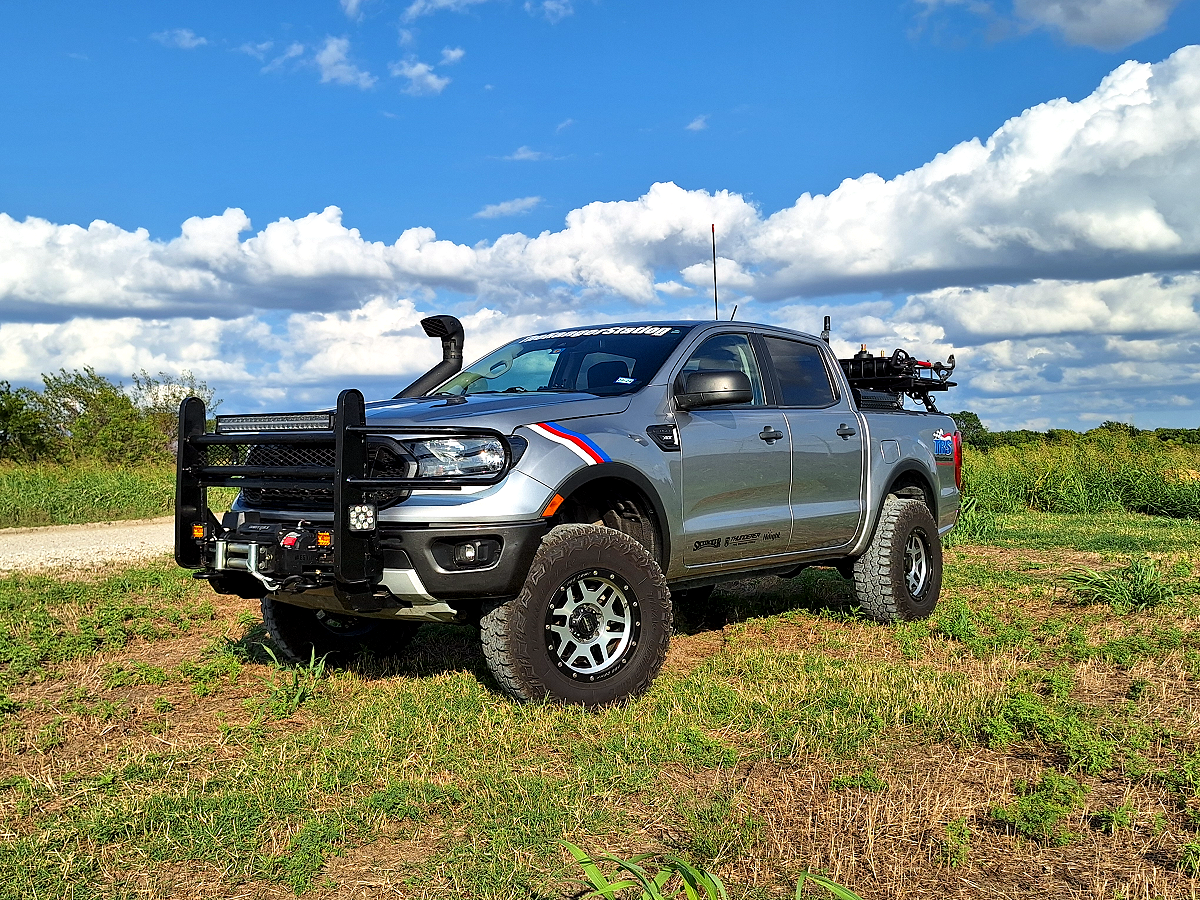
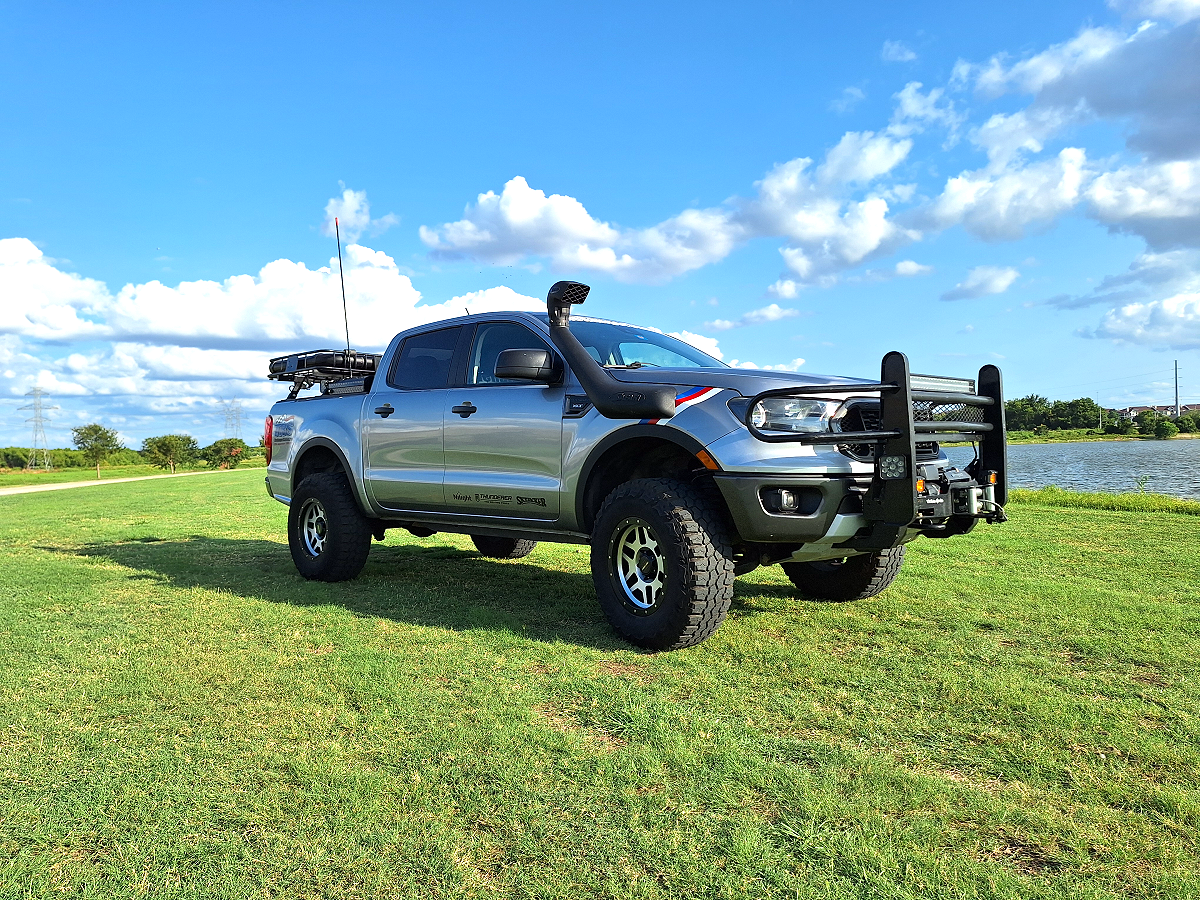
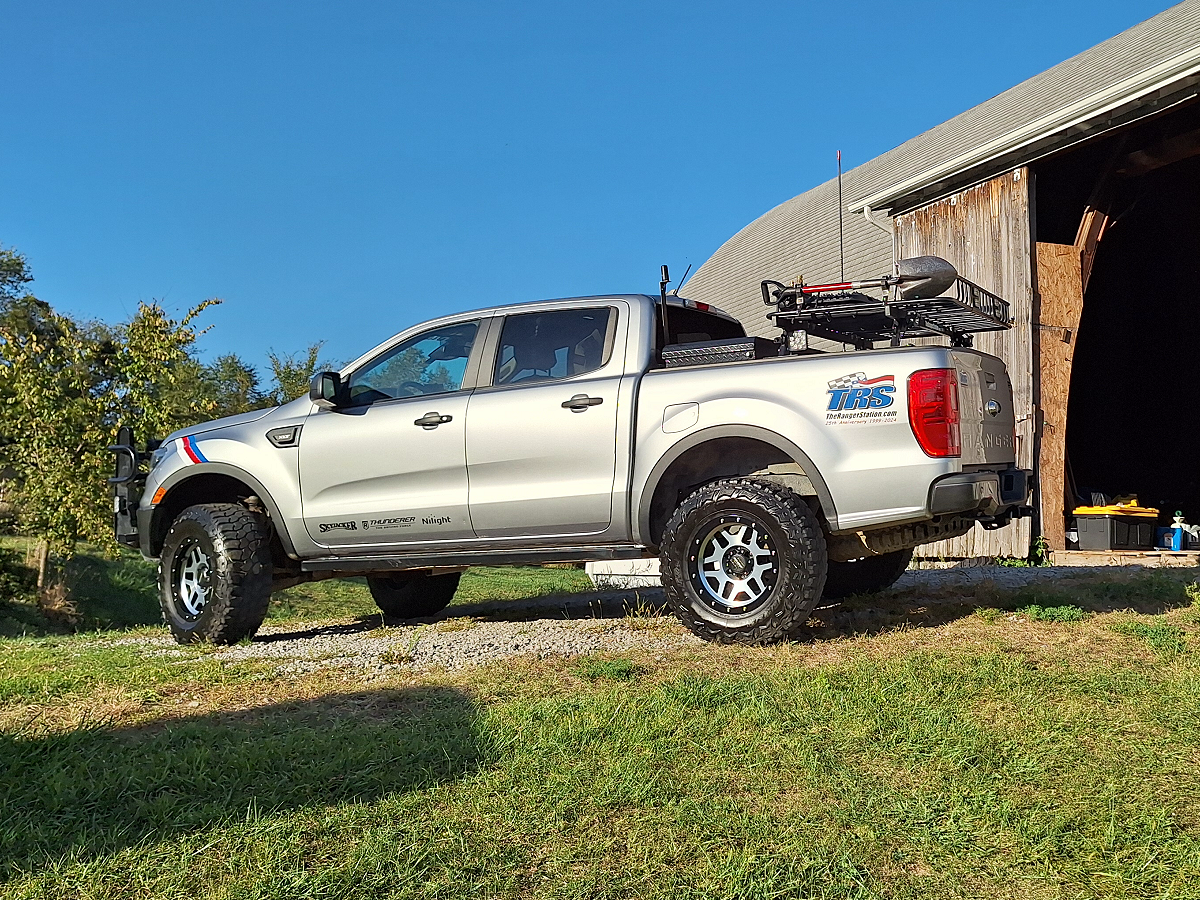
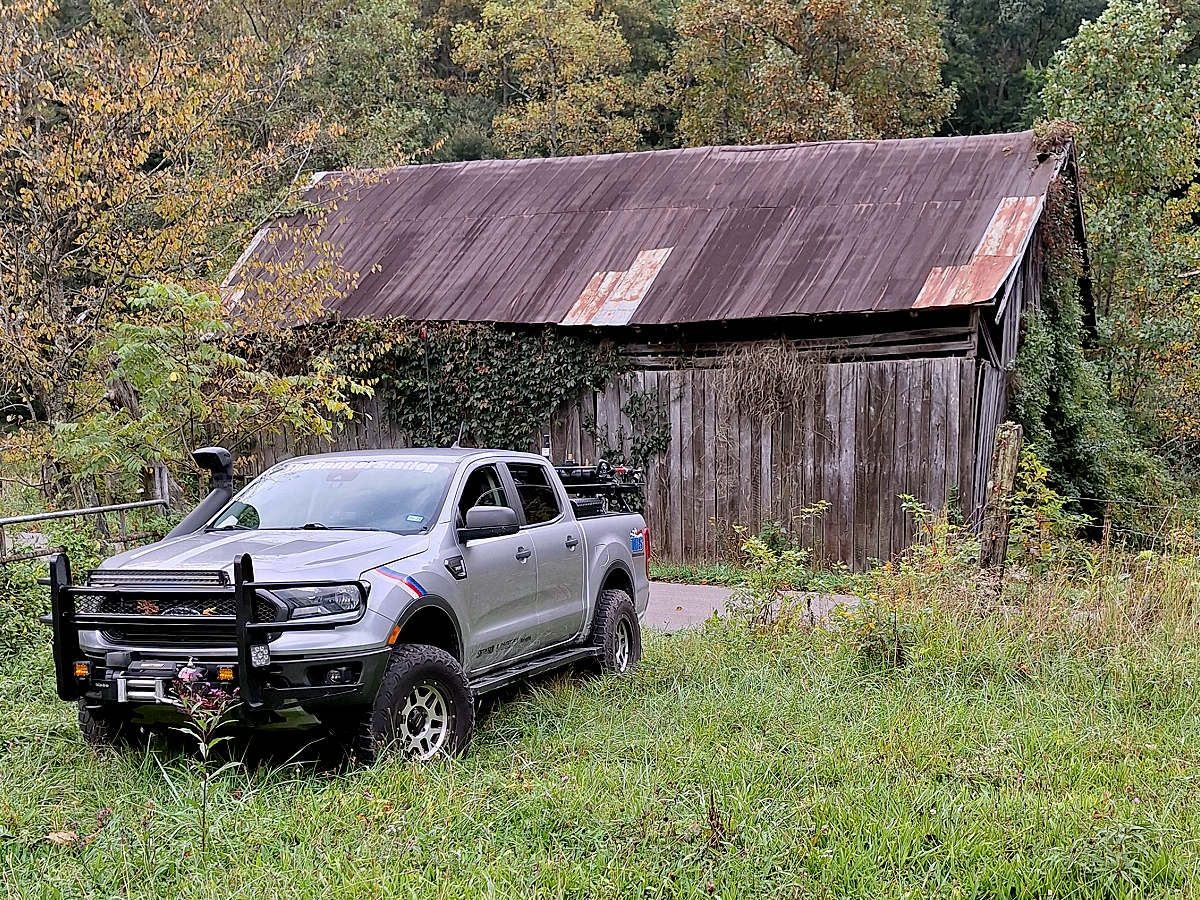
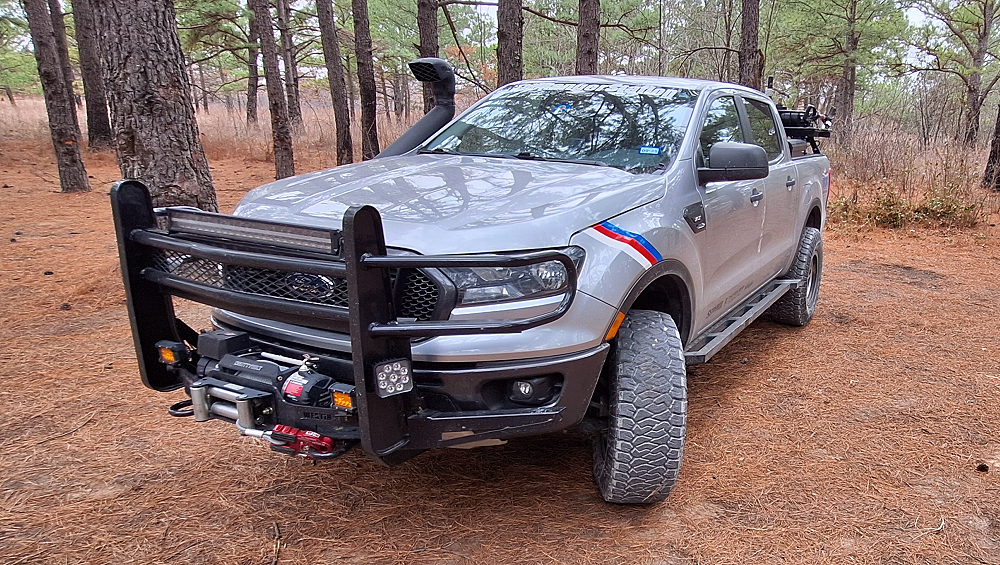
Up until now the TRS Ford Rangers all had a blue over white paint job with a red stripe separating the colors. I wanted to build this new Ranger to celebrate TheRangerStation.com 25th anniversary and decided that I wanted the truck to be silver in honor of that anniversary. I removed the FX4 logo from the bedside and replaced it with a TRS logo. I wanted it to have more of TheRangerStation.com look, so I added white, red and blue stripes to the front fenders. Why are they in this order? Because on my other Rangers the white and blue were always separated by a red stripe. While some may think these are racing stripes or think they’re just there for decoration, these stripes are actually there as a tribute to the TRS-1 and TRS-2 Rangers that came before it.
Building a purpose built and budget friendly adventure rig.
I see new trucks that look like the owners maxed out a credit card buying parts out of a catalog. Some of them are excessive and I question if they actually use all of that gear, or if it’s just for looks. When I began building this truck, I chose to build it on a budget just as I had done with my previous Rangers.
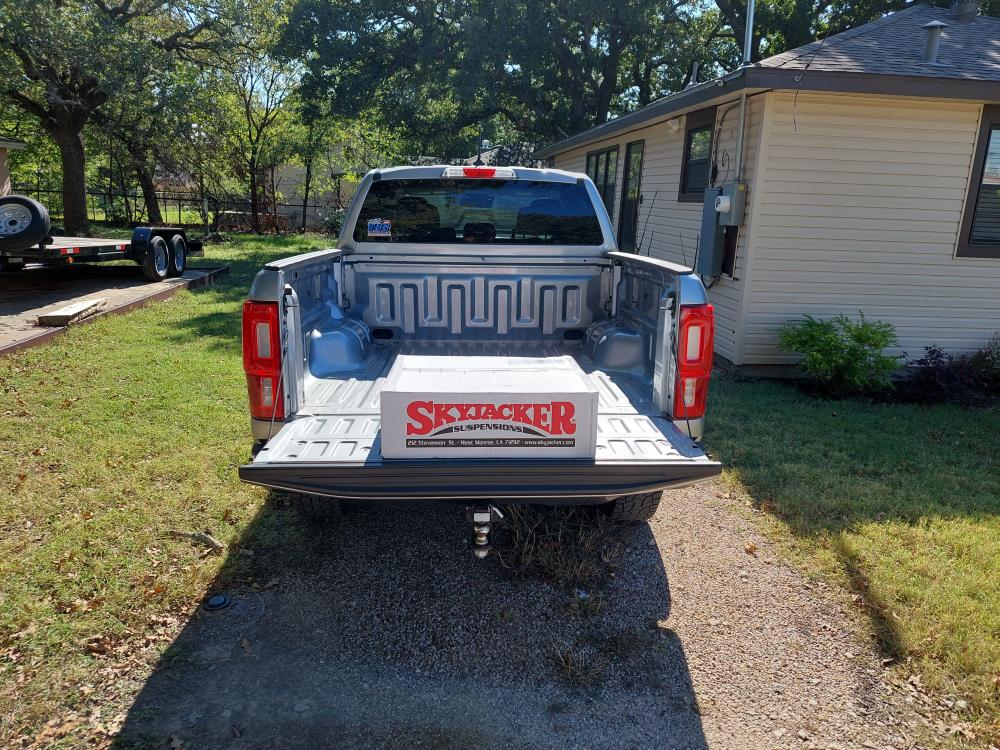
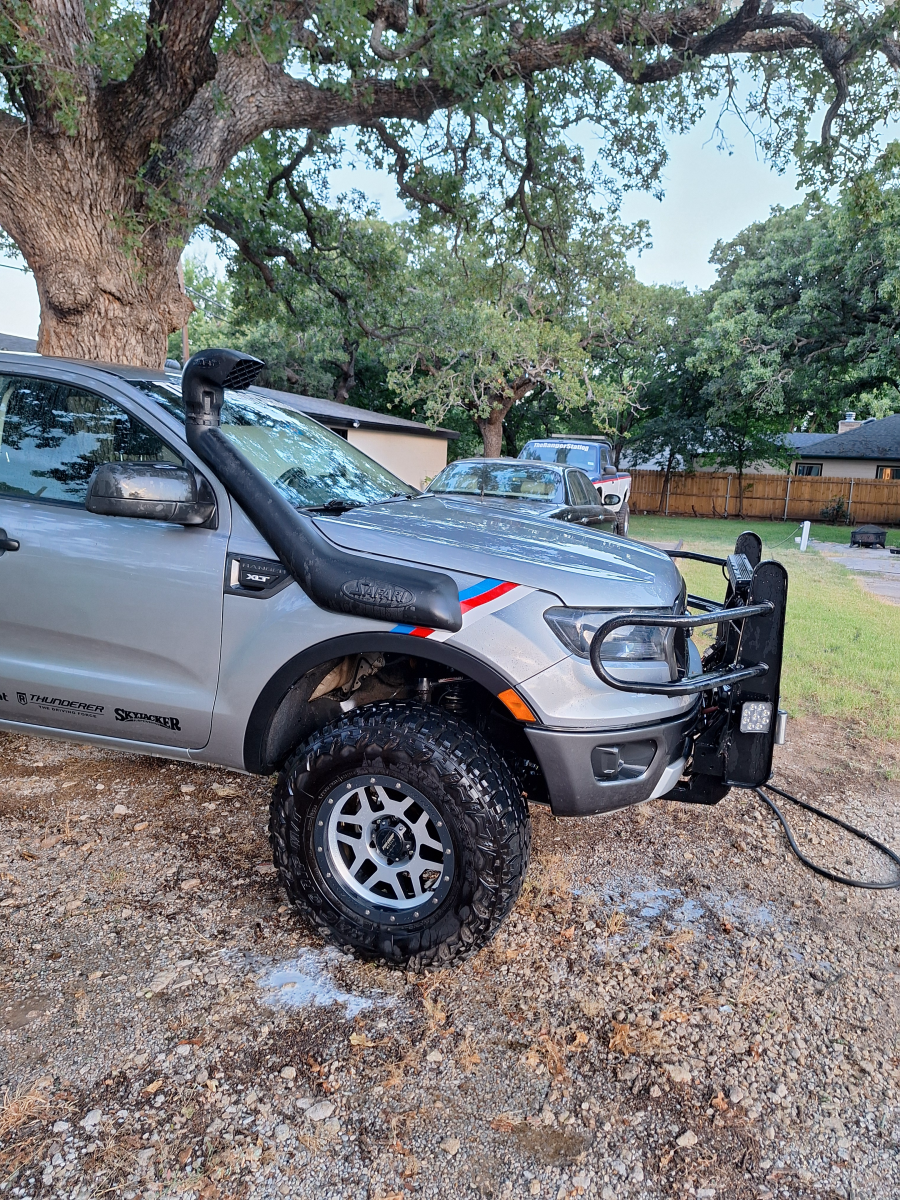
While I had no desire to beg a ton of manufacturers to sponsor this Ranger with their product, I did reach out to Skyjacker Suspension. I have used their suspension components on my Rangers since the 1990’s, and I know they make a strong and quality product. In fact, TRS-2 has used the same Skyjacker 6-inch Class II suspension since 2004 which makes it 20 years old as of 2024. Skyjacker donated their 3.5-Inch lift which features new thick-walled DOM steel tubing and gusseted upper control arms.
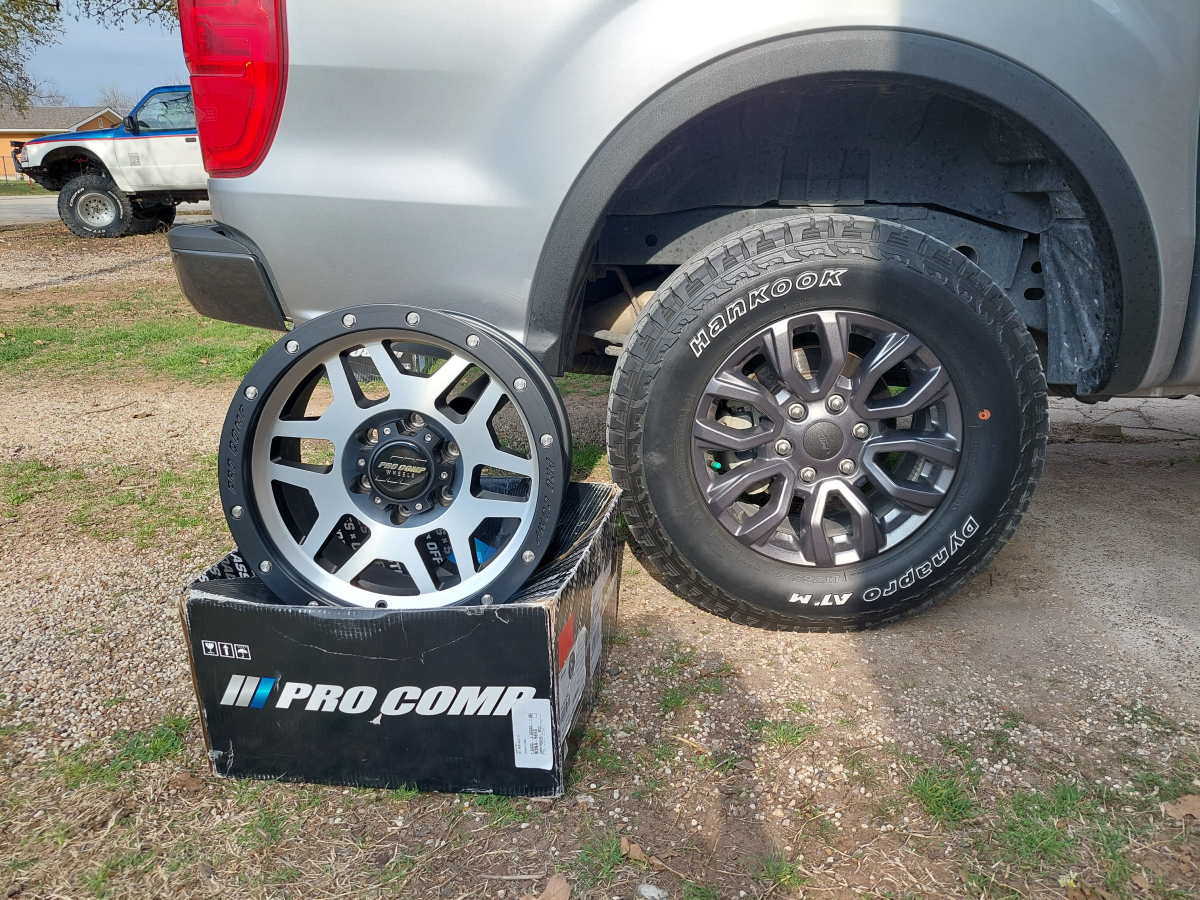
The Skyjacker 3.5-inch lift allowed for a larger tire, and the company that distributes the Americus Rugged MT mud terrains that I put on a Ford Bronco II build at Bronco Corral.com offered to give me a set of 295/70/17 (33.5 x 11.8 x 17) Thunderer Trac Grip M/T’s. I had the tires mounted on 17×9 Pro Comp 41 Series Phaser Machined Face Alloy Wheels. I had to remove the factory intrusion beams and replace them with Ready Lift notched intrusions beams. The Ready Lift notched design increases tire turning clearance and allows for up to a 285/70-17 (33-inch) tire. I had intentions on using 285’s until I was offered the set of 295’s. I will tell you that the 295’s will rub on the rear intrusion beams when you make a half turn of the tire. They don’t rub going straight or at full lock. I had to trim the rear beam to allow for more clearance.
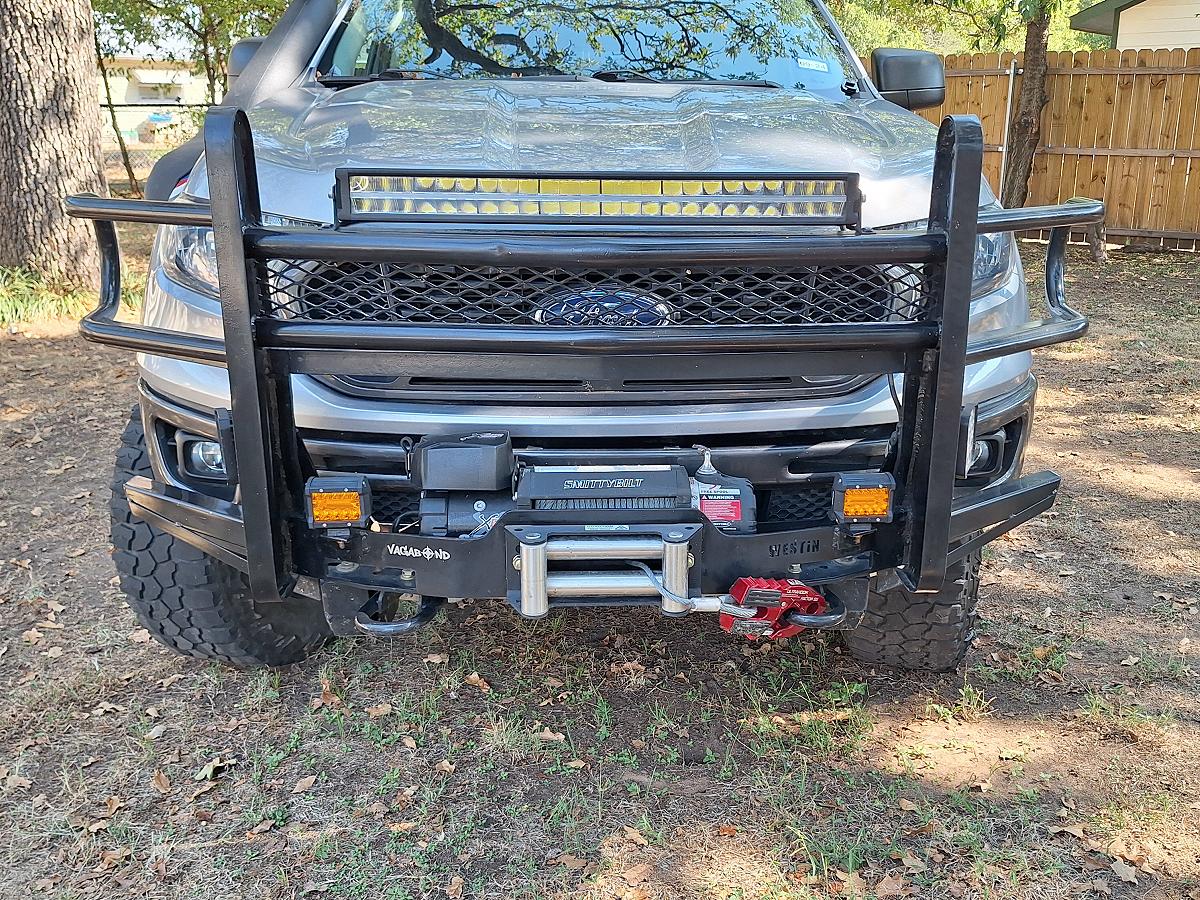
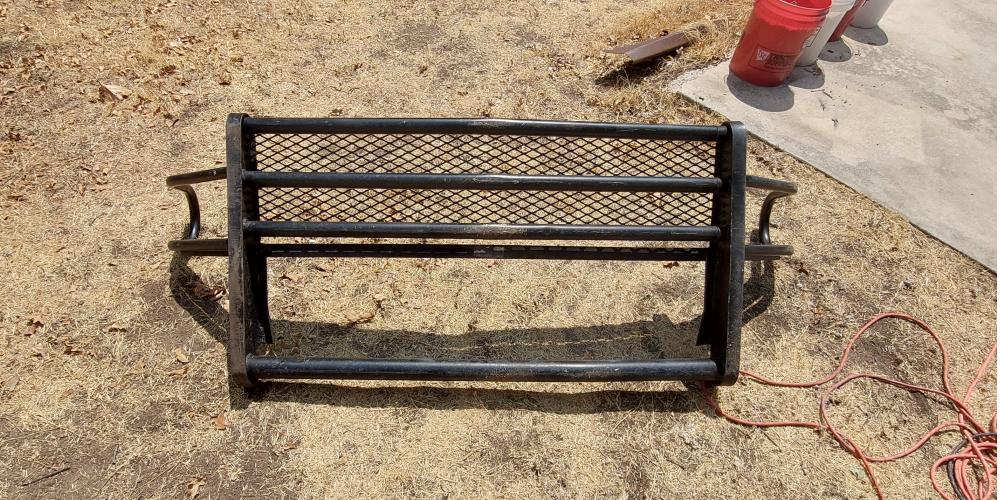
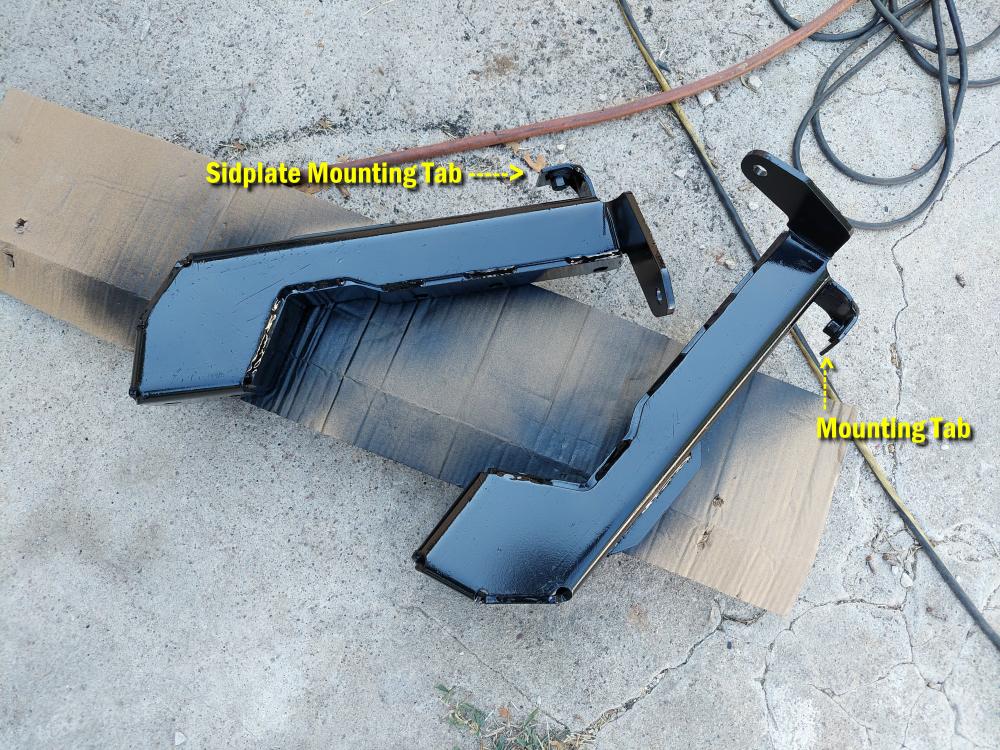
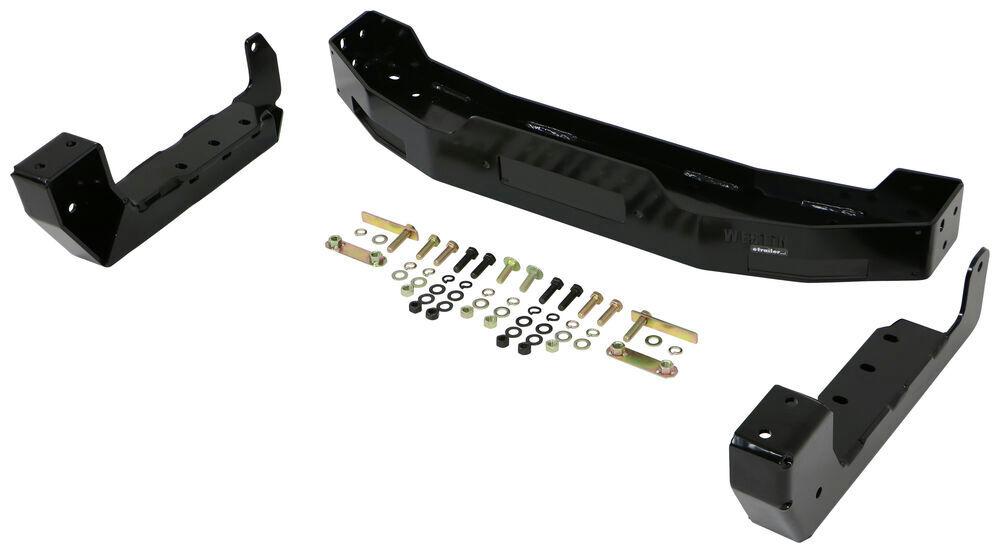
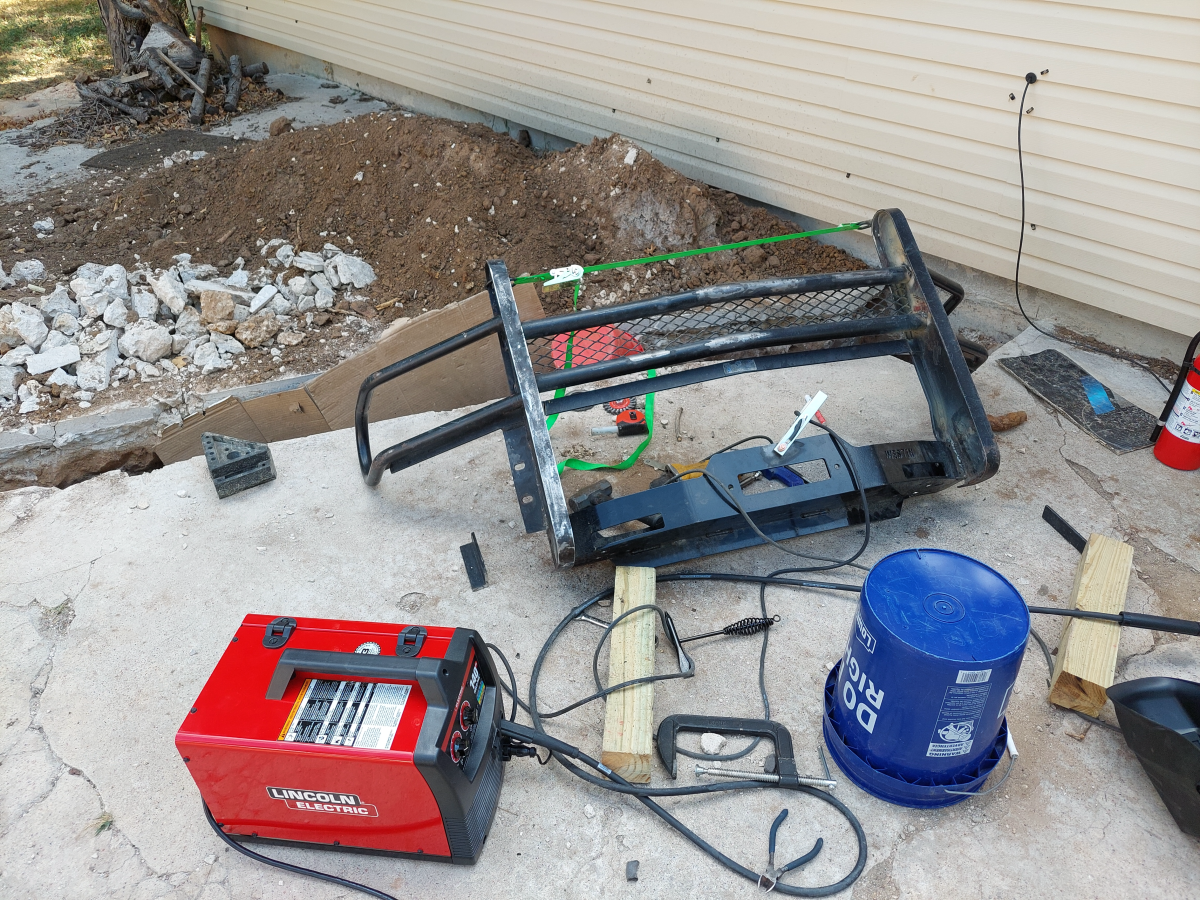
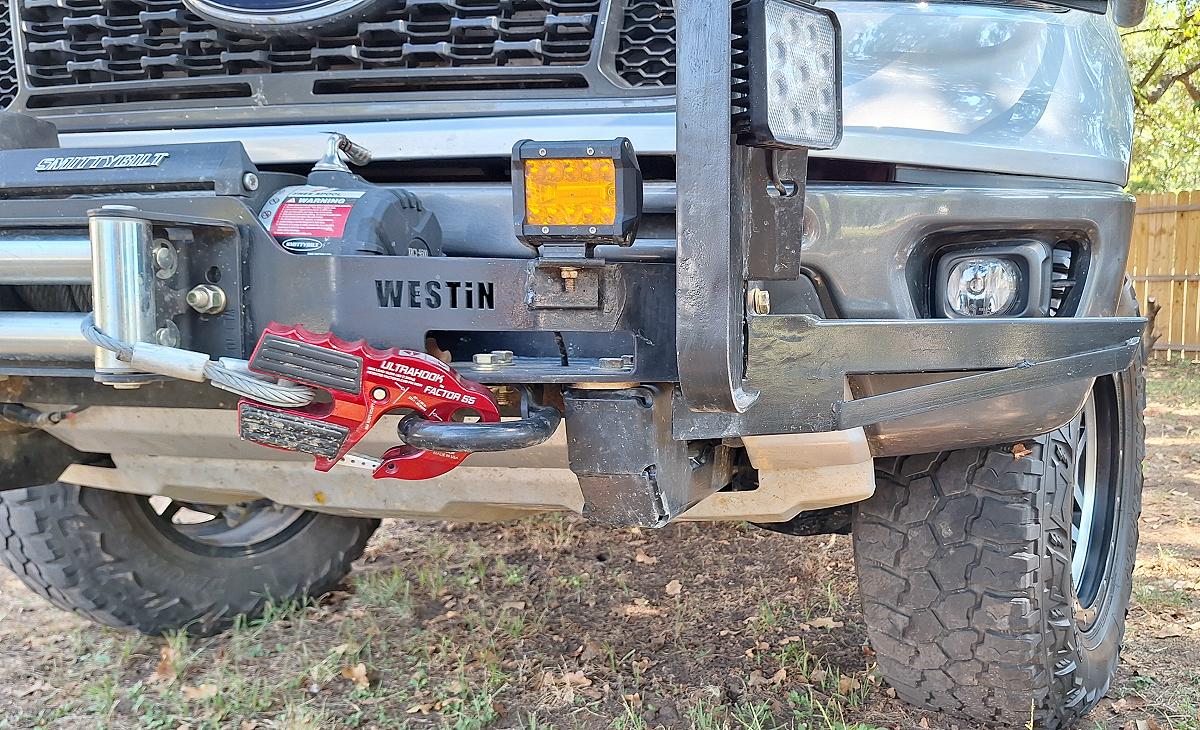
When it came time for a winch bumper, I looked at the possibility of removing the front bumper and building a whole new bumper from scratch. I decided to build something a little more retro instead. A couple of years prior I had purchased a Westin Max Winch Tray for a Ford F-150 from amazon for $100. I was going to put it on my F-150 but never used it. I decided to build a winch bumper around that. I needed a grill guard for the Ranger, so I looked on Facebook Marketplace and found a Ranch Hand grill guard from an older Dodge Ram for $50. I liked the simple hoop design for the headlights, knew Ranch Hand built some beefy stuff, and couldn’t pass up the price. The frame brackets for the F-150 winch tray bolted to the factory holes on the Ranger frame. I just had to drill new holes in the winch tray for it to mount on top of them. For the grill guard, I cut the tubes out between the uprights, removed the top and bottom tubes, and removed the metal screen between them. Then I narrowed the two tubes in the middle and welded it all back together effectively narrowing the grill guard to match the width of the Ranger. Then I welded the grill guard to the Westin winch tray and braced it with some steel angle. I had to remove the factory tow hooks to mount the winch plate, and the tow hooks have a bracket on the rear of them that the skid plate mounts to. So, I had to cut those brackets off and weld them to the winch plate mounts so I could bolt the skid plate back on. A winch bumper would cost $800 or more and one with a grill guard would cost way over $1,000. I have less than $300 in mine.
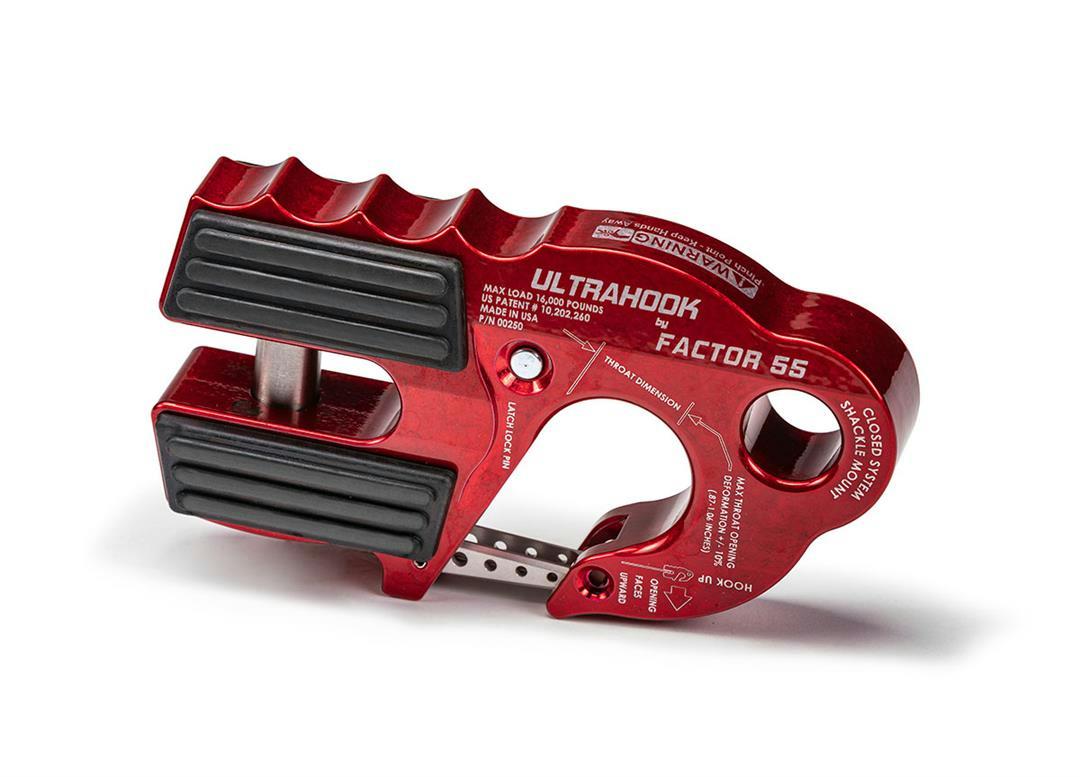
With the grill guard mounted, it was time for a winch. I had a Smittybilt 9.5K winch that I removed from my car hauler before I sold it, so I mounted that winch on the winch plate. Although I would have loved to have bought a larger winch, the 9.5K is strong enough to get the job done and had never been used. The winch is equipped with a Factor 55 Ultrahook which features a shackle mount hole machined into the body of the hook.
The grill guard also provides plenty of space for a Nilight 30-Inch LED lightbar. I’ve mounted lights above the cab and on the windshield posts, but they either create a glare on the hood, or whistle in the wind. You’ve probably seen trucks and Jeeps with ditch lights mounted at an angle near the windshield posts. I used Nilight 4-inch LED lights and mounted them as ditch lights at an angle on the side of the grill guard. Each of the lights can be turned on and off individually. The headlights and driving lights on the Ranger have been upgraded to LED as well.
Although I didn’t make any major upgrades to the rear bumper, I did bolt a set of Ford factory tow hooks to the rear of the frame. I don’t understand why Ford provided tow hooks on the front of the vehicle and not the rear, but it wasn’t difficult to add them.
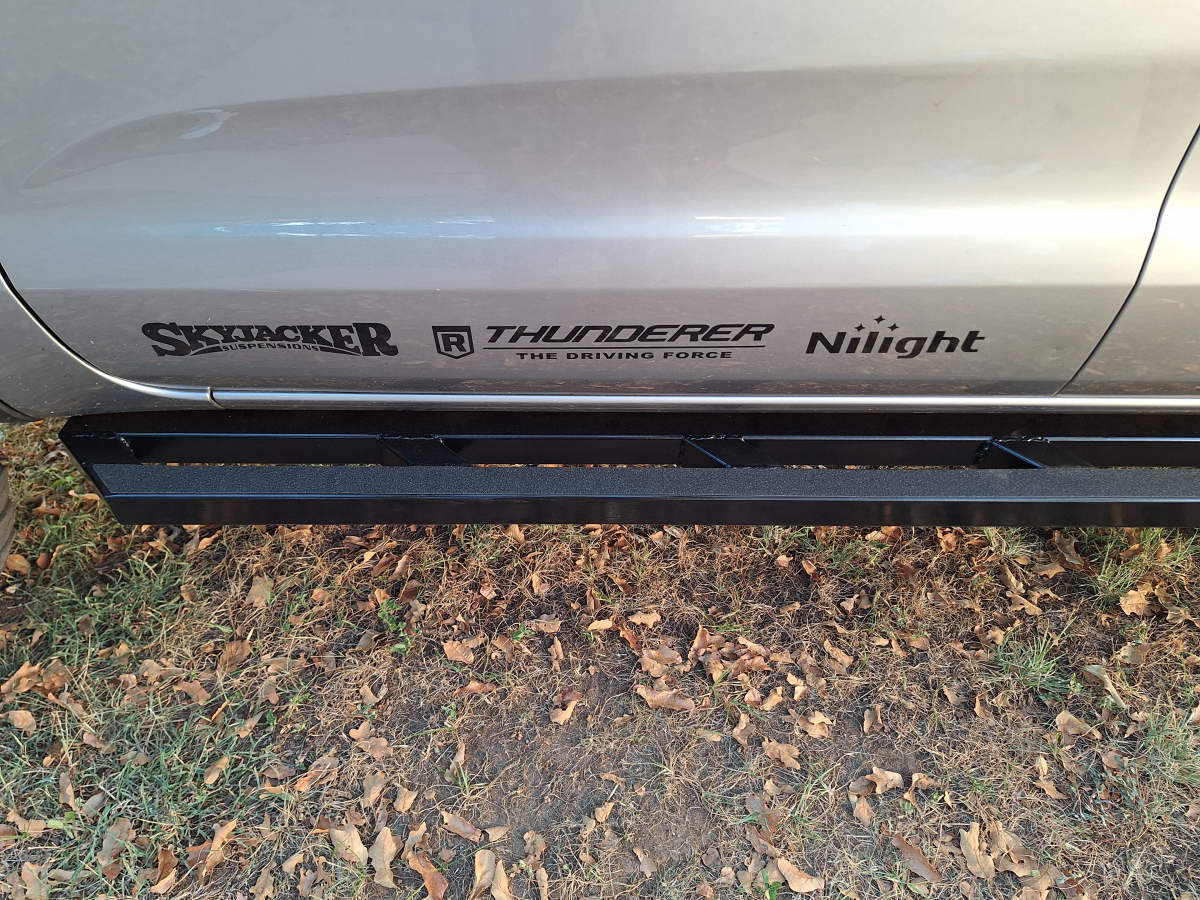
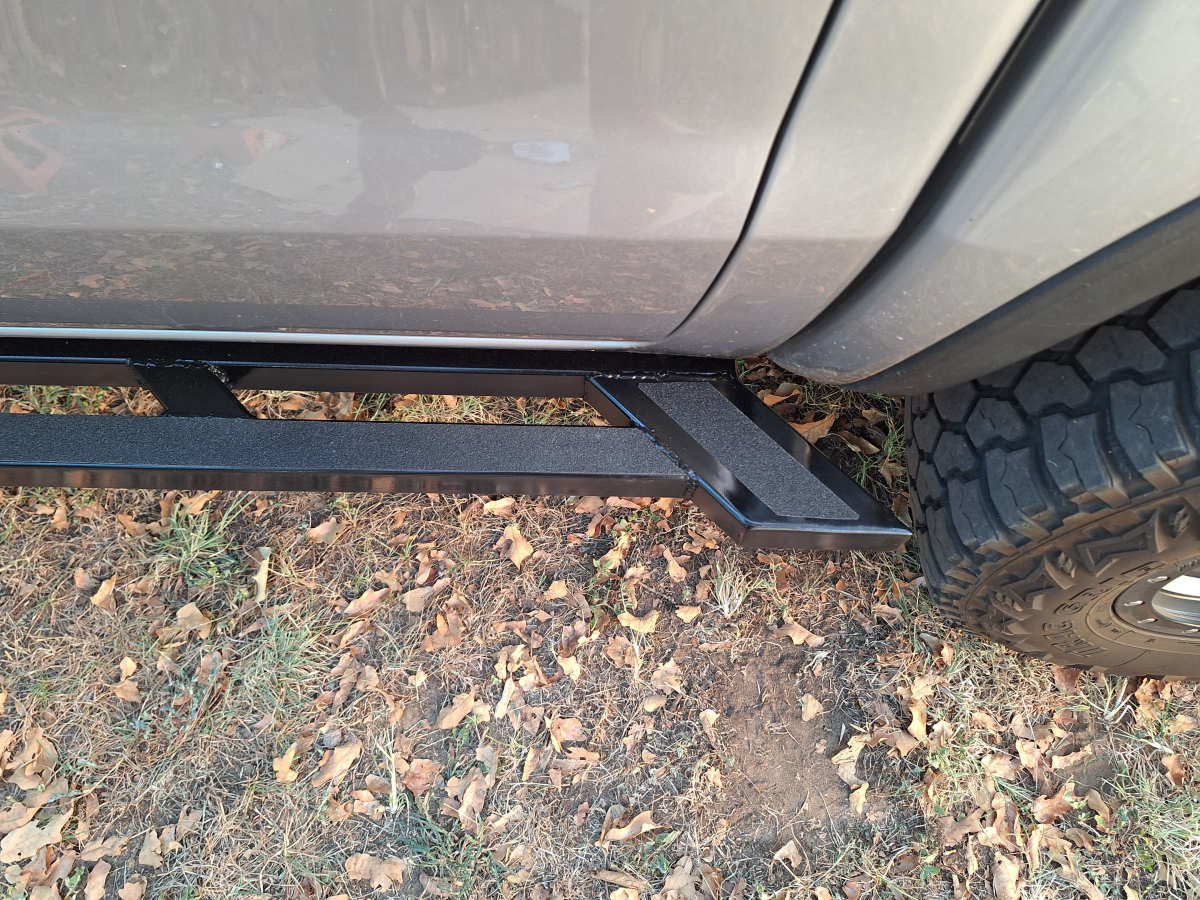
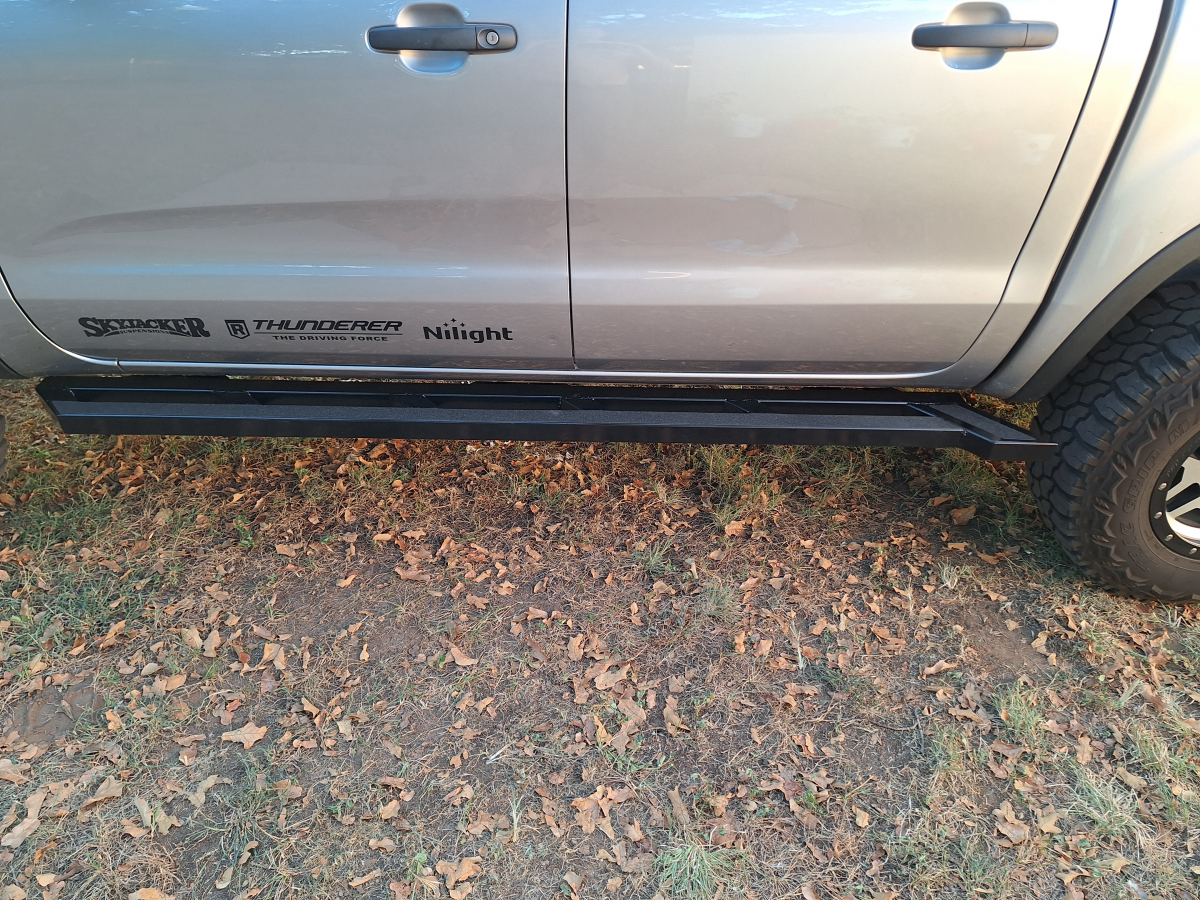
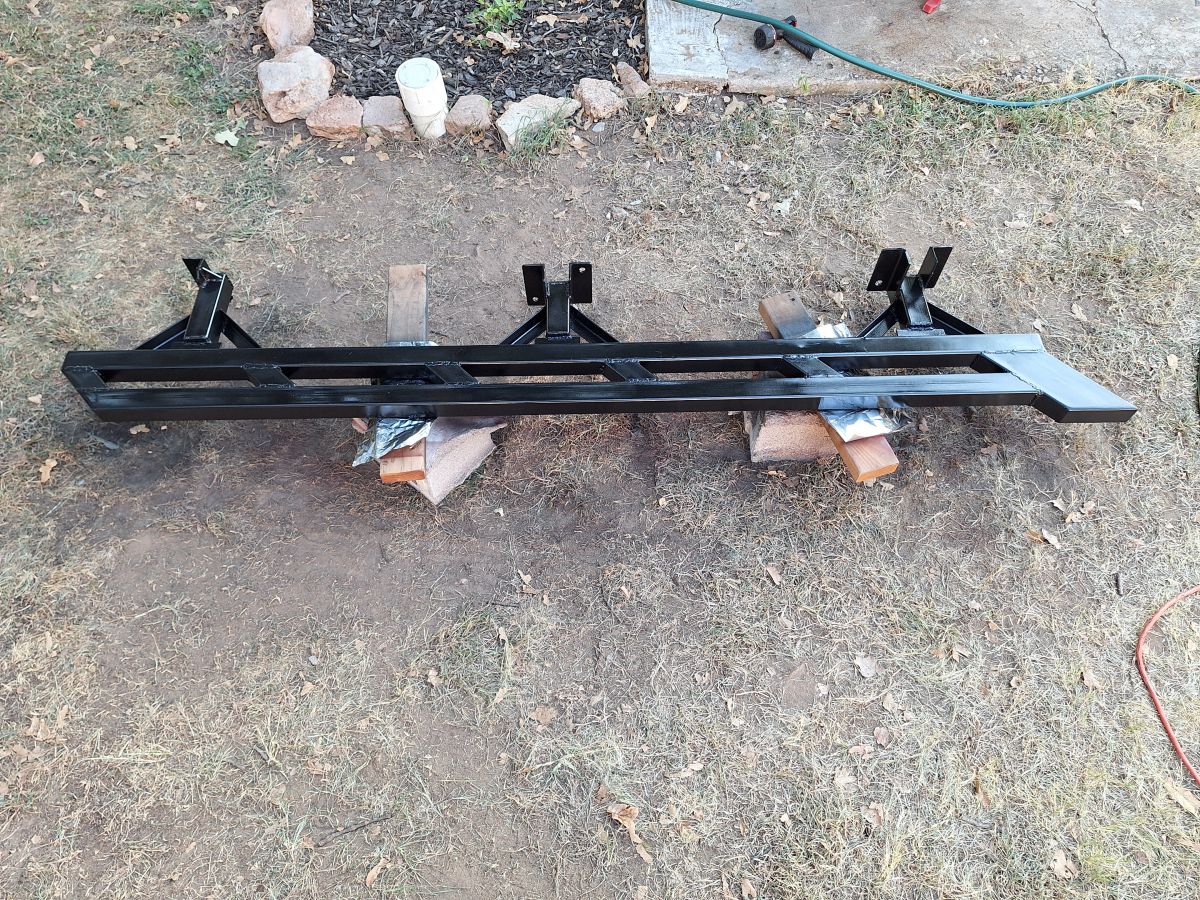
In order to protect the side of the Ranger I decided to make rock sliders out of 2-inch .120 wall steel tubing. There are two rows of tubing with pieces of 2-inch tubing between them to space them 2-inches apart from each other, and then there is an angled kick out at the rear to help push the truck around obstacles. Three 2-inch tubes with 3/16-inch angle on the ends allow the sliders to be bolted to the frame and the tubes are braced with more steel angle.
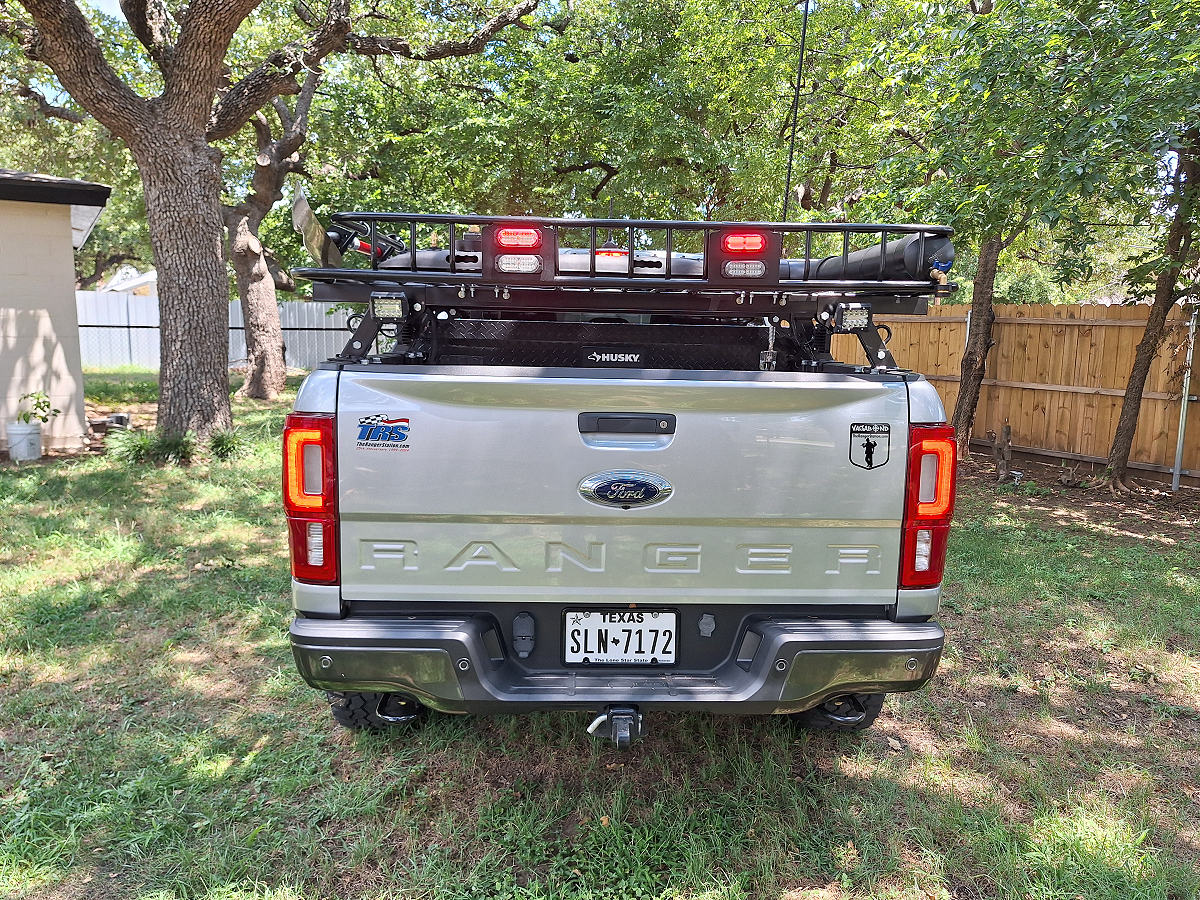
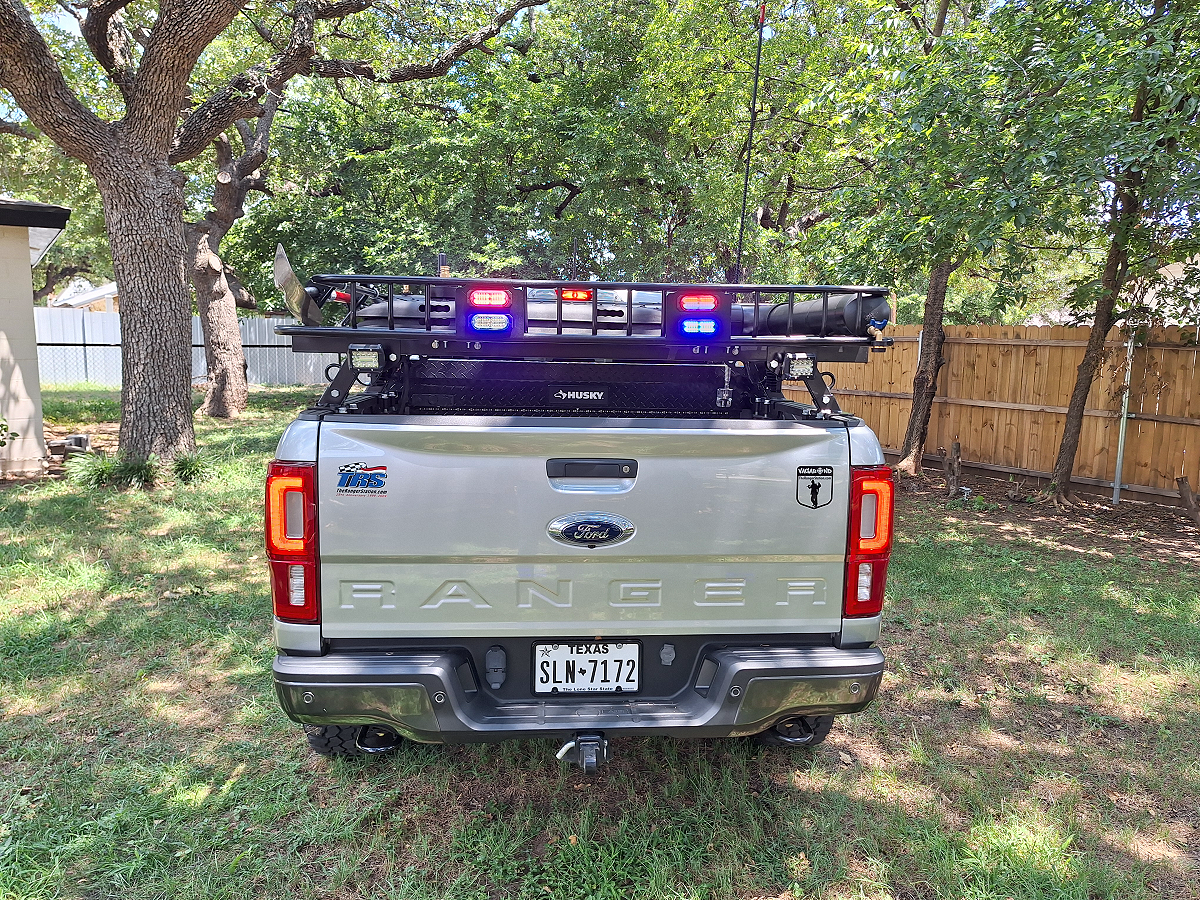
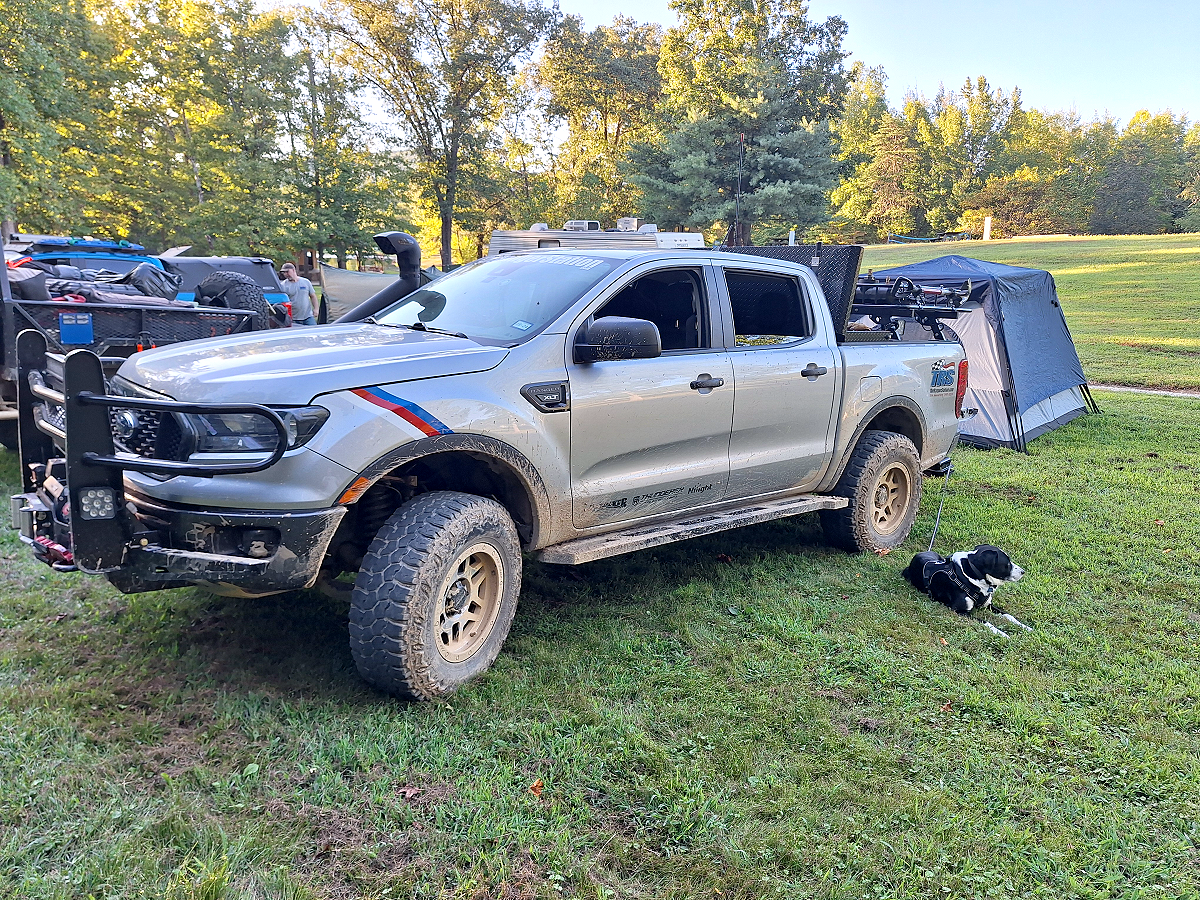
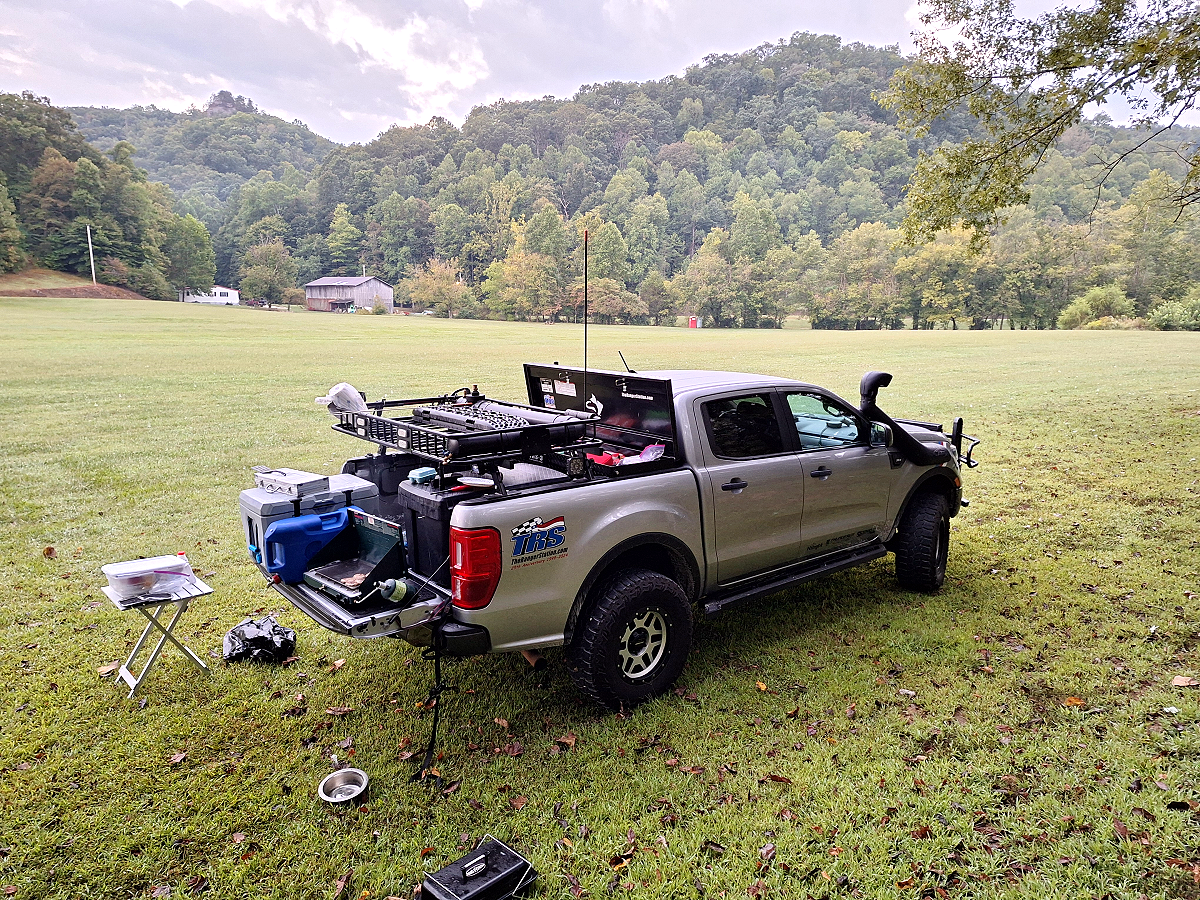
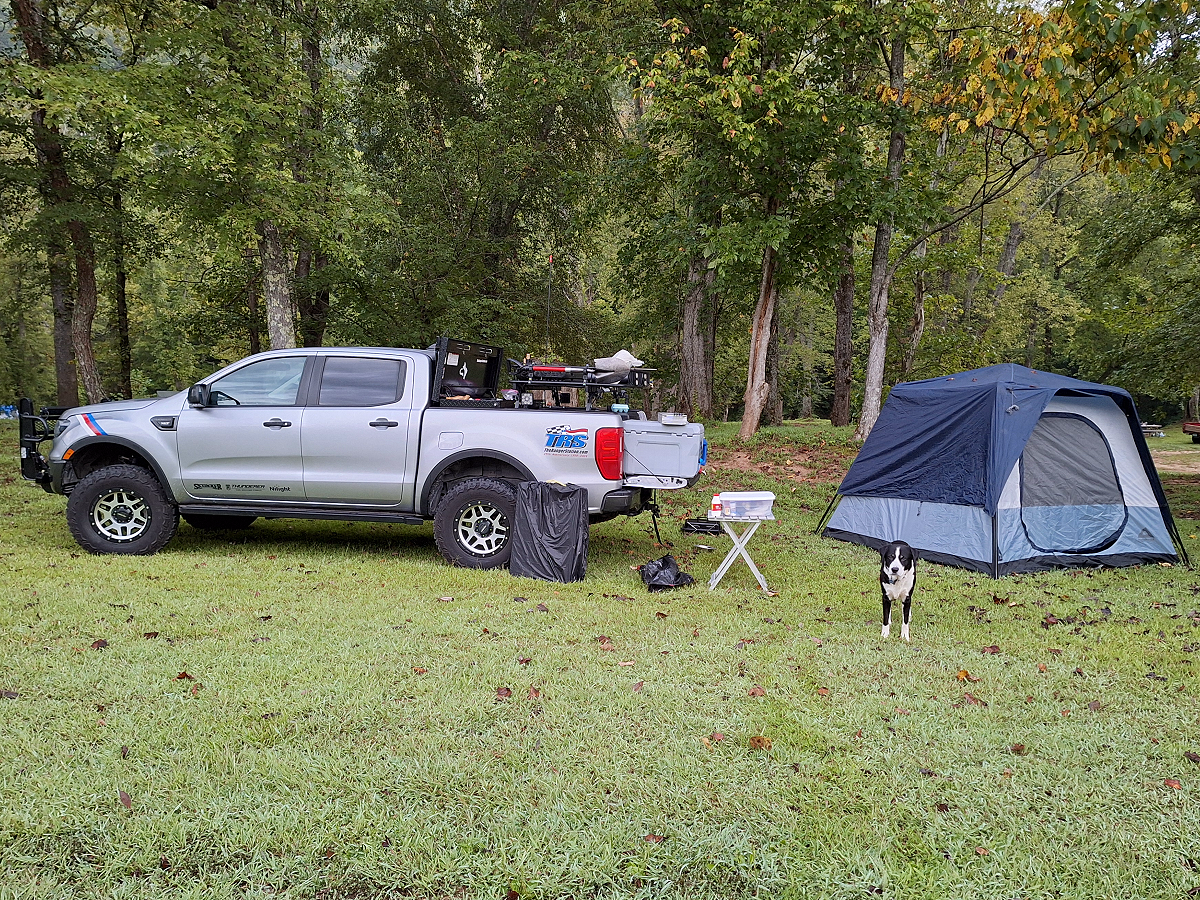
Over the bed you’ll find Elevate Truck Bed Cross Bars with an Arksen 64″x 39″ metal basket mounted on top of it. I bought them individually from Amazon for a total cost of $300. The bars have an 800-pound weight limit which is more than enough for what I need. An ‘Overland’ rack will cost you $800 or more, so I made my own.
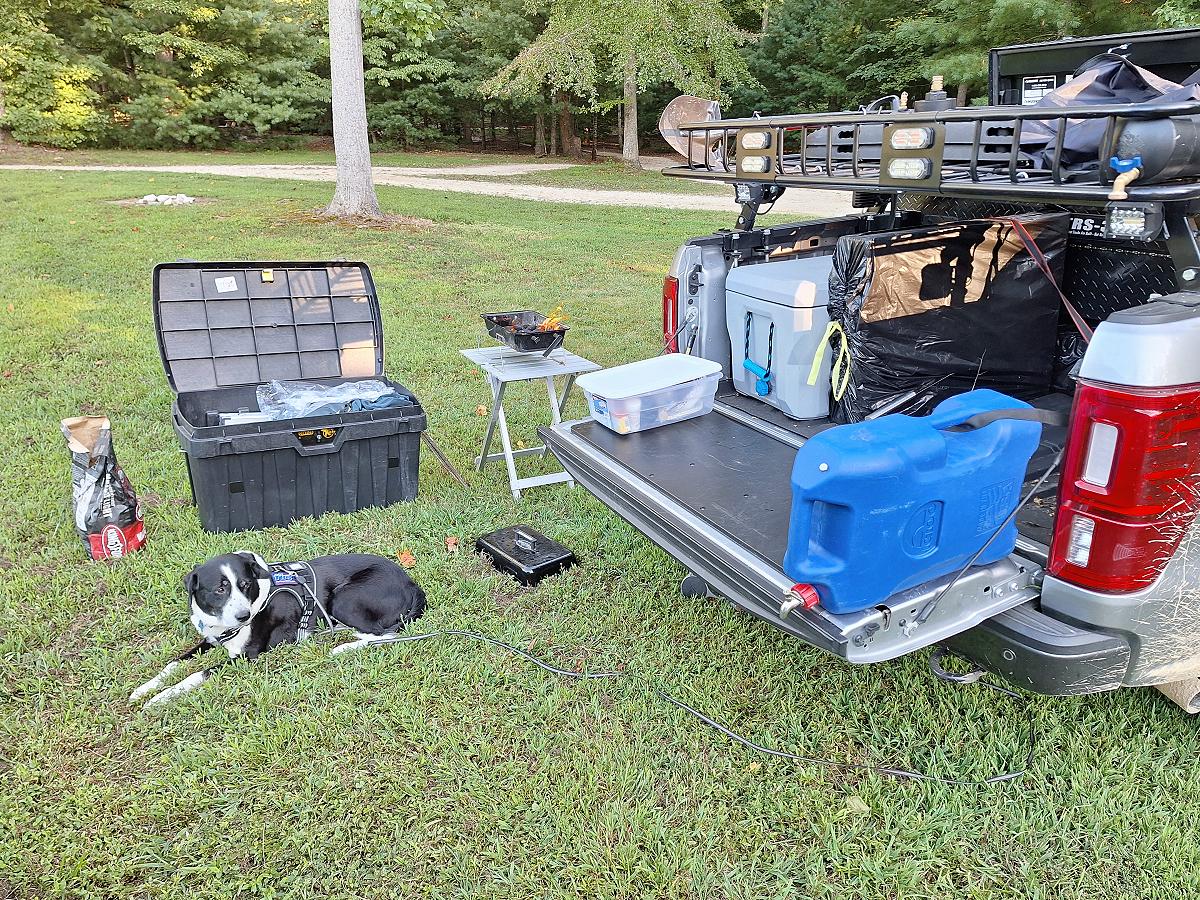
Inside the basket sits a shower/water supply made out of 4-Inch PVC that holds just over 4.5 gallons of water. It includes a fill connection, Shrader valve to pressurize it, a 125-psi pressure relief valve, and a 1/4 turn spigot that has a quick release water hose connection. It comes in handy when I’m on a trip and want to get more water for the dog without wanting to get out my 6-gallon water jug. If I want to use it as a shower, I connect a CYCPLUS rechargeable bicycle pump to it and set it to 30 psi. I have a 6-foot garden hose with an adjustable spray nozzle that allows me to rinse myself off. The basket is also home to a pair of X-Bull recovery traction tracks and a shovel that’s held in place with a set of Quick Fists.
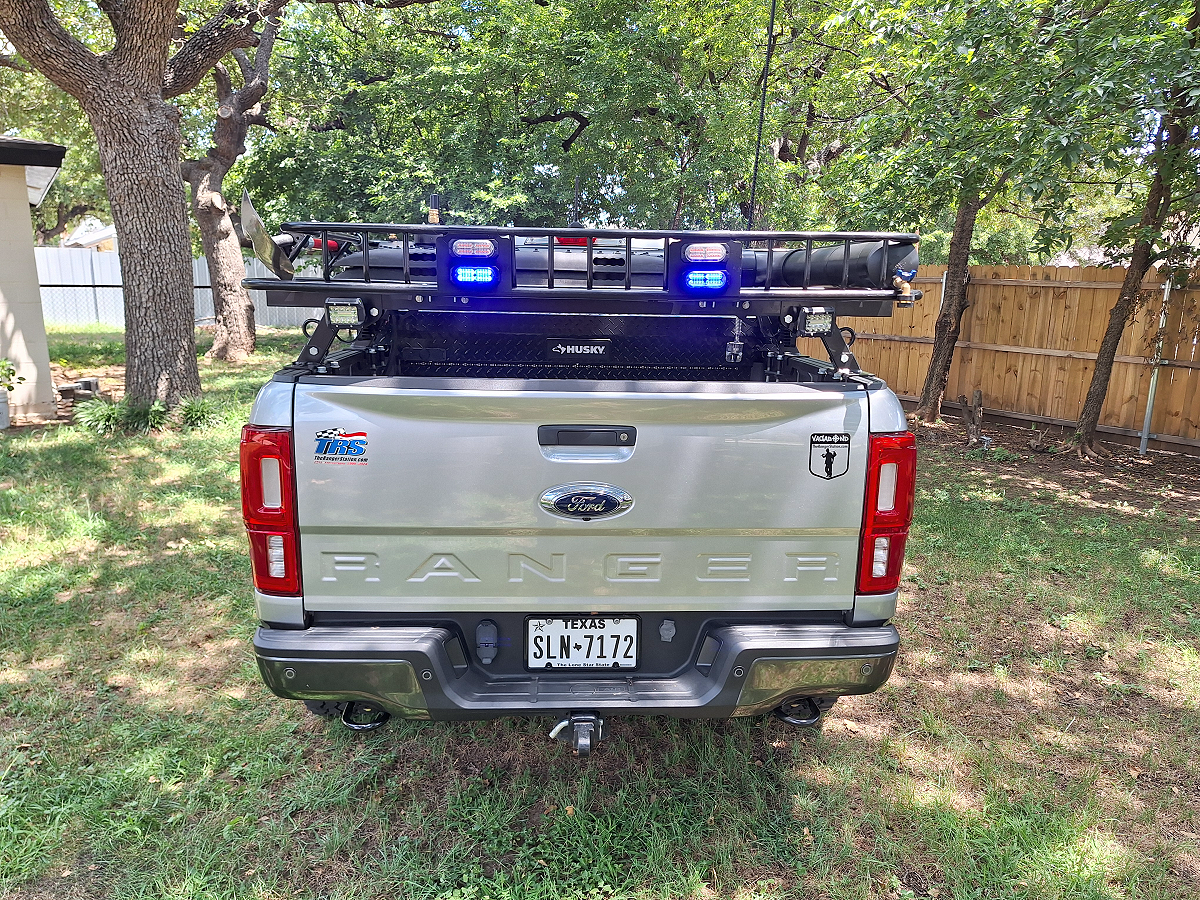
Since the rack and its contents can possibly block the third brake light, I added a pair of Xprite red LED lights to the rear of it and connected them to the brake light wiring at the taillight plug. There’s also a set of blue Xprite LEDs mounted below the red LEDs that can be turned on during dusty trail conditions for added visibility and safety. Blue and amber is also an approved color for vehicles working along the side of the road here in Texas.
On the rear of the cross bars is a set of Nilight 4-inch 60W flood/spot combo LED lights. These provide more lighting when backing up on a trail, setting up camp, or anytime I need to work behind the Ranger at night. These lights use a waterproof relay mounted under the truck that is triggered by either a dash switch or a Nilight remote control so that I can turn them on and off from outside of the truck. I mounted a Nilight 4-inch square LED work light on the driver and passenger side of the bed bars along with a waterproof toggle switch so that I can light up the areas around the sides of the truck at night. I used the 12v power supply plug at the left rear side of the frame rail to power the lights. That plug is there because Ford offers a 12v outlet in the bed. This truck didn’t come with one, but the power is there. The power here isn’t on all of the time, so I went into the trucks system with Forscan and adjusted its timeout so that the power is available for up to 2-hours after the truck is shut off.
I needed a way to be able to disconnect all of this lighting in the event that I wanted to remove the bed bars and rack from the bed. I created a wiring harness covered in heat shrink with a CURT 58080 trailer side 6-pin round wiring harness plug on the end of it. I mounted a CURT 58090 vehicle side 6-pin round trailer wiring harness socket on the inside of the bed so I can unplug the harness and easily remove the rack.
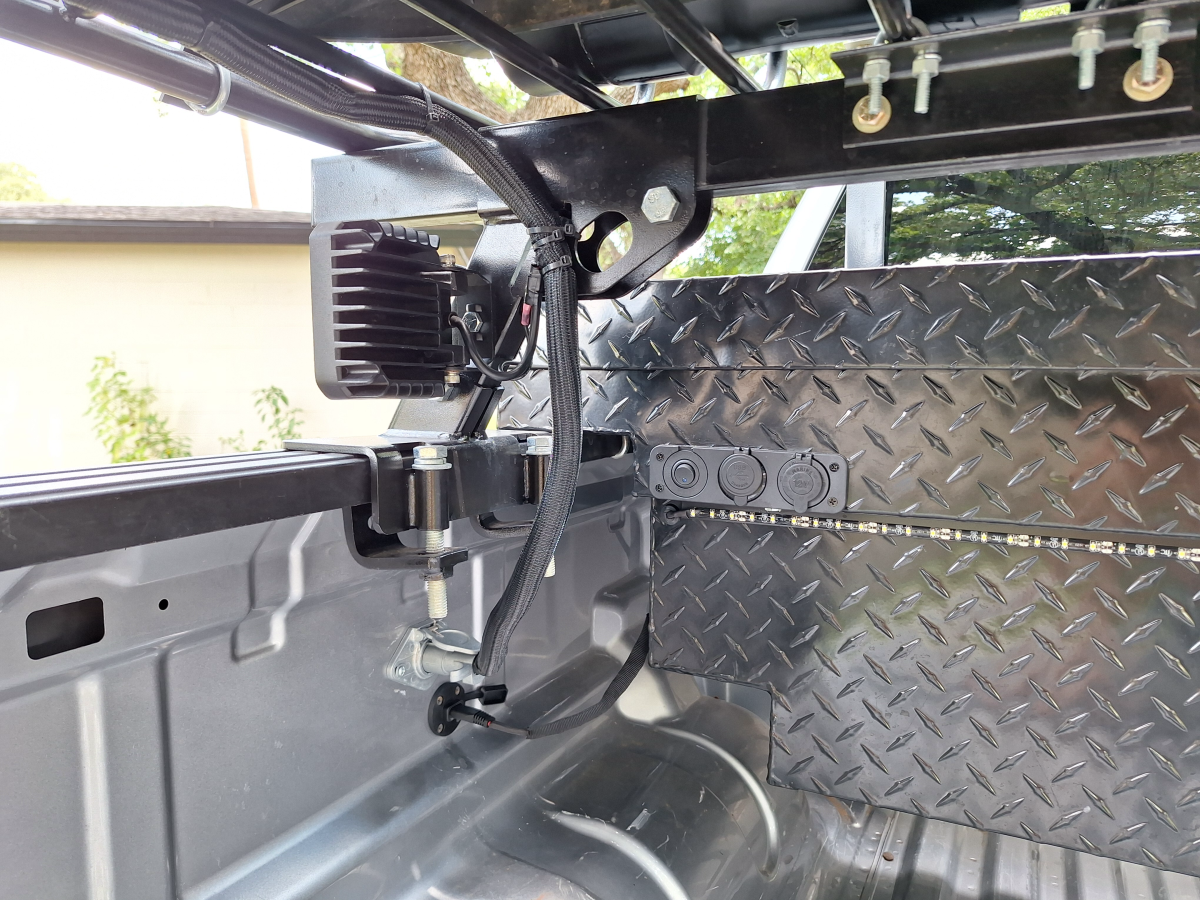
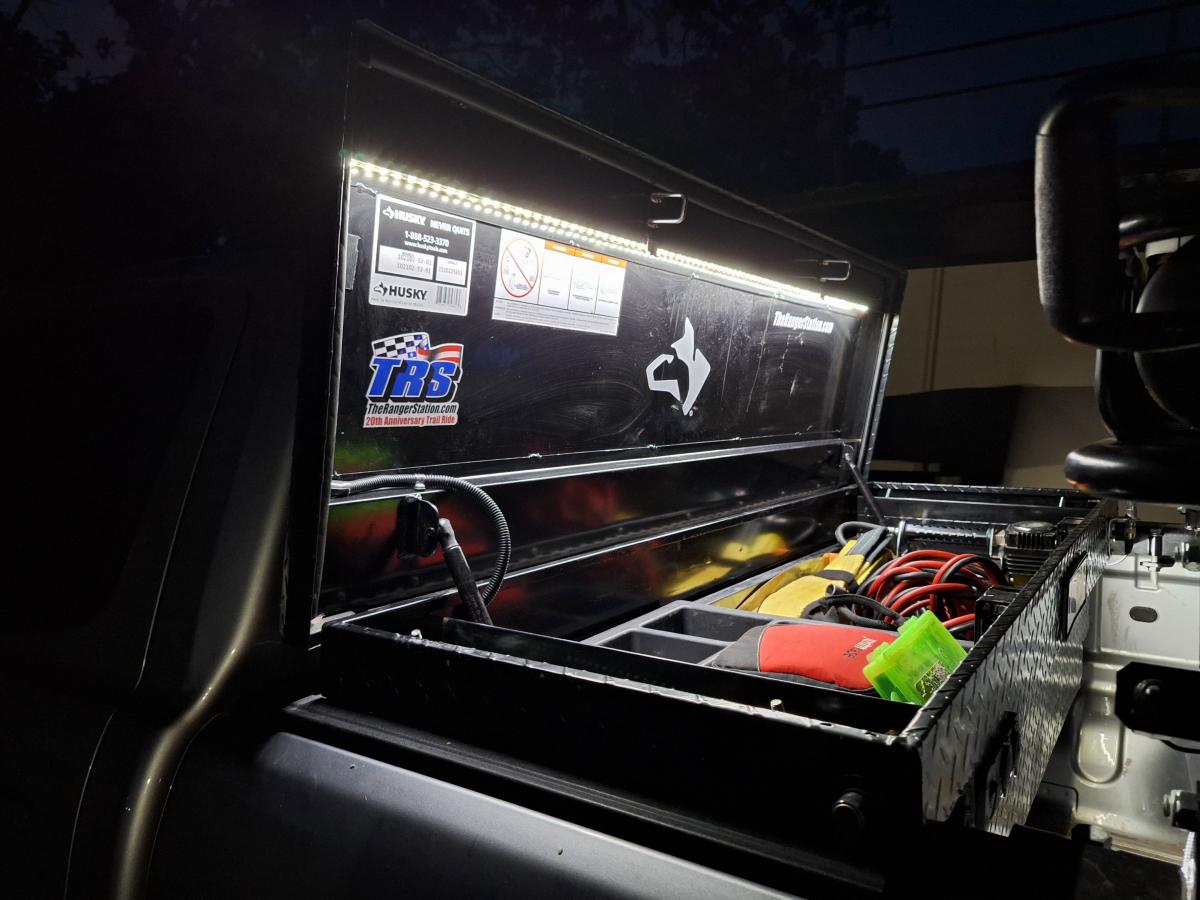
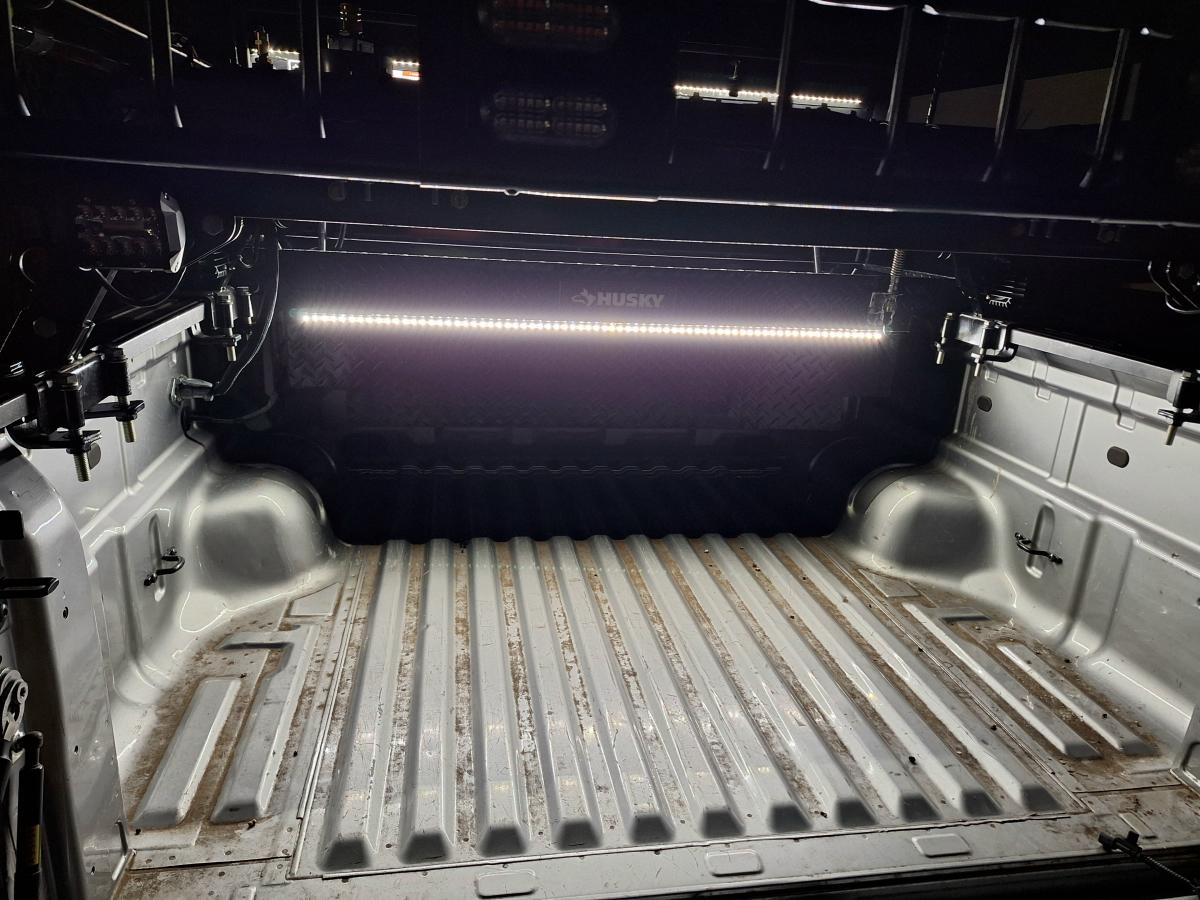
I added a Husky aluminum truck toolbox to the bed for extra storage capacity. Inside the toolbox you’ll find a SmittyBilt 5.65CFM SB2781 Air Compressor, a mounted fire extinguisher, and various tools depending on what I’m doing. The toolbox is also home to the brackets that hold the Firestik 4-Foot CB antenna and Midland MXTA25 3DB Gain NMO GMRS Ghost Antenna. There is an LED light strip inside of the toolbox lid to light the inside of the box up at night, as well as a LED light strip on the front of the toolbox to light up the bed. The toolbox also has a 12-volt outlet and USB charging port. I know that some people want an outlet in their bed and they’re usually near the tailgate. I didn’t want the outlet in a position where I wouldn’t be able to get to it if the bed was loaded, so I mounted it in the top left corner of the toolbox. This charging port is also powered by the 12v accessory wire on the frame rail. I used a weatherproof 12 AWG electrical connecter mounted on the inside of the bed and on the toolbox so that I can unplug it if I should need to remove it.
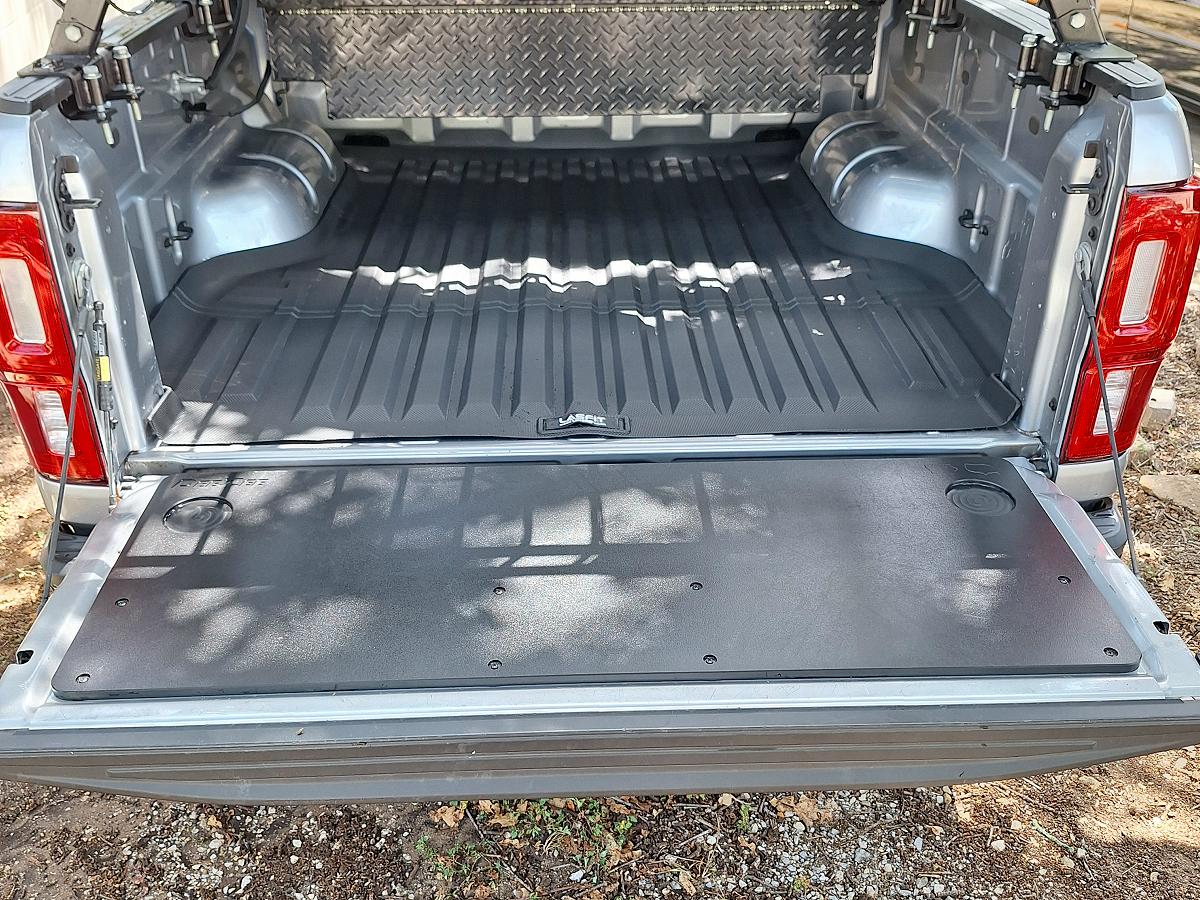
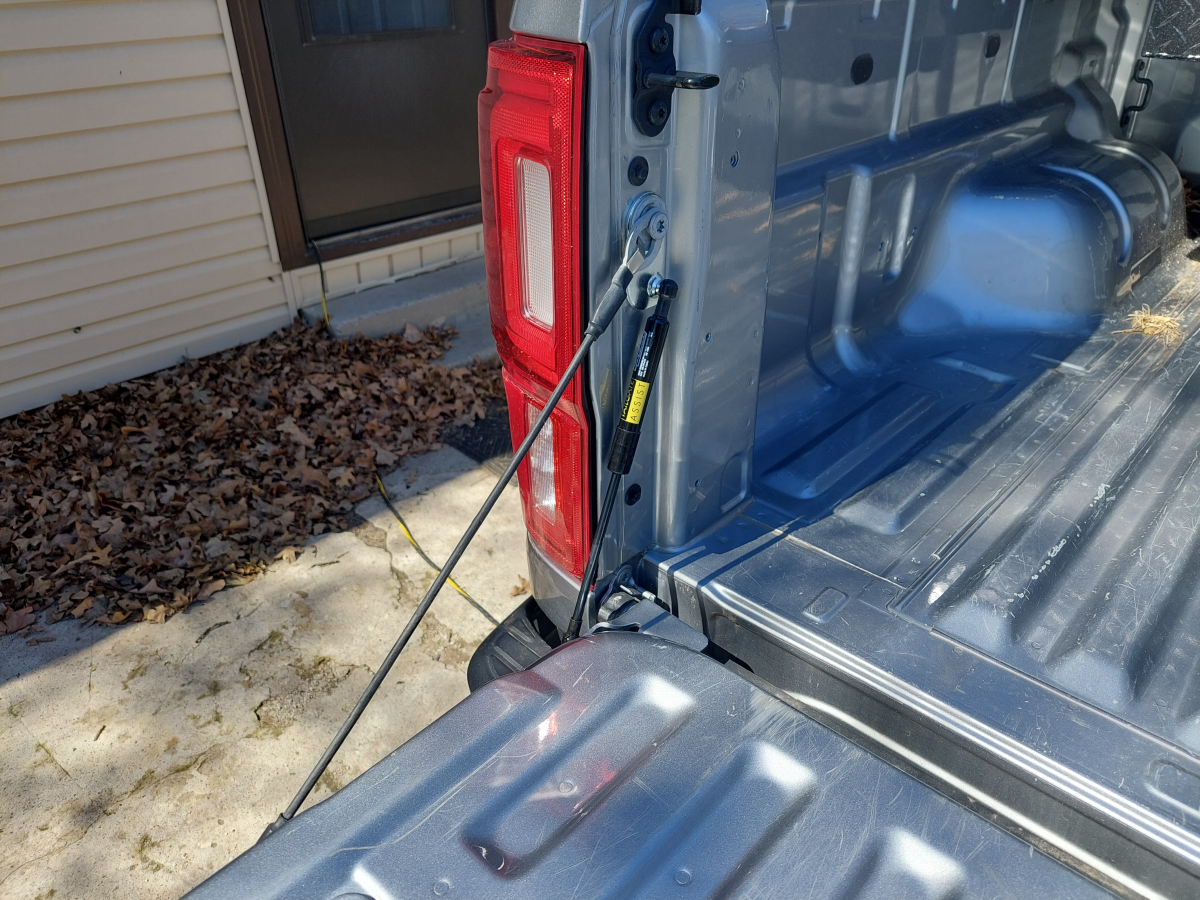
I upgraded the tailgate with a Dee Zee tailgate assist that allows the tailgate to open smoothly and not just drop. I also added a Dee Zee polymer tailgate board which allows the tailgate to function as a table or countertop. This makes preparing and cooking food at the campsite much easier.
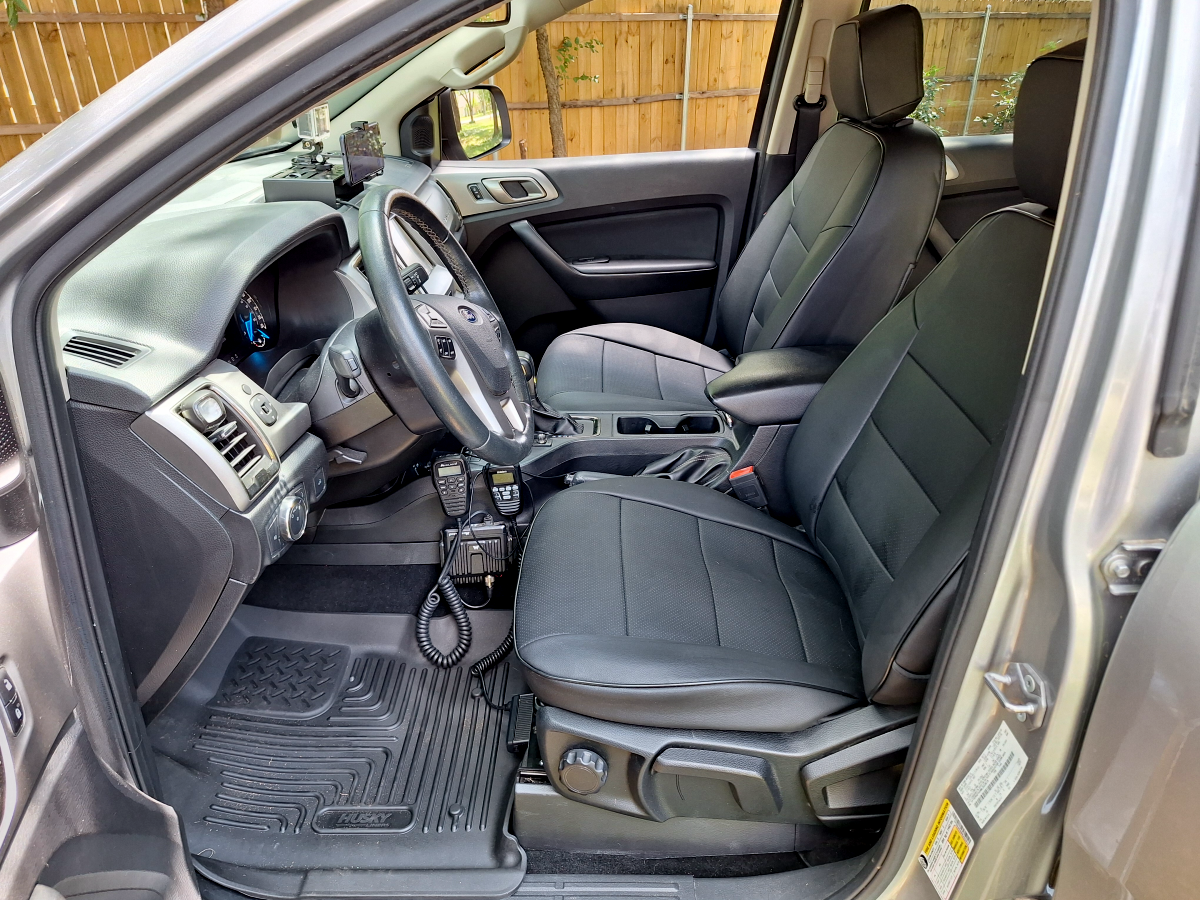
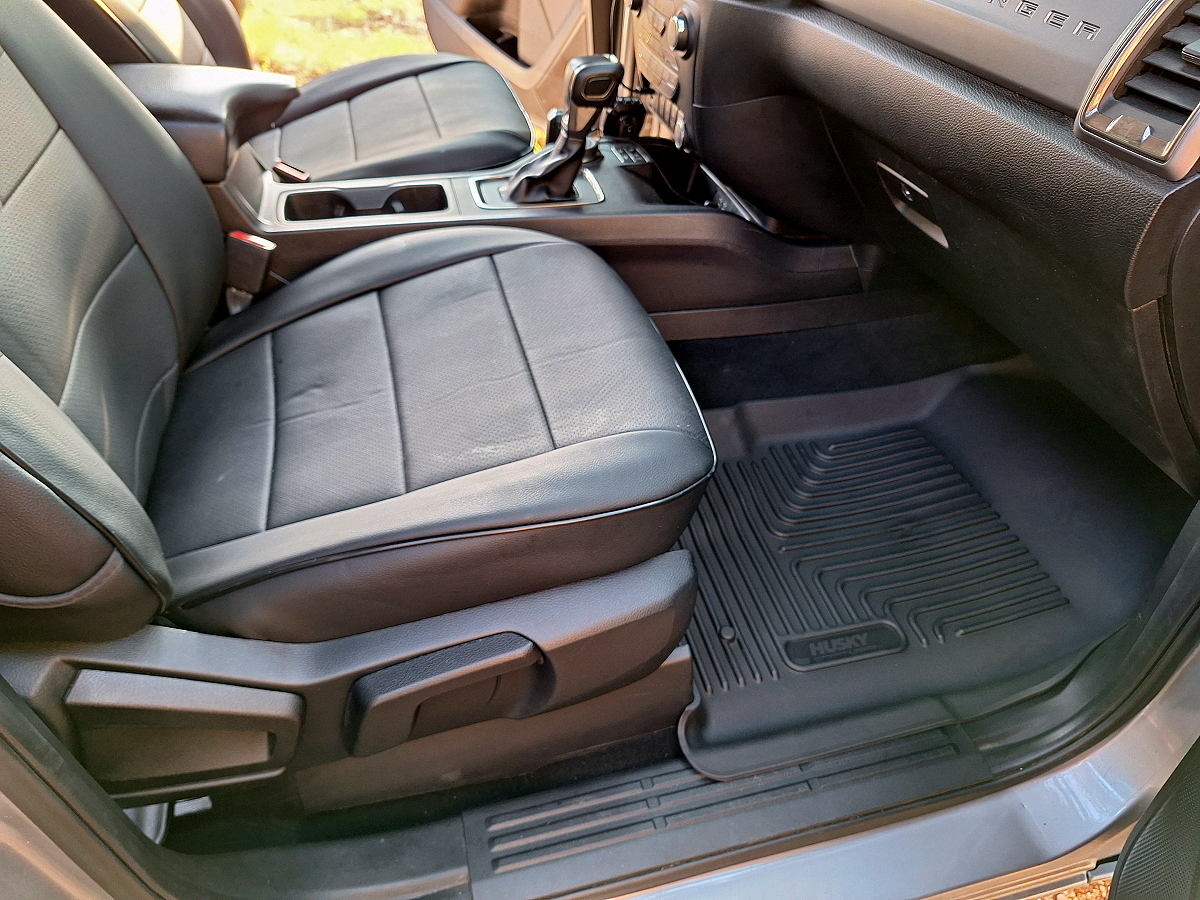
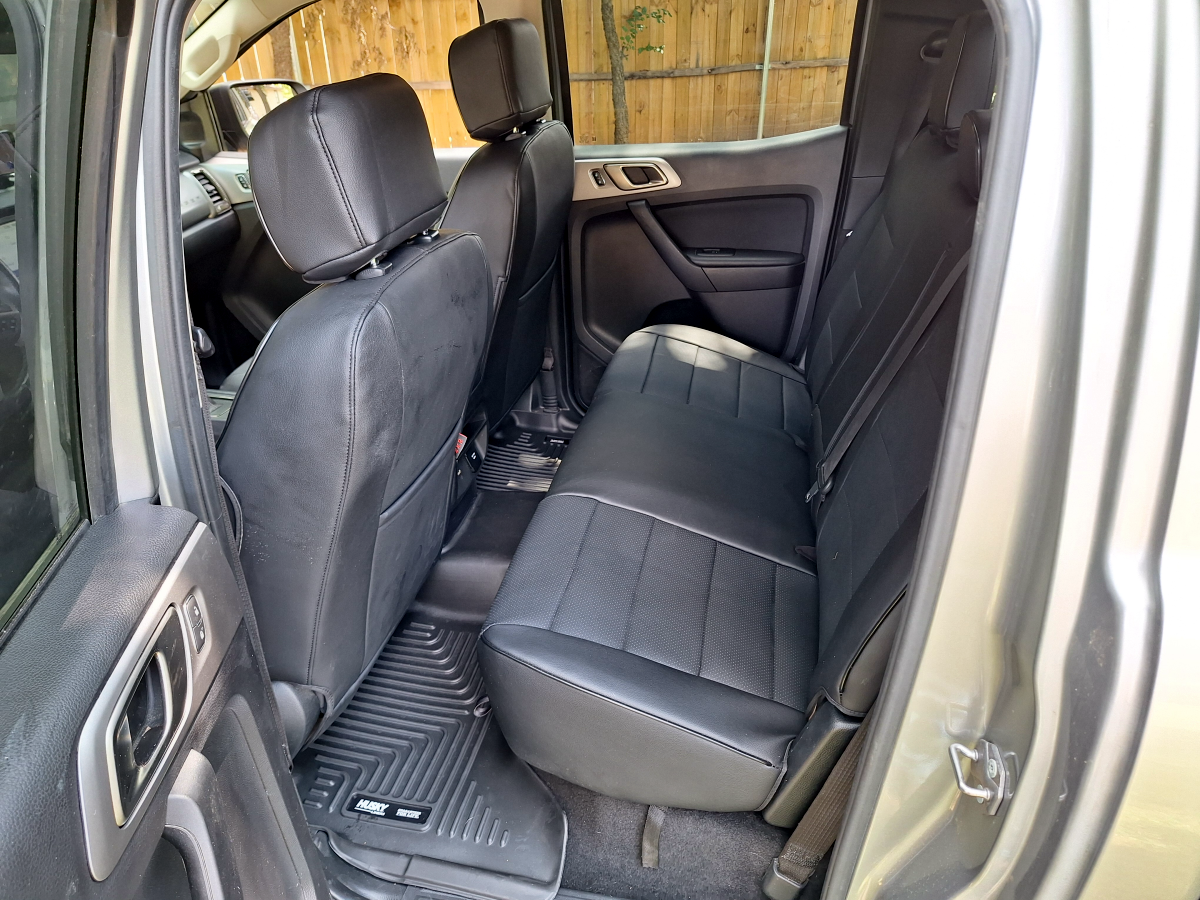
Inside of the cab I added a set of EKR leather seat covers. I was tired of how easily the factory cloth seats stain, and this was an economical solution. They also make it easier to clean the interior since my dog Marley travels with me. I also added a set of Husky floor liners to help aid in keeping the interior clean.
Trail communication is critical, so I added a Midland MXT275 GMRS radio and a Uniden CMX760 mobile CB radio. The MXT275 is mounted to the driver’s side of the center console, and the Uniden CB is mounted under the driver’s seat. Both of these radios have the controls built into the microphone.
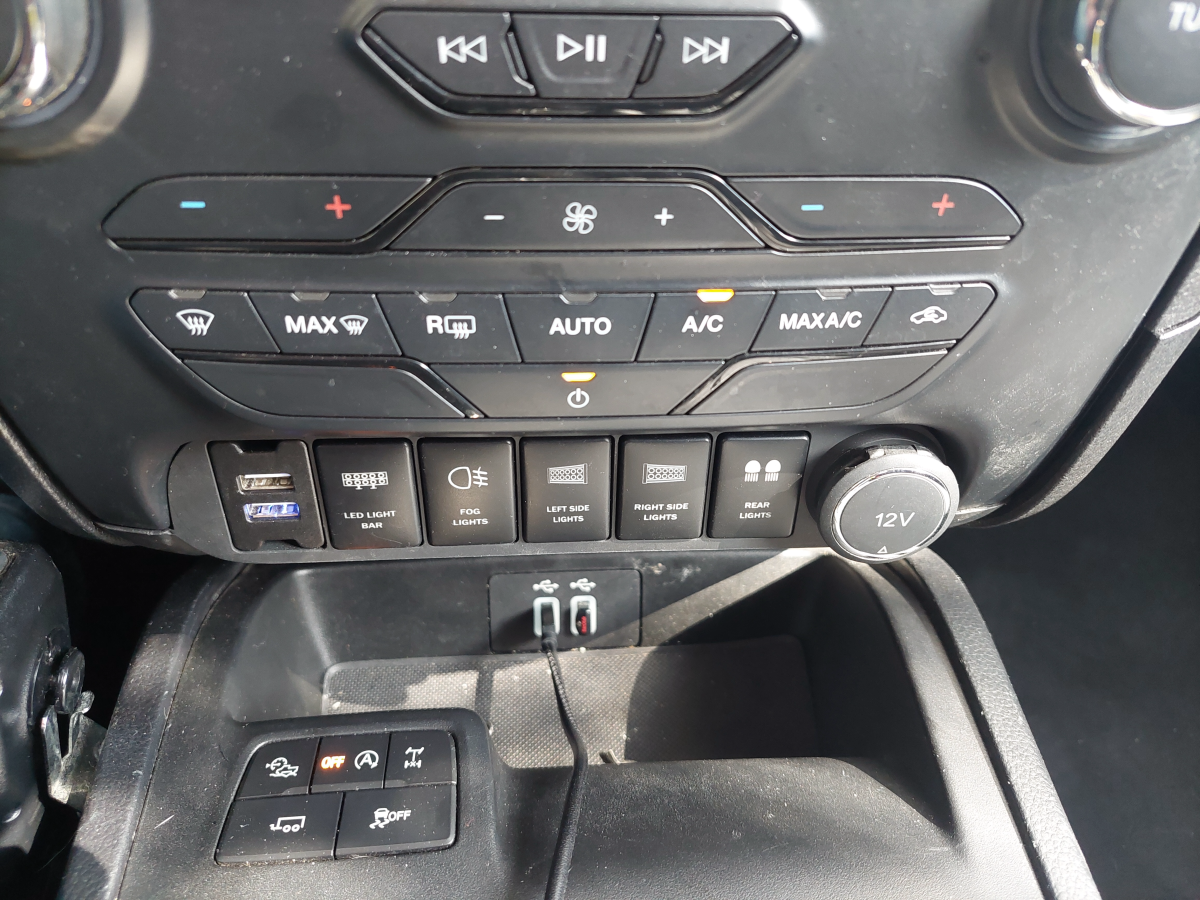
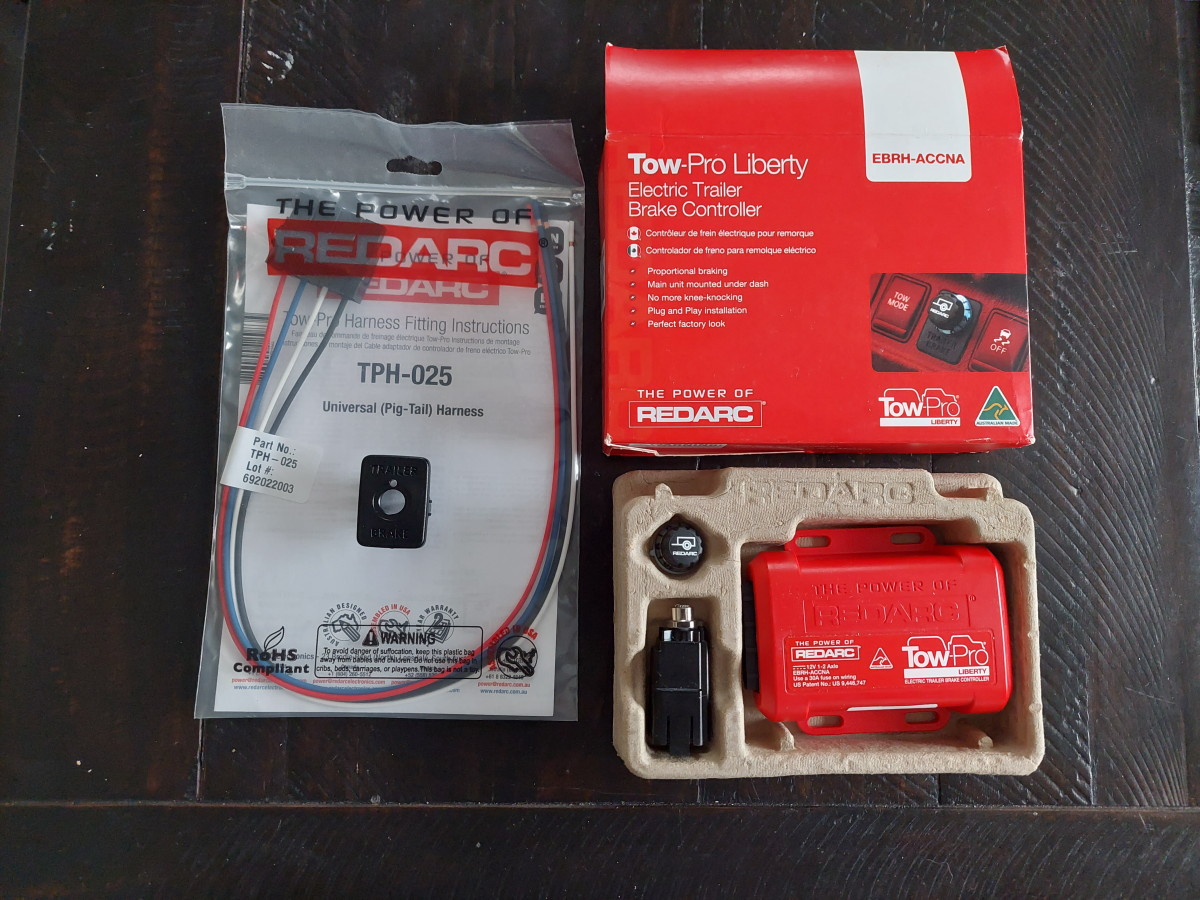
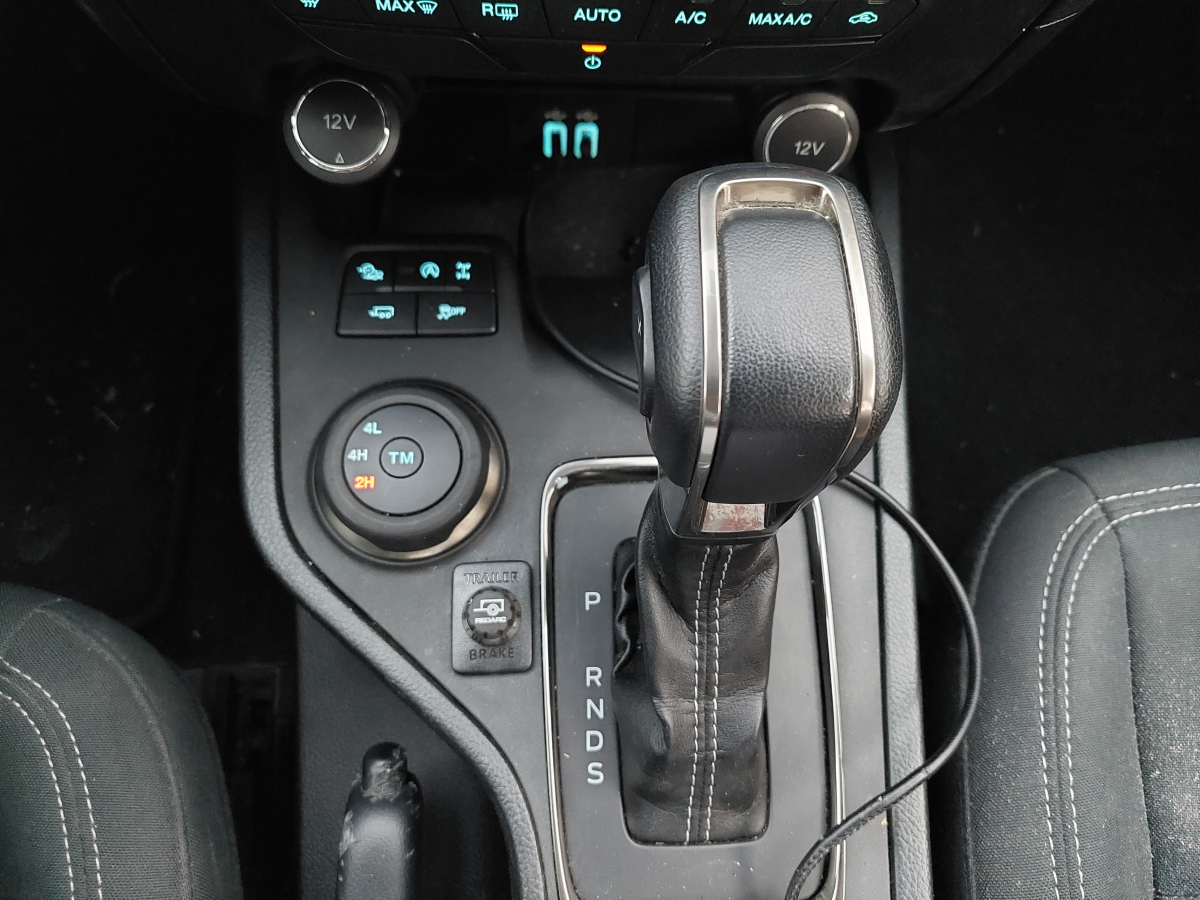
I added an AOB Switch Panel for a Ford Ranger PX2, PX3 which mounts where the 12V outlets are under the dash. It gives it a factory look and, in my opinion, looks better than the Ford upfitter switches. These switches work the front lightbar, fog lights, left ditch light, right ditch light, and rear work lights. I also used this opportunity to replace the left 12v outlet with a USB charging port. Since this is a truck, I wanted it to have the ability to tow a trailer, so I also added a Tow Pro Liberty brake controller. The brake controller is mounted behind the dash panel under the steering wheel. The only part of the brake controller that is visible is the small adjustment knob on the center console.
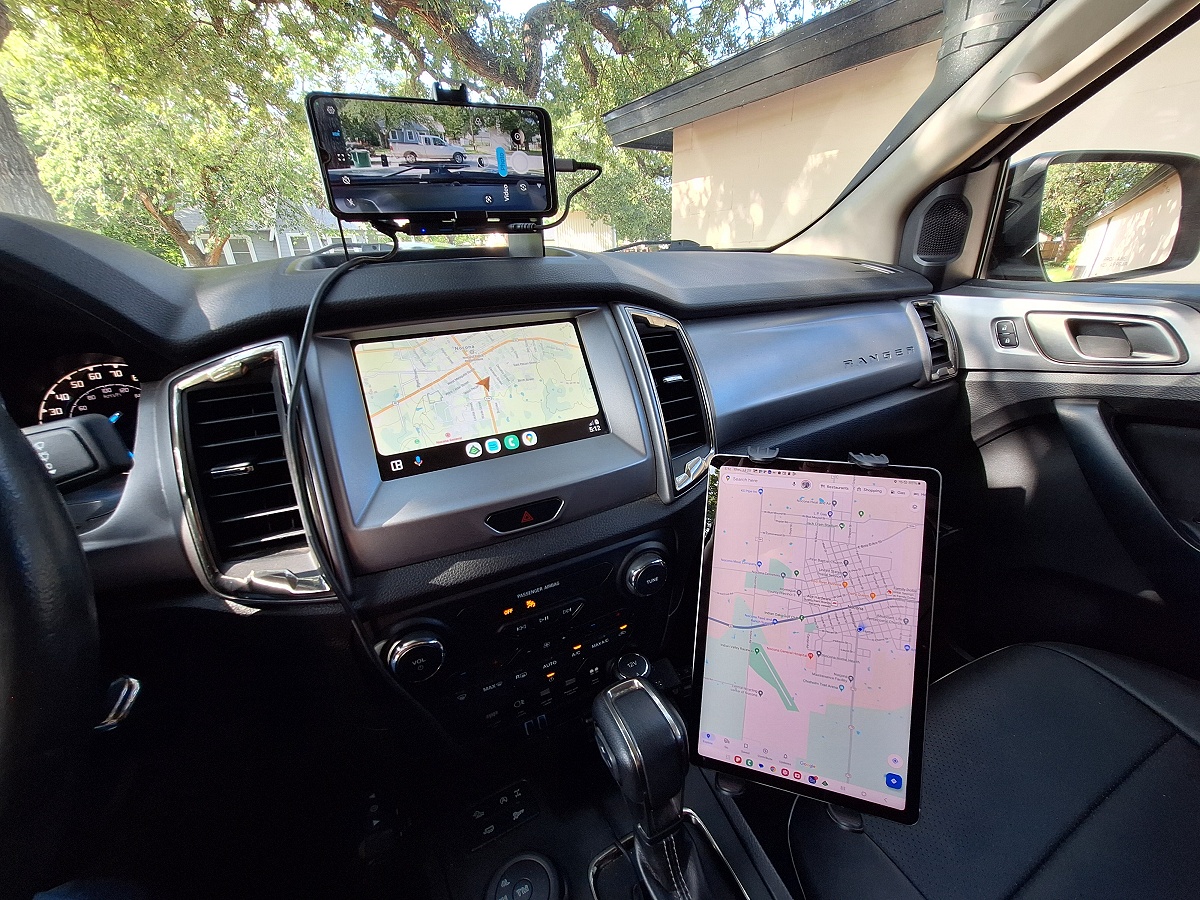
To aid in navigation I added an Arkon tablet mount with a Samsung tablet. I primarily use it to navigate with GAIA GPS. I also have a mount on the dash that holds an older Motorola phone. That phone can display GAIA GPS and Google Maps, but it’s primarily bluetoothed to an AKASO Brave 7 action camera on the front of the vehicle. The phone allows me to start and stop the action camera’s recording as well as shows me what the camera sees. When driving I plug my Samsung cellphone into the Ford SYNC, and it displays Google Maps on the dash for my primary navigation.
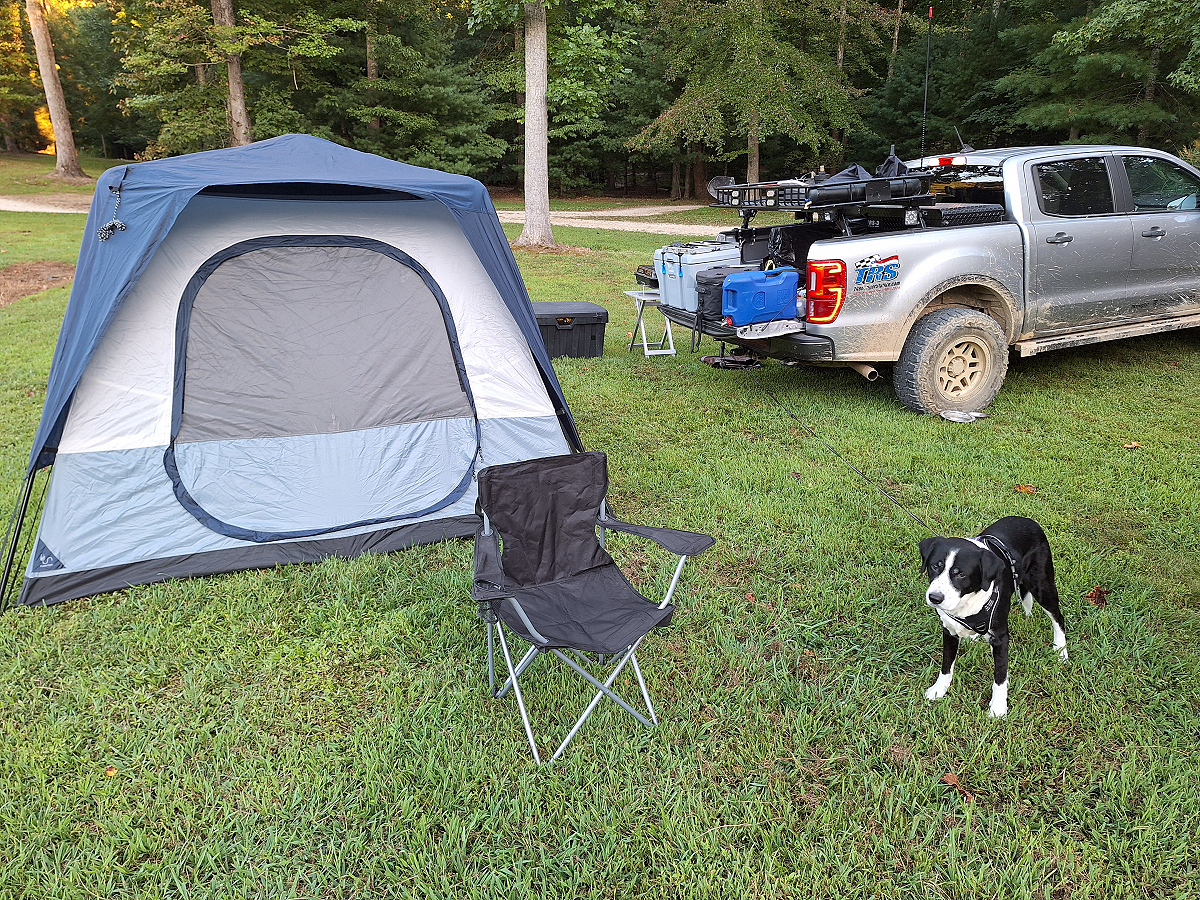
What you don’t see on this Ranger is a roof top tent. I’ve had the opportunity to use a roof top tent when I completed the Trans America Trail, and I’ve also spent weeks exploring the country while just using a ground tent. Both have their advantages and disadvantages. While a roof top tent sets up quick and gets you up off of the ground, they also add a lot of weight high up on your truck and are very expensive. I chose to use a Caddis Rapid Tent which is a ground tent and sets up in just a couple of minutes. It’s affordable, light, and fits easily under the Husky toolbox.
When it’s time to go camping I have a Contigo portable toolbox that’s loaded with my camping gear. All I have to do is slide my Caddis Rapid Tent under the Husky toolbox, load the Contigo box into the bed, and then load the Lifetime 55-quart cooler and strap them down.
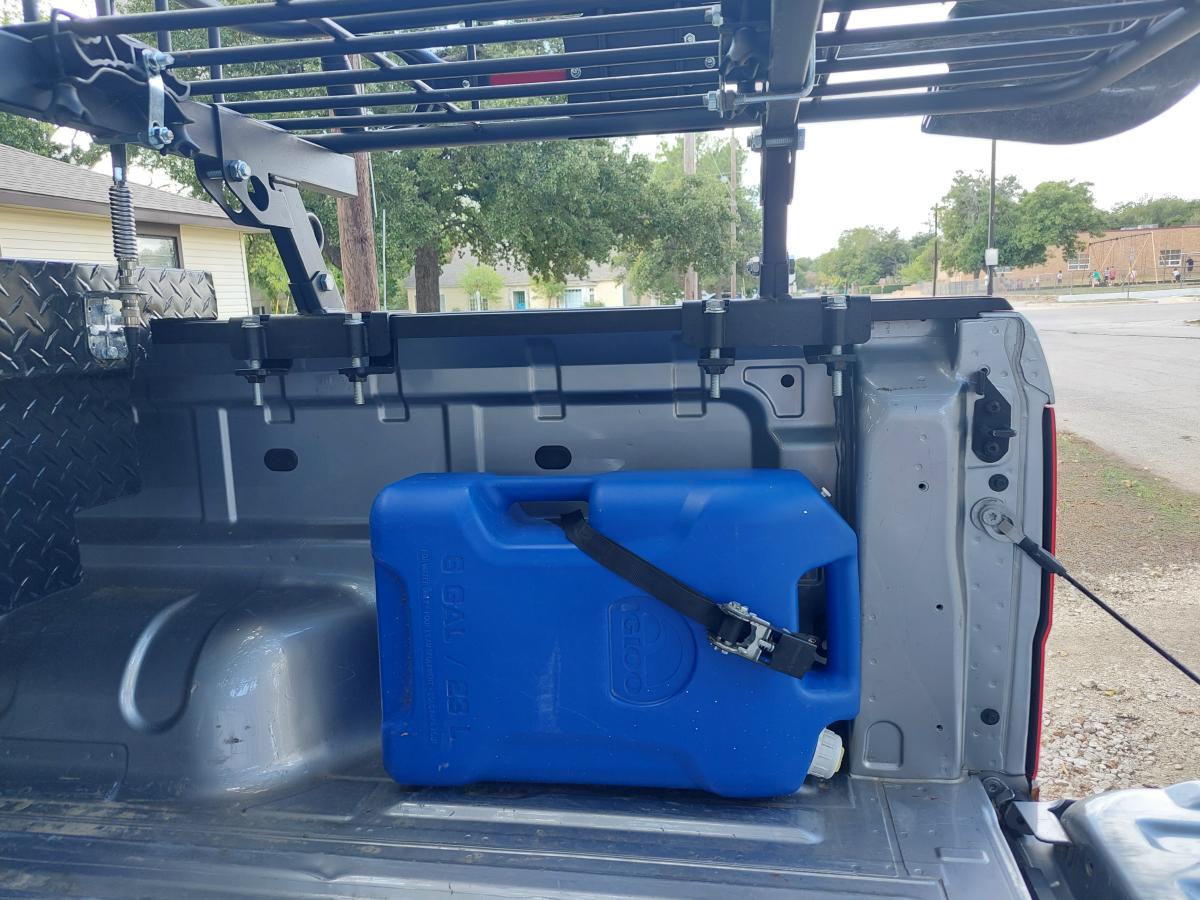
What you won’t see mounted on my rack is Rotopax fuel and water containers. I think they’re really expensive for the small quantity that they carry. I actually use an Igloo 6-gallon water container with a modified spigot, and a Scepter 5-gallon gas can. Both containers will fit in the space between the wheelwell and the tailgate and can be easily secured with a ratchet strap using the factory tie down hoops. If your Ford Ranger doesn’t have the tie down hoops mounted in the holes directly behind the wheel well, you can get a set with the mounting bolts from a Ford dealer. I don’t carry the fuel can all of the time. In fact, I usually only use it if I’m travelling out west or to other very remote areas. I took a 5-gallon gas can with me when I travelled out west on the Trans America Trail, but I didn’t take one when I did the Kentucky Adventure Trail because you pass through plenty of towns with gas stations.
I’m very happy with the outcome of this build. It has everything that I need for an adventure, yet the bed rack can easily come off so I can haul stuff with it. If you see this truck out anywhere, be sure to say hello.
Tire Update
After a year and eight months with several thousands of miles of pavement use and hundreds of miles of trail abuse, the Thunderer Trac Grip M/T were down to 5/32nds of tread, and it was time to look for a replacement.
I spend the majority of the time on pavement with occasional adventures off-road. That much pavement use chews up a set of mud-terrains and they only last me 30k-40k miles on a daily driver.
I decided that it was time to look for an all-terrain that comes with a mileage warranty (mud-terrains do not) but I’ve never put an all-terrain on a truck that I was actually going to take off-road. I began looking for an aggressive all-terrain that would have at least a 50k tread warranty, perform well off-road, not break the bank, and come from a well-known and reputable brand name.
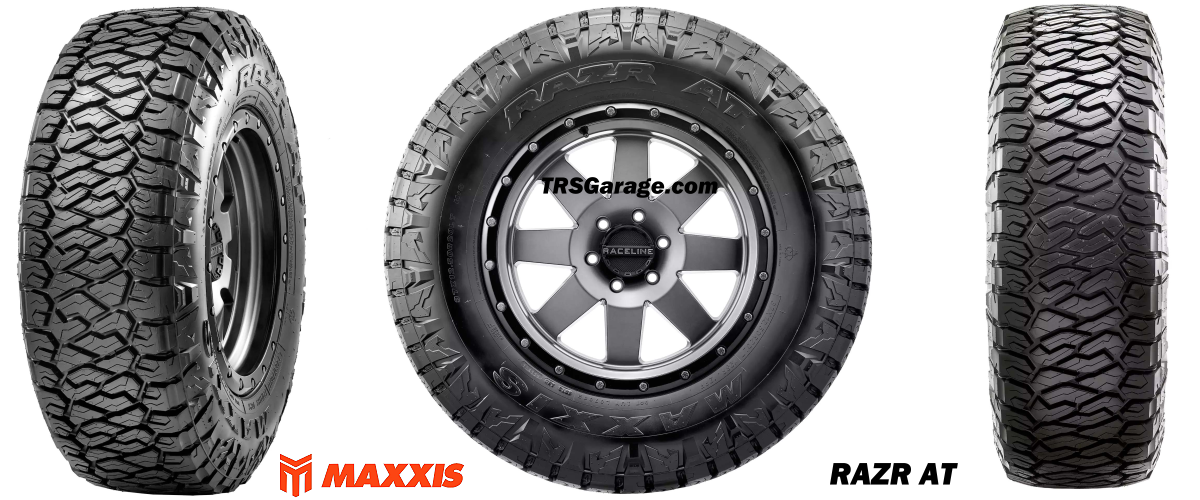
My search led me to Maxxis RAZR AT’s. Maxxis is well-known in the bicycle, motorcycle, ATV/UTV and off-road community. In the off-road community they’re known for the RAZR MT and TREPADOR tires, but the RAZR AT isn’t as well known. But I did find that the off-road community in Australia and New Zealand seem to really love them. So, I ordered a set of LT295/70/17 MAXXIS RAZR AT’s. Full disclosure, I contacted Maxxis and they gave me a sponsor discount, but the tires were pretty affordable already. Don’t believe me, CHECK OUT THE MAXXIS STORE ON AMAZON.
Here is the RAZR AT page of the official MAXXIS WEBSITE.
Want To Know More:
Want to learn more about this Ford Ranger build or see detailed photos of the modifications I’ve done? Check out the link below. It’s also a good place to ask any questions you may have. Thanks for looking!
2021 Ford Ranger FX4 TRS-3 Project Build | The Ranger Station
Video:
Sponsors:
Parts Used:
Skyjacker 3.5-Inch Suspension Lift
ReadyLift Anti Intrusion Beams
Pro Comp 41 Series Alloy Wheels
MAXXIS LT295/70/17 RAZR AT Tires
SmittyBilt 5.65CFM SB2781 Air Compressor
Nilight 4-Inch 60W Flood/Spot LED Lights
Nilight 4-Inch Square LED Work Lights
Nilight 4-Inch Square LED Pods
Nilight 4-Inch LED Amber Fog Lights
Nilight Wiring Harness With Remote Control
Weatherproof 12 Electrical AWG Quick Disconnect
Water Resistant Toggle Switches
Switch Panel With 12V Outlet And USB Port
AOB Switch Panel For Ford Ranger PX2 PX3
CURT 58080 Trailer-Side 6-Pin Round Wiring Harness Plug
CURT 58090 Vehicle-Side 6-Pin Round Trailer Wiring Harness Socket
Tow-Pro Liberty Electric Brake Controller
Midland – MXT275 MicroMobile GMRS Radio
Uniden CMX760 Compact Mobile CB Radio
Midland – MXTA25 3DB Gain Ghost Antenna
EKR Custom Seat Covers For 2019-2023 Ford Ranger
CYCPLUS Rechargeable Bicycle Pump
X-Bull Recovery Traction Tracks
Dee Zee Polymer Tailgate Board
Igloo 6-Gallon Water Container
Photo Gallery:
Click the photos to enlarge.