|
Trucks Of The Month
|
By
4X4Junkie
The
Ford Twin-Traction-Beam (TTB) suspension was a unique, but simple
approach to combining the ride & handling qualities of independent
suspension with the legendary durability of a straight beam axle. It was
built by Ford, in conjunction with Dana using the same technologies used
in the Dana-Spicer straight axle. This includes items such as U-jointed
axle shafts, fully adjustable/serviceable wheel bearings and standard
locking 4WD hubs in both automatic (mechanical) and manually engaged
versions. A large number of parts are even interchangeable between the
two axle types.
The TTB axle is comprised of two beams that are mounted on pivots, with
the tire at one end, and the pivot at the other. The pivots from both
sides cross over center which adds considerable length to the beam
compared to the rather short A-arm setup on conventional independent
suspension designs. A U-joint in the center of the axle allows for
independent movement of both beams.
The
TTB suspension is extremely durable in stock form, but wheel travel and
articulation traits are somewhat lacking. These things really come to
life when modified. With the long suspension beams exceeding
3 feet in length, travel numbers of 18 or more inches (24 or more on
full-size versions) is quite easy to obtain with little to no loss in
durability. The stock radius arms are a bit on the short side, but can
be easily replaced with extended ones similar in length to the axle
beam.
The
Twin-Traction-Beam suspension came in two versions:
The
coil version is found under:
-
1983-1997
Ranger
-
1984-1990
Bronco II
-
1991-1994
Explorer
-
1980-1996
F-150/Bronco
The Rangers/Bronco II used a Dana28 axle up until the 1st part of 1990,
and is not considered very strong. Midway through 1990, they began
receiving the Dana35, which is a far stronger axle (from '93-'97 (some
argue '90-'97, although I have been unable to find any Spicer documents
showing before '93), a "hybrid" version of the D35 using D28
gears was sometimes seen in some non-4.0L trucks. You can check HERE
for ways to identify these) .
The D35 shares many parts (such as the axle U-joints) with the Dana44
that's used under the F-150/Bronco and can be swapped in place of the
Dana28 quite easily. All these axles have a hi-pinion differential,
which improves gear strength and puts the drive shaft up higher out of
harm's way.
There's a wide variety of locking differentials, such as the ARB Air
Locker, Detroit Locker and many others available to fit the Dana35 and
Dana44 models.
The leaf version is found under:
-
1980-1997
F-250
-
1980-1985
F-350s
These
used Dana44 (F-250) and Dana50 (F-250HD/F350) differentials.
These
are not as easy to work with as the coil versions. To get any decent
flex from the leaf TTB would require converting to coil springs and
adding radius arms to it.
Trying to get any travel using the leafs will only result in binding up
of the spring, as the spring wants to travel straight up & down, but
the axle is trying to swing in an arc. Kind of a weird setup. Leafs were
better left on straight axles.
There
are a multitude of manufacturers that make suspension kits for TTB
vehicles. Finding one with good sturdy brackets can be a bit daunting
though. Many of the available brackets can be easily bent with a hard
lateral impact to the wheel. No damage to the axle itself is likely in
such an incident, but with the bracket bent, the wheel alignment is
lost. This is a source of many headaches when it comes to keeping these
things aligned. A kit with good sturdy brackets will maintain the
alignment much better.
On the mid-size Fords, for example, kits that completely REPLACE BOTH
pivot brackets are more likely to be sturdy. Some kits use a
"drop-plate" extension that the stock pivot bracket attaches
to. These can get tweaked and not stay in place. The drop-plate also
creates a clearance issue with the Dana35 differential. When setup for
large amounts of travel, the diff housing can strike the pivot bracket
when mounted on a drop-plate, likely damaging the diff housing.
Skyjacker is one company that has good brackets on their Class II
series of kits and I highly recommend them.
Following are some
tips on getting the best performance out of the suspension.
SETTING THE RIDE
HEIGHT:
The TTB is best setup and aligned at its ideal static ride height. This
will usually allow the use of a near zero degree camber setting and will
put the axle shafts inline without any undue angle on the center axle
U-joint. Ideal height can be measured at the beam pivot bolts with
the wheels pointed straight ahead and the truck on flat level ground,
and is as follows:
For the D35 TTB axle, the pivot bolt should be 1" higher than the
center of the wheel hubs. The D44 TTB axle should have the pivots at the
same height as the hubs.
When a lift is installed (or even on many factory delivered vehicles)
the suspension will often be below this ideal height. This puts the top
of the tires inward, requiring a positive camber correction to align it.
While it is possible to align it to within factory specification with
the suspension as much as 1.5" above or below this ideal height,
performance & ease of alignment will be improved with it at level.
Being below level also reduces ground clearance under the axle, not to
mention reduces up-travel. A high amount of angle on the center U-joint
can make for a bit of a "lurching" motion while in 4x4.
Adjusting this height is accomplished through the use of shims under the
lower coil spring seat on top of the axle beam, where the radius arm
attaches. Large washers can be used to provide increments of about
1/4" per washer. If a large amount of correction is
needed, a 1" thick spacer can be put in. This will give roughly
1.5" of lift height. You can go as high as needed as long as there
is sufficient thread length to reattach the coil retainer. After that, a
longer spring should be used.
These shims can also be used to regain lost height after installation of
a winch & bumper, and the dual batteries needed to run the winch, or
other heavy front-end accessories.
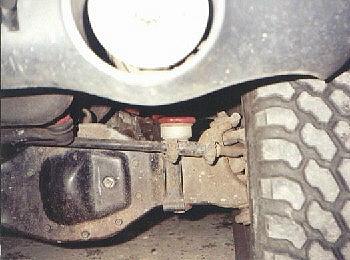
Pictured is a coil spacer used to raise the ride height.

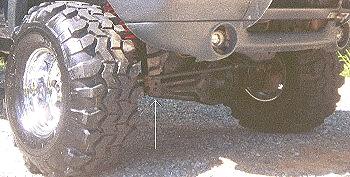
This is an example of a D35 suspension setup at optimum height.

The axle pivot (arrow) is slightly above the wheel hub centerline.
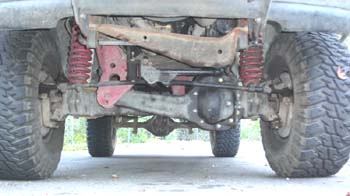
In this picture, you can see the axle pivot is much lower.

This is most likely to occur on the heavier models such as on Supercabs
and 4dr Explorers.
As you can see, it is not ideal for clearance under the axle.
In this particular example, the available upper bracket hole should have
been selected.
When checking the ride height, it is imperative that you roll the truck
back and forth 10-20 feet on a level surface to settle the suspension
before checking the height. When let down off the jack or hoist, the
tires will be cocked under some, which will give an erroneous height
reading (bouncing the suspension will NOT fully settle it).
STEERING:
The steering on TTB suspensions is a sore spot that seems to have been
somewhat overlooked by the aftermarket lift industry. Most companies do
provide a dropped pitman arm to help correct some of the steering
linkage angle after a lift, but if the amount of drop the pitman arm
provides does not closely match the lift height of the pivot brackets
(to within 1.5" or so), the steering can become quite ill-behaved,
and is probably the most common cause of the tire wear complaints that
often surround this suspension. The stock "inverted-Y" style
tierod linkage is rather unforgiving of a bad angle as well, and only
compounds the problem. Most aftermarket drop arms are about 2-3"
dropped compared to the stock arm.
For this reason, dropped pitman arms used alone should best be avoided
if possible on suspension lifts greater than 4" in favor of a
centerlink type steering linkage (such as the Superrunner steering
conversion offered by Superlift
Suspension (you could call this a "K" style linkage). This
type of linkage is better capable of following the movement of the two
halves of the suspension without inflicting near as much bumpsteer (toe
in/out variation) at the wheels. The improvements this kit provides are
quite noticeable even in the 3-4" lift range as well (and is
actually ideally suited to those lift heights. Superlift states it can
be used with up to 6" lift however). The Superrunner kit can be
used with a non-Superlift brand suspension kit.
This picture shows the Superlift steering linkage conversion installed
with a Skyjacker Class II suspension lift.

If
you're handy with a welder, you may be able to build such a linkage
yourself for a considerable cost savings, and at the same time (if
needed) optimize it for a 6" lift height by setting the centerlink
about 2" lower than what Superlift designed it at. However, I do
NOT recommend that you attempt building (or modifying) a critical
component such as the steering unless you have full confidence in your
welding and fabricating ability, and are good at sourcing parts for it.
The TTB suspension is best not lifted over 6", though. After this
height, it becomes near-impossible to restore good steering geometry. A
bodylift can be used for additional height, if desired.
SHOCK
LENGTH AND SPRING RATE:
As with any suspension, having the right shock length and spring rate is
key to getting the most flex when off road. It is usually possible to
improve significantly in this area over what's offered by the lift
industry. Many springs are quite stiff, which limits up-travel, and the
shocks provided in a kit are often shorter than what's ideal, limiting
down-travel. This can cost several inches overall travel in many cases.
Shock length:
To
find the right shock length, the vehicle can be jacked up letting the
suspension completely relax (hang) and then measuring the distance
between the shock mounts. This is to be done with the spring in place,
but without the shock (A spring clamp or J-clip on the Ranger/Explorer/BII
upper spring mount will be needed to retain the spring in the tower and
should actually be used at all times). Measure from the base of the top
stud to the center of the lower eye. This will give the extended length
of the required shock. If between available lengths, go with what's
closest. A little longer/shorter shouldn't matter much.
With
the shock in place, set the bump stop to just touch with about 1"
shock travel left. Shims/washers or a metal spacer & a longer bolt
can be used on the bump stop to set its height. Be sure to check that
the differential housing won't contact the passenger side beam pivot
bracket if it's the "drop-plate" type.
Also check to see that the radius arm bushing isn't overstressed from
too much angle if the vehicle still has stock length radius arms. If
needed, the bump stop can be set an inch or so lower to preserve bushing
life.
Removal of the coilspring (shock still in place) can make the process of
setting the bumpstop height much easier.
Spring rate:
The
lower the spring-rate of a spring, the more it will flex. This is
something to research when shopping for a suspension kit. Again,
Skyjacker seems to have a bit lower rate springs than most. They often
need the shimming for height mentioned above, but is not detrimental to
performance in any way.
Skyjacker
Pt. # 136 springs for the Ranger appear to be around 400 lb-in. Some
others exceed 550. A spring in the 275-330 lb-in range will give awesome
flex on a rig setup to rock crawl. Unfortunately, these would have to be
made custom on a per-application basis from a company such as National
Spring as no one has offered them as part of a kit yet. Lower rate
springs will also have a longer free-length for a given lift height. The
added flex from such springs tends to amplify any deficiencies in the
steering as well, so be sure your steering geometry is in good order
before experimenting with low-rate custom coils
The
use of rod ends (Heim joints) on the extended radius arms can also bring
forth some additional travel and flex, although they will be of little
benefit unless custom extended shock/spring towers are also used.
Let's not forget about the anti-swaybar, as well. Disconnect-type end
links can be purchased (or made) to allow quick removal of the swaybar
for better trail performance. Some degradation of street handling will,
of course, occur with it disconnected, so its best to disconnect it only
for off road.
Hopefully a time will come that we start seeing some new or redesigned
stuff in the suspension aftermarket for the TTB Fords. Coils more
specific to bodystyle & engine types, flexier coils, and
improvements to the steering. Until then, the tips above should be of
some help in attaining a greater level of performance out of your lifted
Twin-Traction-Beam truck.
LINKS FOR SOME ADDITIONAL
READING:
Dana28
to Dana35 swap
Washer
coil shims
Coil
spacer info
Skyjacker
Tuning Tips
|
