- Joined
- Oct 22, 2016
- Messages
- 61
- Reaction score
- 6
- Points
- 8
- Location
- New Orleans, LA
- Vehicle Year
- 2000
- Make / Model
- Ford
- Engine Size
- 3.0
- Transmission
- Automatic
Posted this over on the Fordtrucks forums. Here's the recap of my project.
The breaks with the ~~~~~~~ are where it was different posts on different days:
5-16-2018
My 2000 2WD had been getting a worse and worse misfire over time. Add to that random codes for lean conditions and misfires on cylinder 6 on and off. I had swapped in new injectors which helped but the problem would always come back.
If I ran the truck hard, say pushed it to a steady 80 in a 70 for a while and went over a big bridge in the process, the misfire would be more pronounced at idle with the truck really warmed up.
Compression was all over the place on cylinders 4,5 and 6 and would vary as to which cylinder would have the lower pressure from day to day. I finally resolved myself to it being time to pull the heads and see what is up after 180,000 miles. I had read about the exhaust valves hammering themselves into the soft factory valve seats and causing the valves to leak by, worse when really hot.
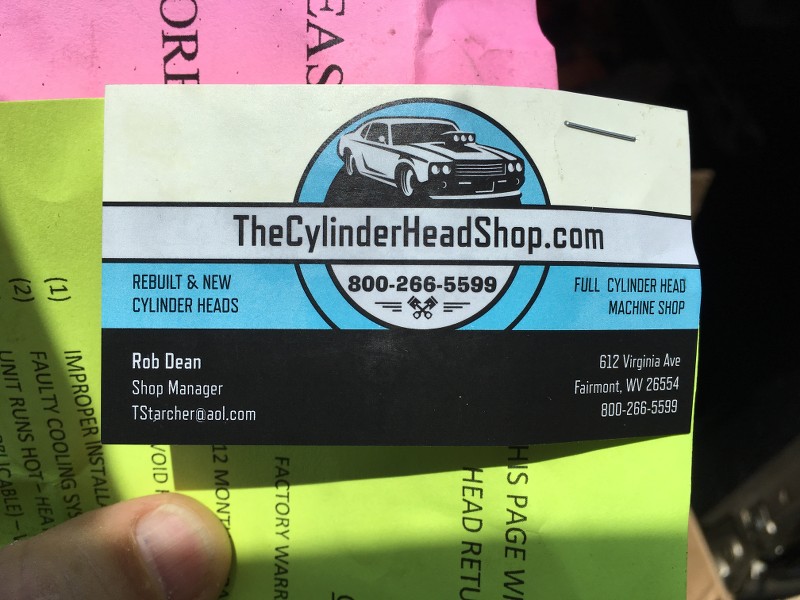
I bought a set of heads from The Cylinder Head Shop out of WV on ebay for $299, no cores needed to send back, along with head bolts and a Felpro gasket kit.
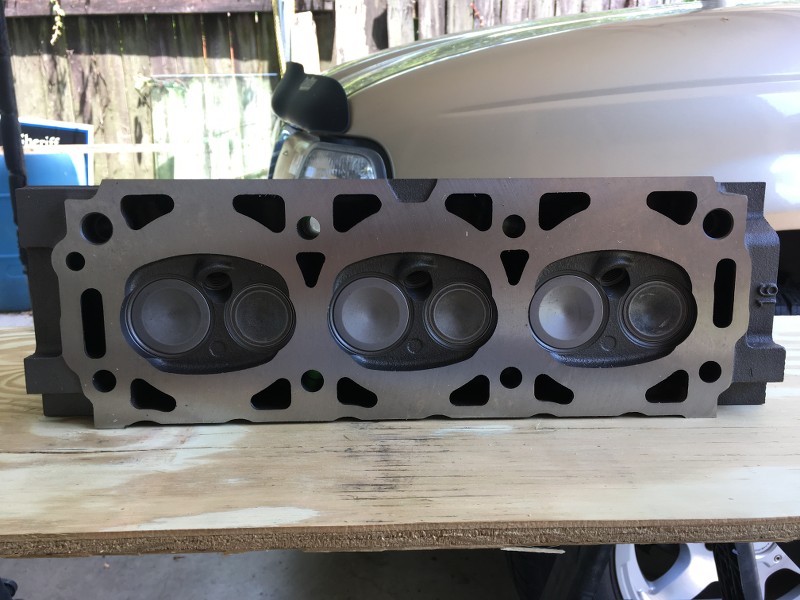
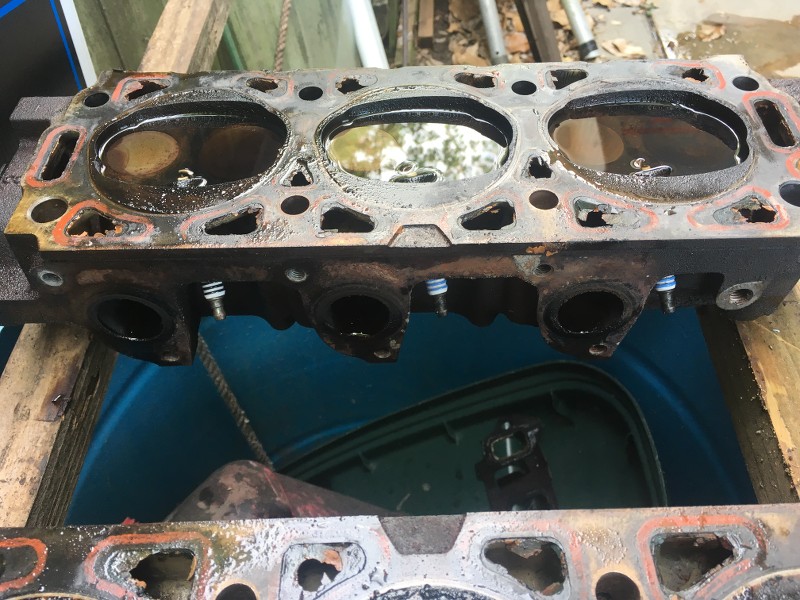
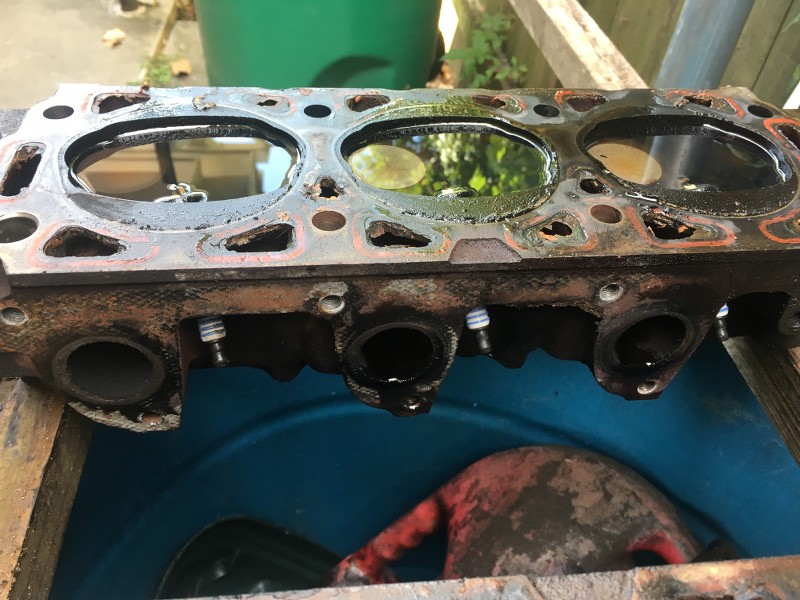
Got the heads yesterday.
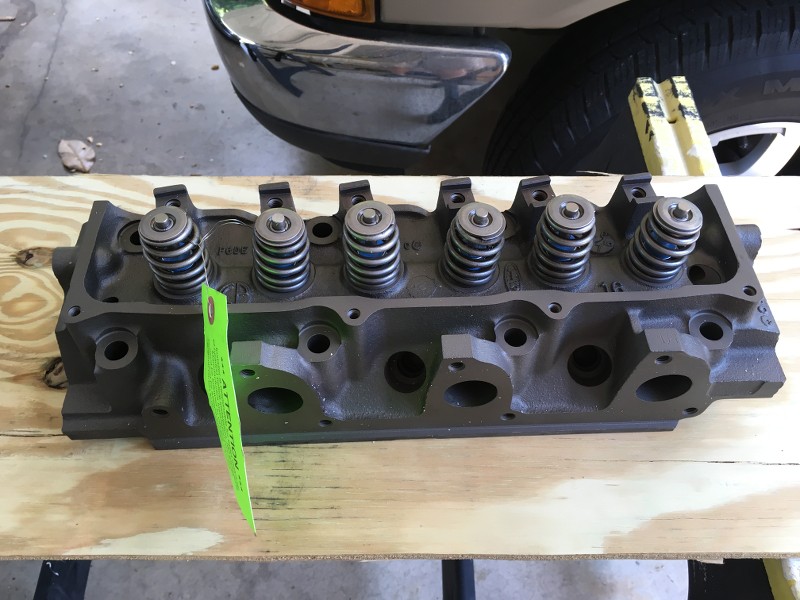
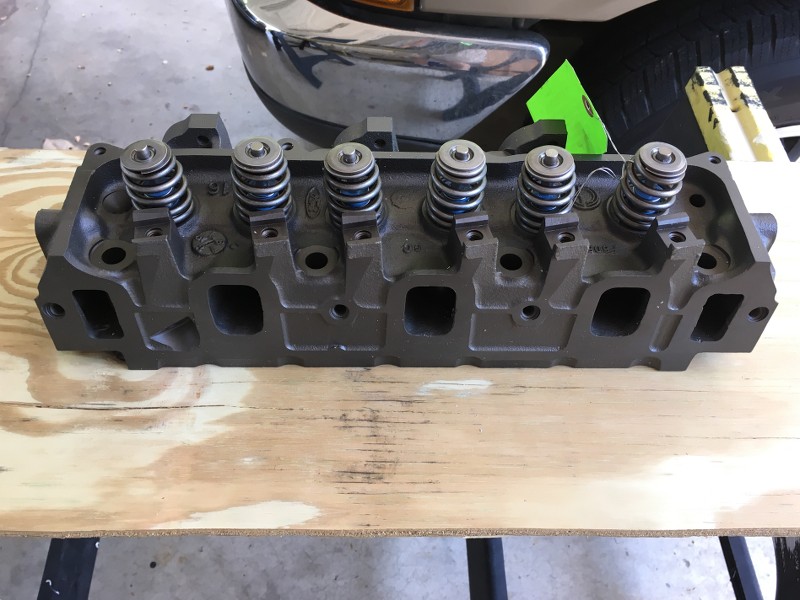
Upon inspection, I am most likely not going to go through the hassle of taking them apart, grinding, cleaning and reassembling. They showed up in much better shape than I was expecting. There isn't much room for port matching to the intake manifold gasket, the valves could be unshrouded a little, but not very much, and there is no casting flash in the runners. I ran my finger through all of them and there are no sharp edges, no flakes sticking off the walls and and all the turns are rounded over already.
I am going to go around the lip where the heads were surfaced and knock off that knife edge where it transitions from deck surface to combustion chamber to help with pinging. I don't see any other sharp edges that would make detonation a problem.
The most work to do would be smoothing the valve guides over to a more rounded tip and like I said, I am not pulling them apart since they are so well assembled right now.
I am going to look over the intake while it off and see how bad it might be.

~~~~~~~~~~~~~~~~~~~~~~~~~~~~~~~~~~~~~~~~~~~~~~~~~~ ~~~~~~~~~~~~~~~~~~~~~~~~~~~~~~~~~~~~~~~~~~~~~~~~~~ ~~~~~~~~~~~~~~~~~~~~~~~~~~~~~~~~~~~~~
5-27-2018
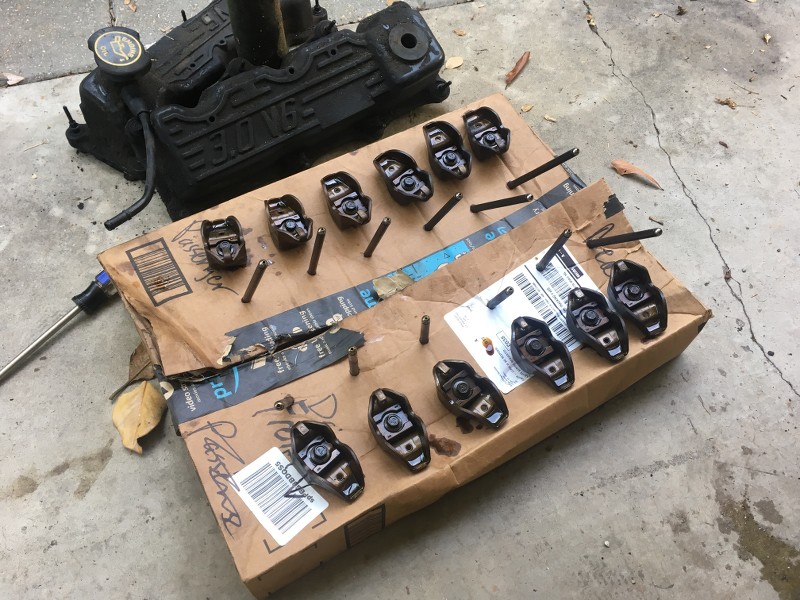
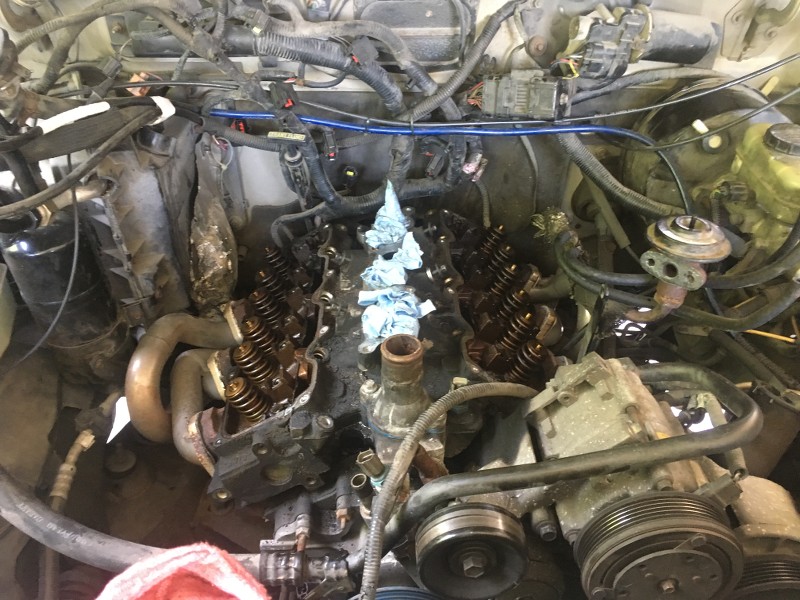
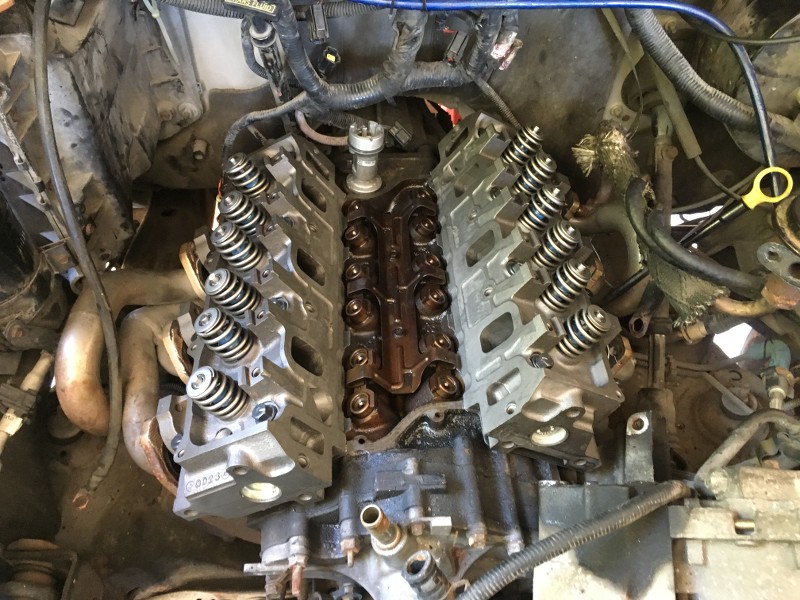
Today was disassembly. No broken bolts!!!!
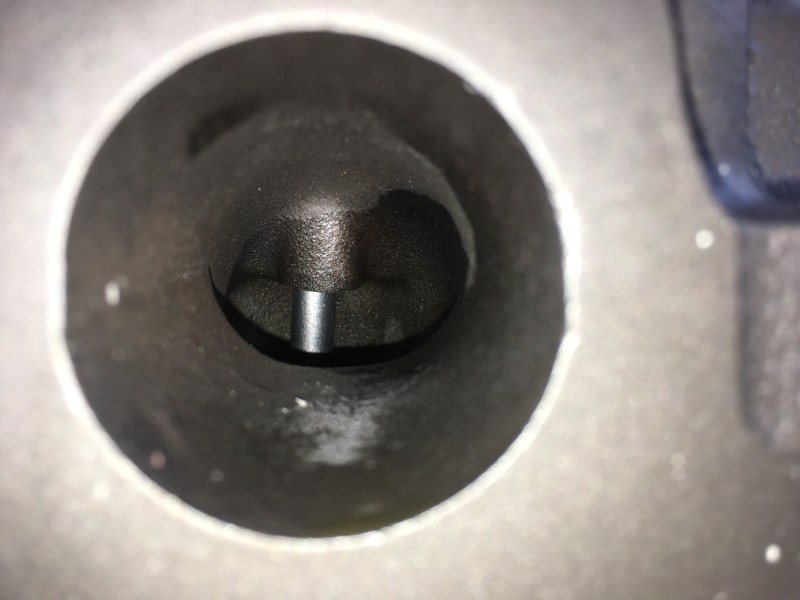
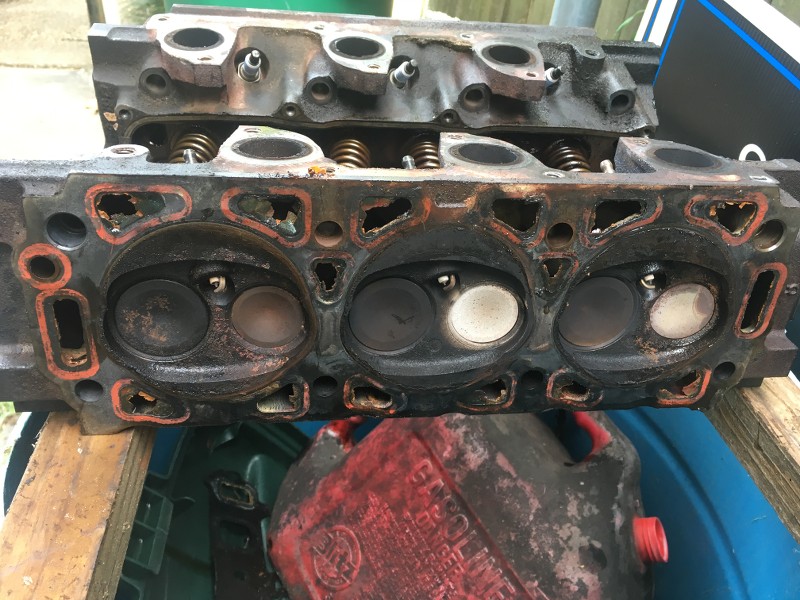
Once the heads were off, my guess on the drivers side head having issues was confirmed by looking at the #4 and #6 exhaust valves:
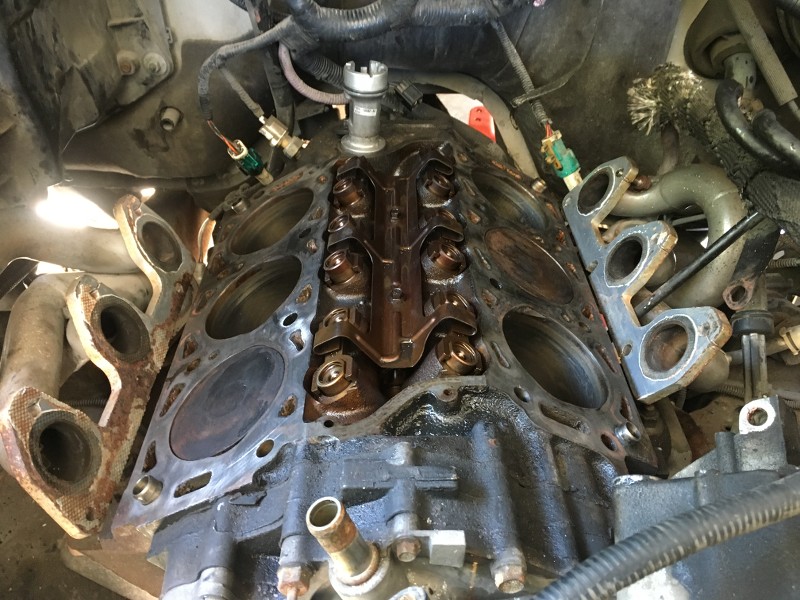
Cylinders 1,2 and 3 had varying amounts of heat in them as well:
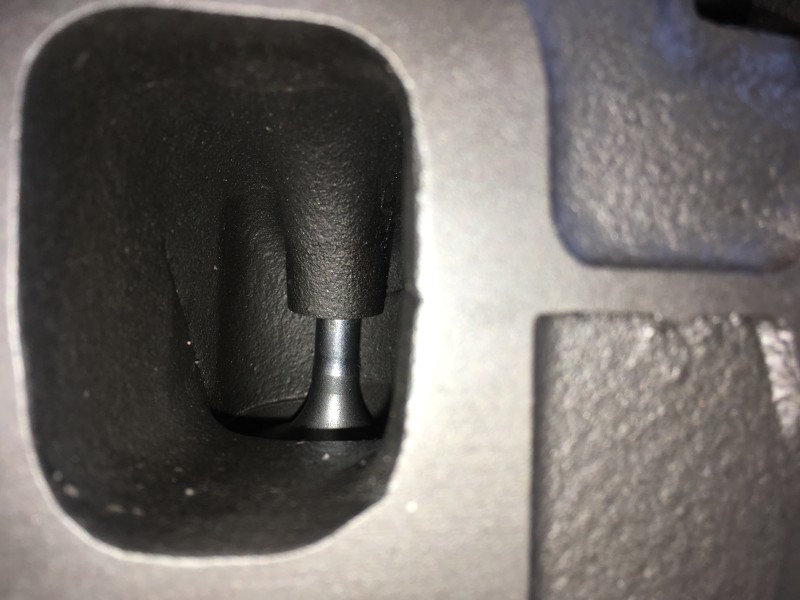
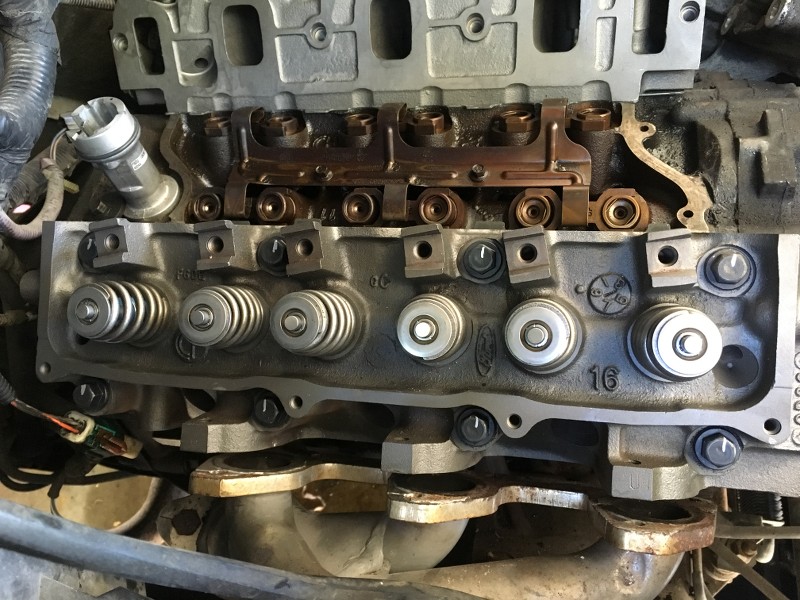
Then I laid the heads flat and filled the combustion chambers with brake parts cleaner and had 5 out of 6 exhaust valves leaking by with the brake parts cleaner coming out of the exhaust ports:
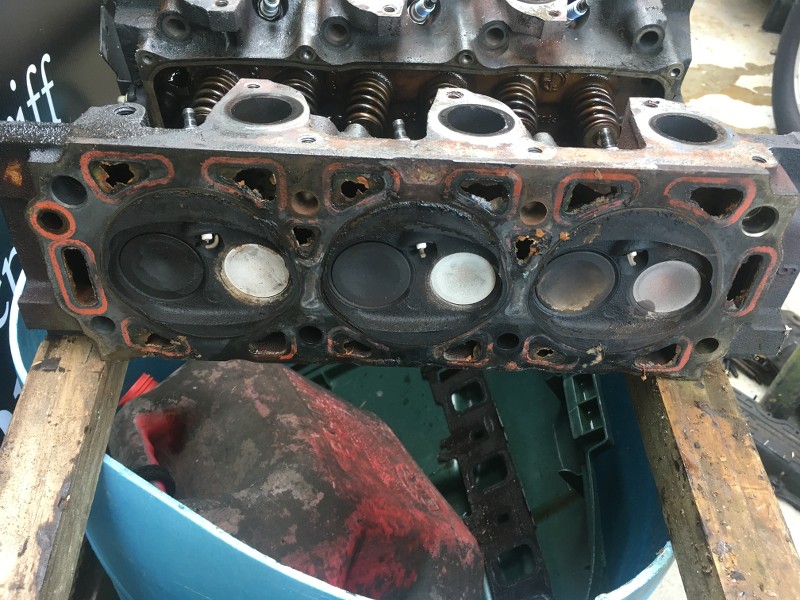
Then I tried to get some better shots at how the valves are sitting in the heads. You can see that they have somewhat shifted in the seat to one side:
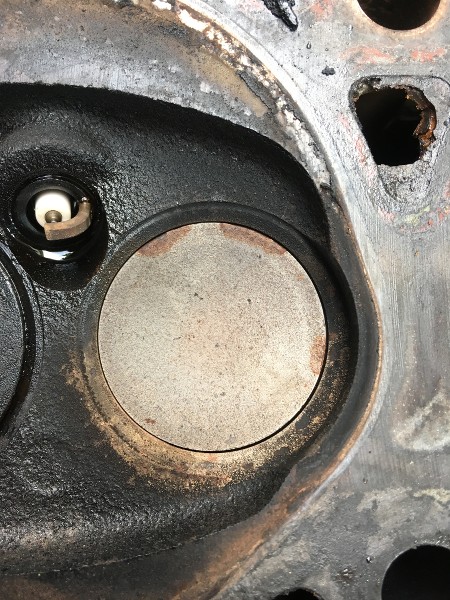
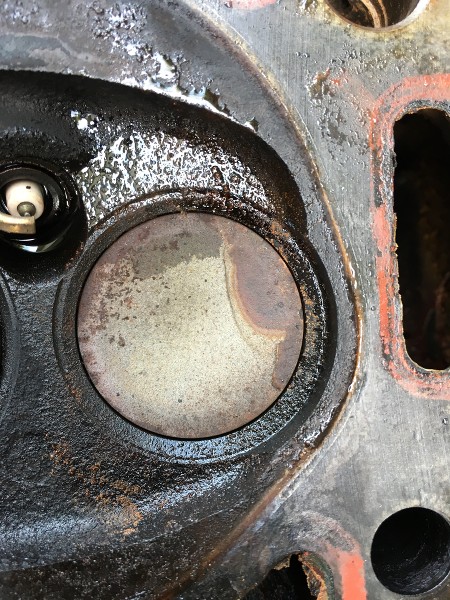
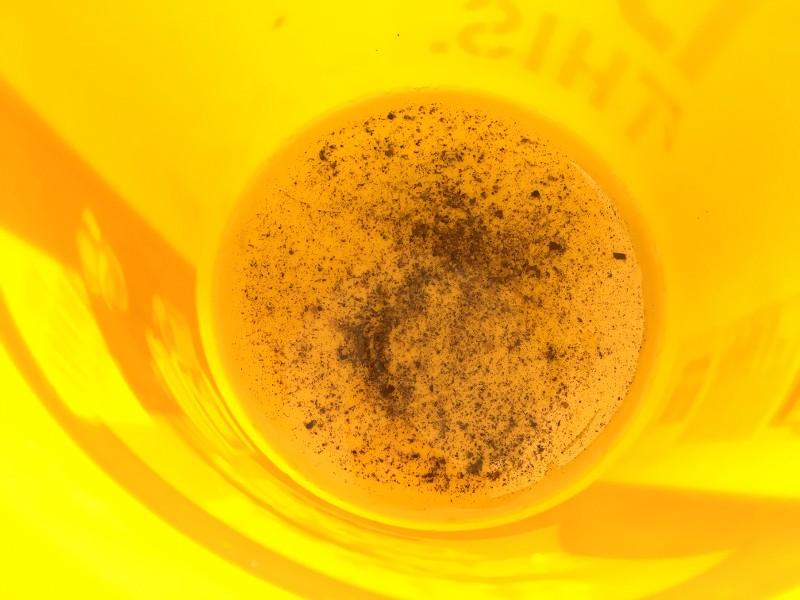
One thing I am happy to see is that the cylinder wall still have a cross hatch after 180,000 miles and no detectable ridge at the top of the cylinder:
~~~~~~~~~~~~~~~~~~~~~~~~~~~~~~~~~~~~~~~~~~~~~~~~~~ ~~~~~~~~~~~~~~~~~~~~~~~~~~~~~~~~~~~~~~~~~~~~~~~~~~ ~~~~~~~~~~~~~~~~~~~~~~~~~~~~~~~~~~~~~~~~~~~~~~~~~~ ~~~~~~~~~~~~~~~~~~~~~~~~~~~~~~~~~~~~~~~~~~~~~
5-28-2018
Got it all back together and running. After looking at the heads some more and seeing that cylinder #4's spark plug had a cracked porcelain, the head gaskets on the drivers side were shot. I looks like the metal by the water passage has rusted some and that probably pushed the surface apart to let coolant into the combustion chamber once it pressurized:
I didn't get any more pictures because it was full steam ahead with reassembly.
I am still getting a lean bank 1 code after a while of driving. The short term fuel trims start around 0.90 and the long terms start at 1.00, then as it idles, the short terms slowly come up to 1.00 and the long terms start to climb up to 1.25 until the code gets thrown.
I need to hook up my big scanner and look at the graph of the O2 sensors and see if it is time to replace them.
~~~~~~~~~~~~~~~~~~~~~~~~~~~~~~~~~~~~~~~~~~~~~~~~~~ ~~~~~~~~~~~~~~~~~~~~~~~~~~~~~~~~~~~~~~~~~~~~~~~~~~ ~~~~~~~~~~~~~~~~~~~~~~~~~~~~~~~~~~~~~~~~~~~~~~~~~~ ~~~~~~~~~~~~~~~~~~~~~~~~~~~~~~~~~~~~~~~~~~~~~~
6-6-2018
Okay, got some time to work on the fuel trims today. The truck has been holding steady with a +24% on bank 1 and +17% on bank 2. I have hosed the engine down with water and brake parts cleaner trying to find a vacuum leak to no avail. I was worried the intake gaskets to the heads were leaking and I was going to gave to pull it all off again.
~~~~~~~~~~~~~~~~~~~~~~~~~~~~~~~~~~~~~~~~~~~~~~~~~~ ~~~~~~~~~~~~~~~~~~~~~~~~~~~~~~~~~~~~~~~~~~~~~~~~~~ ~~~~~~~~~~~~~~~~~~~~~~~~~~~~~~~~~~~~~~~~~~~~~~~~~~ ~~~~~~~~~~~~~~~~~~~~~~~~~~~~~~~~~~~~~~~~~~~
6-6-2018
Today, after much video watching about fuel trims, I found one that helped a lot from Pine Hollow Auto Diagnostics. I unplugged my Jet after market MAF and the truck instantly idled better and the fuel trims went diving immediately.
https://youtu.be/FXT49BMxCOg
I amazingly found my OEM MAF sensor and housing and reinstalled them. After starting and letting it run for a while, the LTFT's settled down to bank 1 bouncing between +6 and 7% and bank 2 boucing between 0 and +1%.
I'm hoping the new O2 sensors that are on the way can get them closer to agreeing and Bank 1 being closer to 0.
Also, other good news is that the coolant and oil have both stayed completely full and in their respective parts of the engine. No mixing on vital fluids!!!!
~~~~~~~~~~~~~~~~~~~~~~~~~~~~~~~~~~~~~~~~~~~~~~~~~~ ~~~~~~~~~~~~~~~~~~~~~~~~~~~~~~~~~~~~~~~~~~~~~~~~~~ ~~~~~~~~~~~~~~~~~~~~~~~~~~~~~~~~~~~~~~~~~~~~~~~~~~ ~~~~~~~~~~~~~~~~~~~~~~
6-9-2018
Today was new idler and tensioner pulleys. Tomorrow is a new belt that just arrived, along with the new front O2 sensors that showed up today too.
That should be it for maintenance for a while, then I drive the truck as my daily driver again.
Before I put the new heads on, I did put a sanding drum on my Dremel tool and took off that knife edge around the combustion chambers on the heads where they were surfaced. Just rolled that sharp edge over to be round and stop it from being such an isolated hot spot. I also rolled the engine over to get each piston to top dead center and used a scraper to get the carbon buildup off of the piston faces so I can start from scratch on carbon.
~~~~~~~~~~~~~~~~~~~~~~~~~~~~~~~~~~~~~~~~~~~~~~~~~~~~~~~~~~~~~~~~~~~~~~~~~~~~~~~~~~~~~~~~~~~~~~~~~~
6-10-18
I changed the serpentine belt today. I am letting the truck cool off before I tackle the O2 sensors. Since I have the underdrive crank pulley to turn all the accessories slower and also a smaller alternator pulley to speed just that back up to factory speed, my belt was a Goodyear/Continental 4060865 / 6PK2195. Its shorter than stock and fit perfectly for my application:
~~~~~~~~~~~~~~~~~~~~~~~~~~~~~~~~~~~~~~~~~~~~~~~~~~~~~~~~~~~~~~~~~~~~~~~~~~~~~~~~~~~~~~~~~~~~~~~~
6-10-18
Swapped out the O2 sensors today. Had to buy the O2 sensor crows foot wrench from Harbor Freight. That made it much easier.
Fired the truck up and once the fuel system went closed loop, Bank one was +1% long term and Bank two is -1% long term. So I am hoping the fuel trims will be nearly perfect once the computer reads for a while and gets the fuel tables sorted out.
And while I was under the truck, I noticed that the front tires are wearing the inside tread more. Jacked it and put a pry bar under the tires to find out that I need 4 new ball joints. It only really needs the lowers, but if I am going that deep into the suspension, I am changing all 4.
~~~~~~~~~~~~~~~~~~~~~~~~~~~~~~~~~~~~~~~~~~~~~~~~~~~~~~~~~~~~~~~~~~~~~~~~~~~~~~~~~~~~~~~~~~~~~~~~~~
6-10-18
Here's the data stream after all engine related repairs done. The computer still has to relearn the fuel trims after the new O2 sensors. Went from +25% and +17% to 0% and -4% on long term. I think that proves I don't have any vacuum leaks and all is well. Now once the ball joints arrive from Rockauto, I can rebuild the front end and have it back as my daily driver. Until then, its horrible gas mileage in the F150.
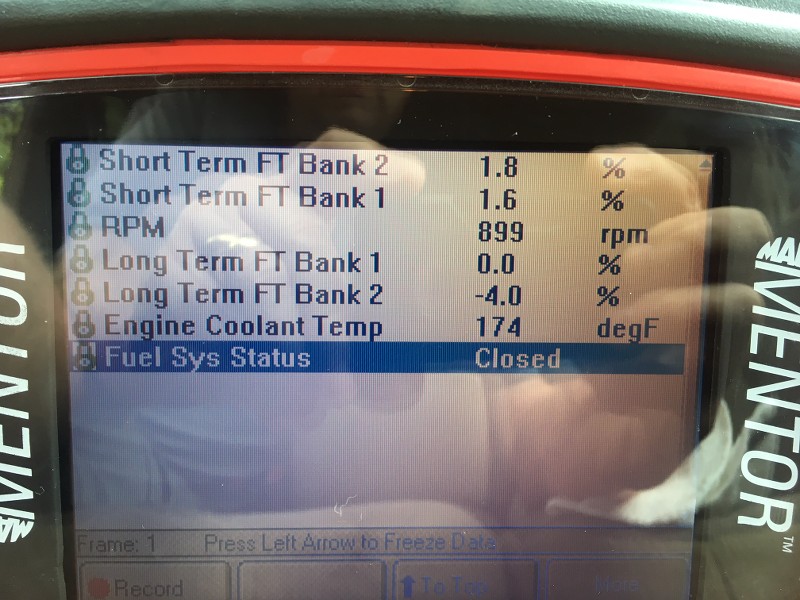
~~~~~~~~~~~~~~~~~~~~~~~~~~~~~~~~~~~~~~~~~~~~~~~~~~~~~~~~~~~~~~~~~~~~~~~~~~~~~~~~~~~~~~~~~~~~~~~~~~~~
6-19-18
Installed 4 new Moog ball joints over the weekend. The truck is a the alignment shop right now getting a caster/camber kit installed and an alignment done.
It was wearing the front tires on the inside only, so I picked it up and put a pry bar under the front wheels and the lower ball joints were really sloppy. While I was tearing it down enough to do the lowers, I did the uppers while I was in there.
I need to rebuild the 3rd brake light on my camper shell when I get the truck back. The outer red lens is fine, but the holder for the incandescent lights on the inside has been beaten to death over the years of hauling lawn care gear in it. I'll post pics of my repair idea when I get it built and finished.
~~~~~~~~~~~~~~~~~~~~~~~~~~~~~~~~~~~~~~~~~~~~~~~~~~~~~~~~~~~~~~~~~~~~~~~~~~~~~~~~~~~~~~~~~~~~~~~~~~~
As of today, 6-26-18
One full tank of fuel through the truck and it is running great!!! After this next tank of fuel, I will reset the trip odometer and see what the average mileage is. Fuel trim are right around -1% and -4%. Not sure why why its having to lean out the mix a little, but its WAY better than it adding +17% and +25%. Fuel economy is definitely much better just by seeing how the needle moves for my usual trips taken with the truck. Right now I have a stop and go 45 minute commute to and from work each day and it's getting easily double the mileage of my 95 F150 with the 4.9. Plus the AC blows colder and the stereo is way nicer to make for a much more civilized commute.
I have been driving it harder and harder, hold speed going over bridges and such way better than it used to. It has way more power over 3000 RPM than I remember it having. Its amazing what all 6 cylinders firing can do for engine smoothness and power.
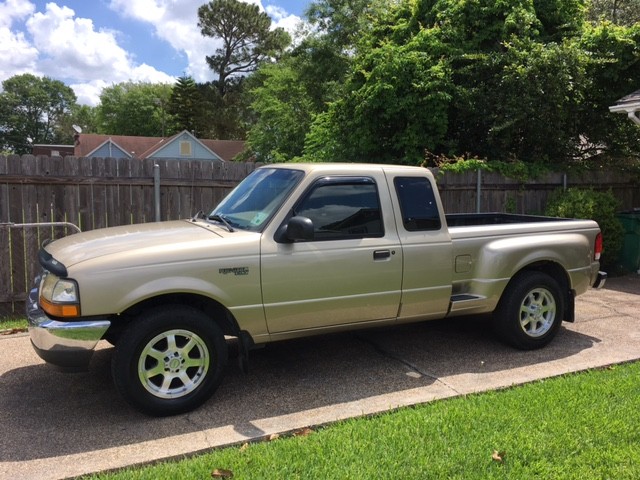
This is with the camper shell off. The rims are American Racing AR899's 16x7.5 and the tires are P225/70R-16 Michelin LTX M/S2 as a package from tire rack already mounted and balanced.
The breaks with the ~~~~~~~ are where it was different posts on different days:
5-16-2018
My 2000 2WD had been getting a worse and worse misfire over time. Add to that random codes for lean conditions and misfires on cylinder 6 on and off. I had swapped in new injectors which helped but the problem would always come back.
If I ran the truck hard, say pushed it to a steady 80 in a 70 for a while and went over a big bridge in the process, the misfire would be more pronounced at idle with the truck really warmed up.
Compression was all over the place on cylinders 4,5 and 6 and would vary as to which cylinder would have the lower pressure from day to day. I finally resolved myself to it being time to pull the heads and see what is up after 180,000 miles. I had read about the exhaust valves hammering themselves into the soft factory valve seats and causing the valves to leak by, worse when really hot.
I bought a set of heads from The Cylinder Head Shop out of WV on ebay for $299, no cores needed to send back, along with head bolts and a Felpro gasket kit.
Got the heads yesterday.
Upon inspection, I am most likely not going to go through the hassle of taking them apart, grinding, cleaning and reassembling. They showed up in much better shape than I was expecting. There isn't much room for port matching to the intake manifold gasket, the valves could be unshrouded a little, but not very much, and there is no casting flash in the runners. I ran my finger through all of them and there are no sharp edges, no flakes sticking off the walls and and all the turns are rounded over already.
I am going to go around the lip where the heads were surfaced and knock off that knife edge where it transitions from deck surface to combustion chamber to help with pinging. I don't see any other sharp edges that would make detonation a problem.
The most work to do would be smoothing the valve guides over to a more rounded tip and like I said, I am not pulling them apart since they are so well assembled right now.
I am going to look over the intake while it off and see how bad it might be.
~~~~~~~~~~~~~~~~~~~~~~~~~~~~~~~~~~~~~~~~~~~~~~~~~~ ~~~~~~~~~~~~~~~~~~~~~~~~~~~~~~~~~~~~~~~~~~~~~~~~~~ ~~~~~~~~~~~~~~~~~~~~~~~~~~~~~~~~~~~~~
5-27-2018
Today was disassembly. No broken bolts!!!!
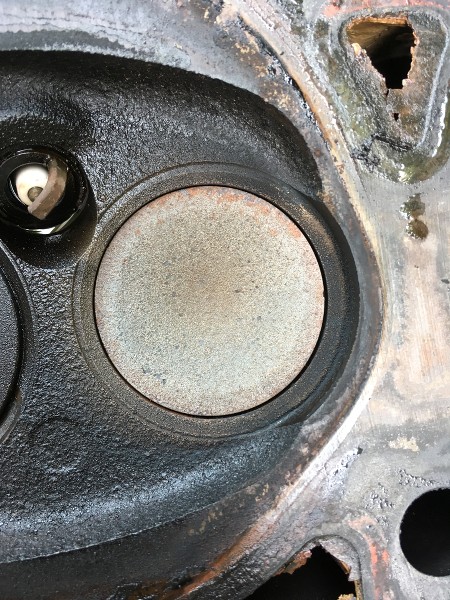
Once the heads were off, my guess on the drivers side head having issues was confirmed by looking at the #4 and #6 exhaust valves:
Cylinders 1,2 and 3 had varying amounts of heat in them as well:
Then I laid the heads flat and filled the combustion chambers with brake parts cleaner and had 5 out of 6 exhaust valves leaking by with the brake parts cleaner coming out of the exhaust ports:
Then I tried to get some better shots at how the valves are sitting in the heads. You can see that they have somewhat shifted in the seat to one side:
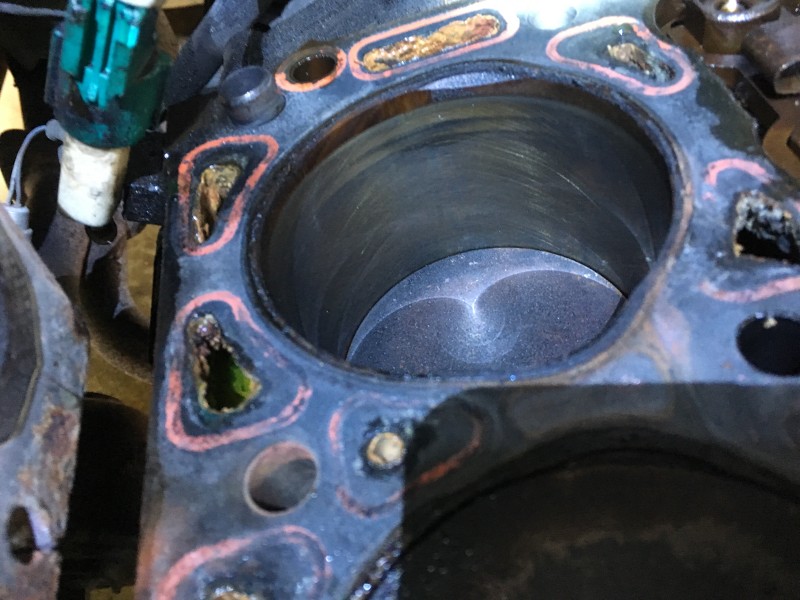
One thing I am happy to see is that the cylinder wall still have a cross hatch after 180,000 miles and no detectable ridge at the top of the cylinder:
~~~~~~~~~~~~~~~~~~~~~~~~~~~~~~~~~~~~~~~~~~~~~~~~~~ ~~~~~~~~~~~~~~~~~~~~~~~~~~~~~~~~~~~~~~~~~~~~~~~~~~ ~~~~~~~~~~~~~~~~~~~~~~~~~~~~~~~~~~~~~~~~~~~~~~~~~~ ~~~~~~~~~~~~~~~~~~~~~~~~~~~~~~~~~~~~~~~~~~~~~
5-28-2018
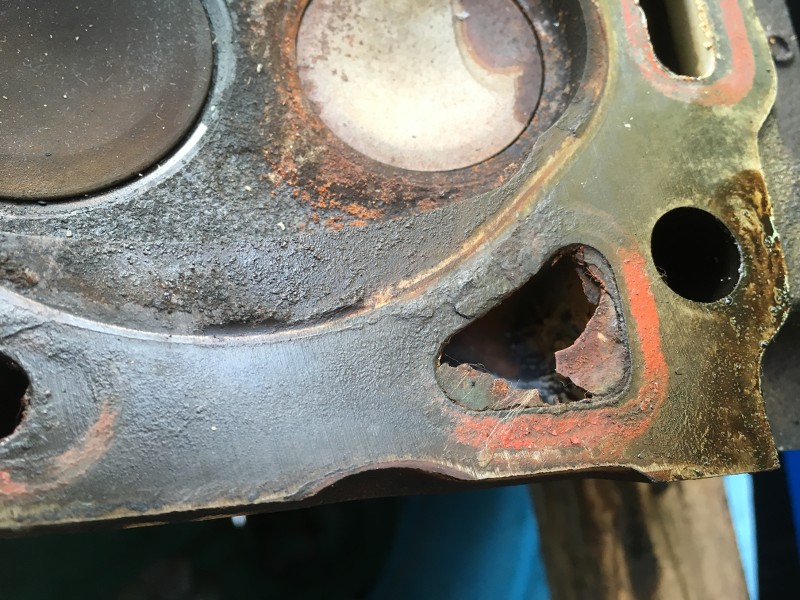
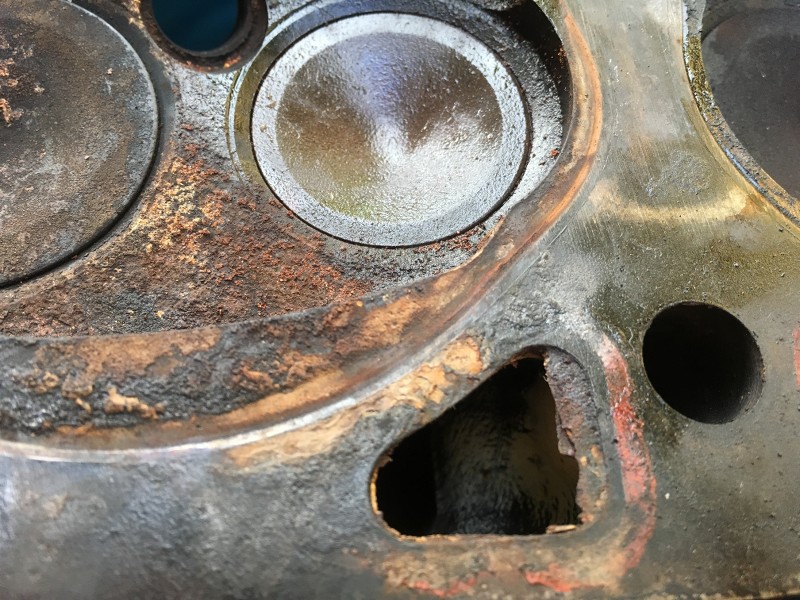
Got it all back together and running. After looking at the heads some more and seeing that cylinder #4's spark plug had a cracked porcelain, the head gaskets on the drivers side were shot. I looks like the metal by the water passage has rusted some and that probably pushed the surface apart to let coolant into the combustion chamber once it pressurized:
I didn't get any more pictures because it was full steam ahead with reassembly.
I am still getting a lean bank 1 code after a while of driving. The short term fuel trims start around 0.90 and the long terms start at 1.00, then as it idles, the short terms slowly come up to 1.00 and the long terms start to climb up to 1.25 until the code gets thrown.
I need to hook up my big scanner and look at the graph of the O2 sensors and see if it is time to replace them.
~~~~~~~~~~~~~~~~~~~~~~~~~~~~~~~~~~~~~~~~~~~~~~~~~~ ~~~~~~~~~~~~~~~~~~~~~~~~~~~~~~~~~~~~~~~~~~~~~~~~~~ ~~~~~~~~~~~~~~~~~~~~~~~~~~~~~~~~~~~~~~~~~~~~~~~~~~ ~~~~~~~~~~~~~~~~~~~~~~~~~~~~~~~~~~~~~~~~~~~~~~
6-6-2018
Okay, got some time to work on the fuel trims today. The truck has been holding steady with a +24% on bank 1 and +17% on bank 2. I have hosed the engine down with water and brake parts cleaner trying to find a vacuum leak to no avail. I was worried the intake gaskets to the heads were leaking and I was going to gave to pull it all off again.
~~~~~~~~~~~~~~~~~~~~~~~~~~~~~~~~~~~~~~~~~~~~~~~~~~ ~~~~~~~~~~~~~~~~~~~~~~~~~~~~~~~~~~~~~~~~~~~~~~~~~~ ~~~~~~~~~~~~~~~~~~~~~~~~~~~~~~~~~~~~~~~~~~~~~~~~~~ ~~~~~~~~~~~~~~~~~~~~~~~~~~~~~~~~~~~~~~~~~~~
6-6-2018
Today, after much video watching about fuel trims, I found one that helped a lot from Pine Hollow Auto Diagnostics. I unplugged my Jet after market MAF and the truck instantly idled better and the fuel trims went diving immediately.
https://youtu.be/FXT49BMxCOg
I amazingly found my OEM MAF sensor and housing and reinstalled them. After starting and letting it run for a while, the LTFT's settled down to bank 1 bouncing between +6 and 7% and bank 2 boucing between 0 and +1%.
I'm hoping the new O2 sensors that are on the way can get them closer to agreeing and Bank 1 being closer to 0.
Also, other good news is that the coolant and oil have both stayed completely full and in their respective parts of the engine. No mixing on vital fluids!!!!
~~~~~~~~~~~~~~~~~~~~~~~~~~~~~~~~~~~~~~~~~~~~~~~~~~ ~~~~~~~~~~~~~~~~~~~~~~~~~~~~~~~~~~~~~~~~~~~~~~~~~~ ~~~~~~~~~~~~~~~~~~~~~~~~~~~~~~~~~~~~~~~~~~~~~~~~~~ ~~~~~~~~~~~~~~~~~~~~~~
6-9-2018
Today was new idler and tensioner pulleys. Tomorrow is a new belt that just arrived, along with the new front O2 sensors that showed up today too.
That should be it for maintenance for a while, then I drive the truck as my daily driver again.
Before I put the new heads on, I did put a sanding drum on my Dremel tool and took off that knife edge around the combustion chambers on the heads where they were surfaced. Just rolled that sharp edge over to be round and stop it from being such an isolated hot spot. I also rolled the engine over to get each piston to top dead center and used a scraper to get the carbon buildup off of the piston faces so I can start from scratch on carbon.
~~~~~~~~~~~~~~~~~~~~~~~~~~~~~~~~~~~~~~~~~~~~~~~~~~~~~~~~~~~~~~~~~~~~~~~~~~~~~~~~~~~~~~~~~~~~~~~~~~
6-10-18
I changed the serpentine belt today. I am letting the truck cool off before I tackle the O2 sensors. Since I have the underdrive crank pulley to turn all the accessories slower and also a smaller alternator pulley to speed just that back up to factory speed, my belt was a Goodyear/Continental 4060865 / 6PK2195. Its shorter than stock and fit perfectly for my application:
~~~~~~~~~~~~~~~~~~~~~~~~~~~~~~~~~~~~~~~~~~~~~~~~~~~~~~~~~~~~~~~~~~~~~~~~~~~~~~~~~~~~~~~~~~~~~~~~
6-10-18
Swapped out the O2 sensors today. Had to buy the O2 sensor crows foot wrench from Harbor Freight. That made it much easier.
Fired the truck up and once the fuel system went closed loop, Bank one was +1% long term and Bank two is -1% long term. So I am hoping the fuel trims will be nearly perfect once the computer reads for a while and gets the fuel tables sorted out.
And while I was under the truck, I noticed that the front tires are wearing the inside tread more. Jacked it and put a pry bar under the tires to find out that I need 4 new ball joints. It only really needs the lowers, but if I am going that deep into the suspension, I am changing all 4.
~~~~~~~~~~~~~~~~~~~~~~~~~~~~~~~~~~~~~~~~~~~~~~~~~~~~~~~~~~~~~~~~~~~~~~~~~~~~~~~~~~~~~~~~~~~~~~~~~~
6-10-18
Here's the data stream after all engine related repairs done. The computer still has to relearn the fuel trims after the new O2 sensors. Went from +25% and +17% to 0% and -4% on long term. I think that proves I don't have any vacuum leaks and all is well. Now once the ball joints arrive from Rockauto, I can rebuild the front end and have it back as my daily driver. Until then, its horrible gas mileage in the F150.
~~~~~~~~~~~~~~~~~~~~~~~~~~~~~~~~~~~~~~~~~~~~~~~~~~~~~~~~~~~~~~~~~~~~~~~~~~~~~~~~~~~~~~~~~~~~~~~~~~~~
6-19-18
Installed 4 new Moog ball joints over the weekend. The truck is a the alignment shop right now getting a caster/camber kit installed and an alignment done.
It was wearing the front tires on the inside only, so I picked it up and put a pry bar under the front wheels and the lower ball joints were really sloppy. While I was tearing it down enough to do the lowers, I did the uppers while I was in there.
I need to rebuild the 3rd brake light on my camper shell when I get the truck back. The outer red lens is fine, but the holder for the incandescent lights on the inside has been beaten to death over the years of hauling lawn care gear in it. I'll post pics of my repair idea when I get it built and finished.
~~~~~~~~~~~~~~~~~~~~~~~~~~~~~~~~~~~~~~~~~~~~~~~~~~~~~~~~~~~~~~~~~~~~~~~~~~~~~~~~~~~~~~~~~~~~~~~~~~~
As of today, 6-26-18
One full tank of fuel through the truck and it is running great!!! After this next tank of fuel, I will reset the trip odometer and see what the average mileage is. Fuel trim are right around -1% and -4%. Not sure why why its having to lean out the mix a little, but its WAY better than it adding +17% and +25%. Fuel economy is definitely much better just by seeing how the needle moves for my usual trips taken with the truck. Right now I have a stop and go 45 minute commute to and from work each day and it's getting easily double the mileage of my 95 F150 with the 4.9. Plus the AC blows colder and the stereo is way nicer to make for a much more civilized commute.
I have been driving it harder and harder, hold speed going over bridges and such way better than it used to. It has way more power over 3000 RPM than I remember it having. Its amazing what all 6 cylinders firing can do for engine smoothness and power.
This is with the camper shell off. The rims are American Racing AR899's 16x7.5 and the tires are P225/70R-16 Michelin LTX M/S2 as a package from tire rack already mounted and balanced.
Last edited: