
FliesLikeABrick
New Member
- Joined
- May 12, 2021
- Messages
- 11
- Reaction score
- 19
- Points
- 3
- Location
- Virginia, US
- Vehicle Year
- 1995
- Make / Model
- Ford Ranger
- Transmission
- Manual
I am working on my 2nd Ford Ranger at home - a 1998 instead of 1995 this time. In another thread I'll post soon, I will my at-home solutions to a few challenges while rebuilding the power steering rack.
Now I am turning my attention to one of the remaining issues, a very floppy/loose shift lever on the steering column.
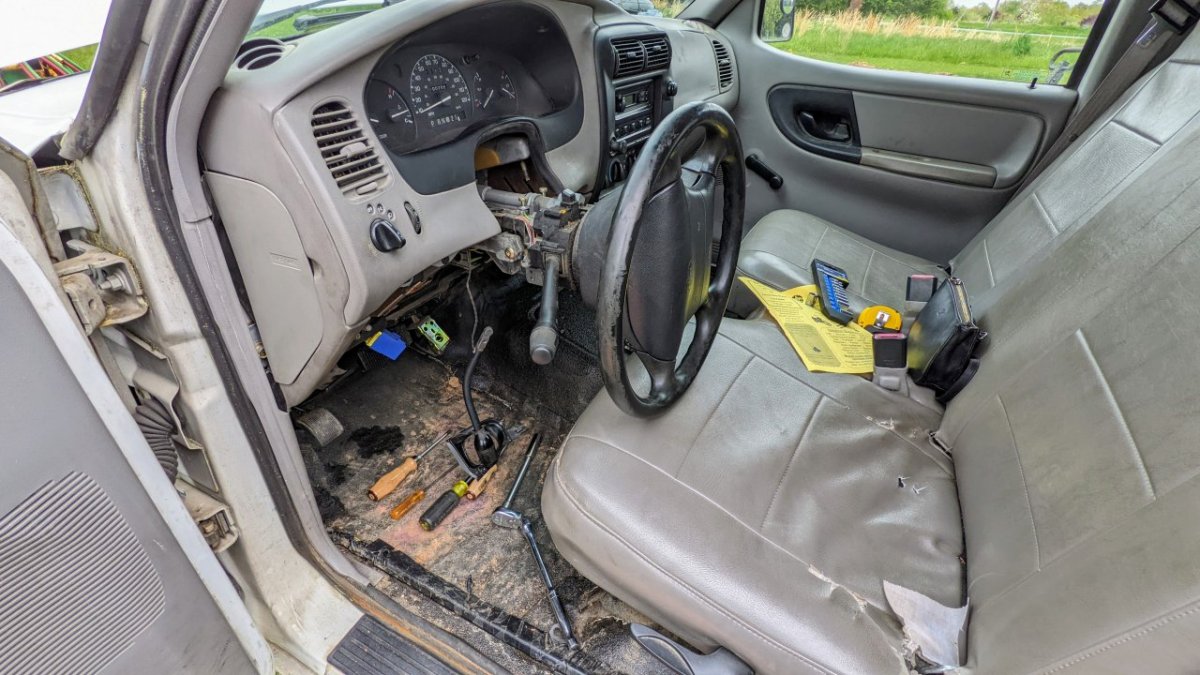
This Ranger spent over 20 years as a fleet/campus vehicle at a power plant, so everything between the operator and the transmission had atypically high wear from constant shifting park/reverse/drive -- way more shifting action per mile than a typical vehicle. The lever flops forward and back, and has excessive play/lost motion vertically when trying to shift the automatic transmission. There are other parts that needed TLC, such as the transmission range "sensor"/module which had a worn out contact (for the reverse light/beeper circuit).
When I removed the covers for the steering column, I found a broken piece of the "shift plunger" that had fallen out the back of the shift tube. The input lever is supposed to hook into the plunger and push/pull it to unlock and allow rotation of the shift tube to move the cable at the bottom of the shift column, in turn shifting the transmission.
First step was to pull the knee bolster cover and panel, then drop the steering column down to rest on the seat.
This allowed access to the 7x T30 fasteners that hold down the shift tube and the shift interlock solenoid towards the rear.
There are also 2 fasteners that attach the final linkage (from the cable) to the bottom end of the shift tube assembly.
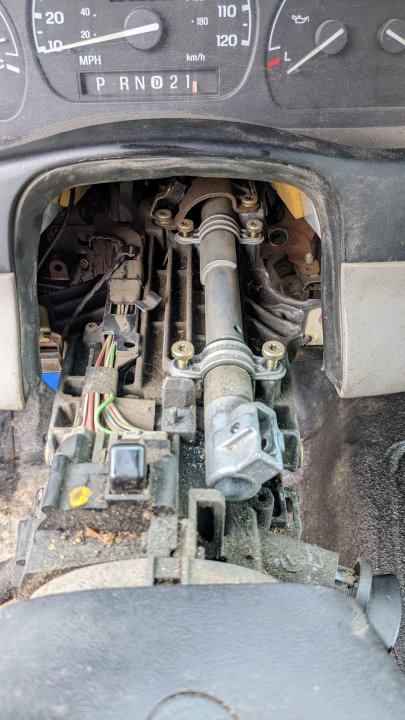
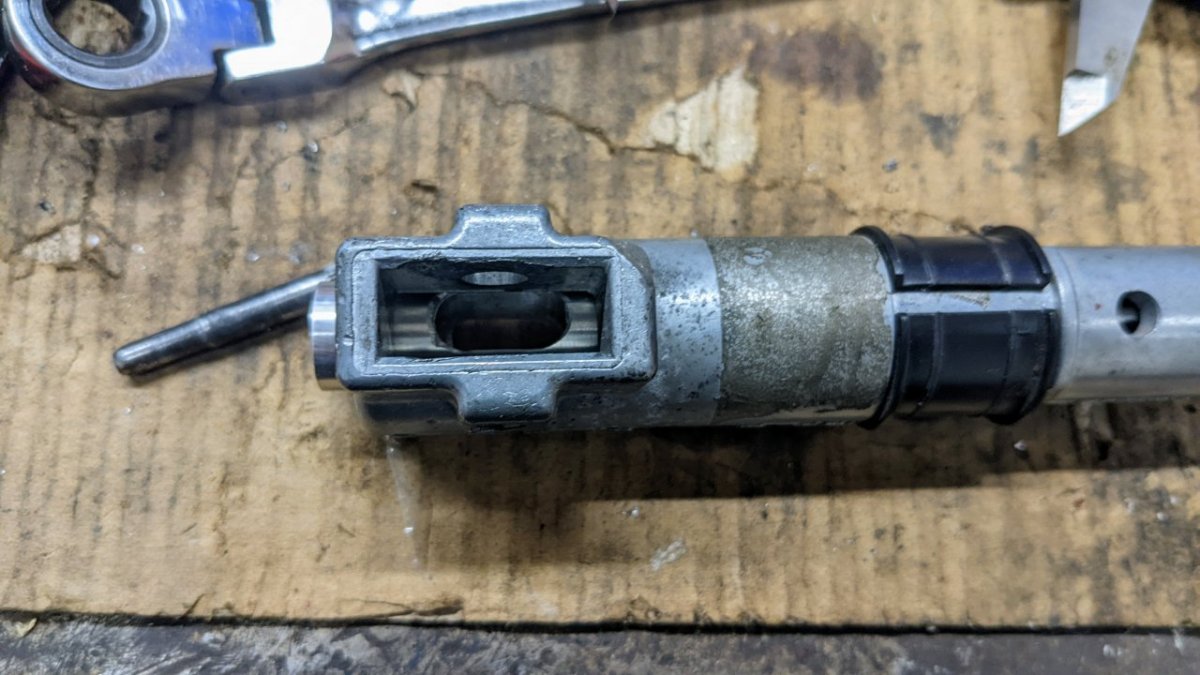
This assembly has the broken plunger inside.
Normally the rectangular slot in the plunger holds the end of the shift lever captive. However with it broken off, various forces from the lever seemed to be acting in less-than-ideal ways. The plunger is galled on one side, the retaining pin holes in the outer tube are all egged out (the pin rattled around loose), etc.
I suspect it is not a coincidence that this zinc (or pot metal) casting broke in the corners of the slot.
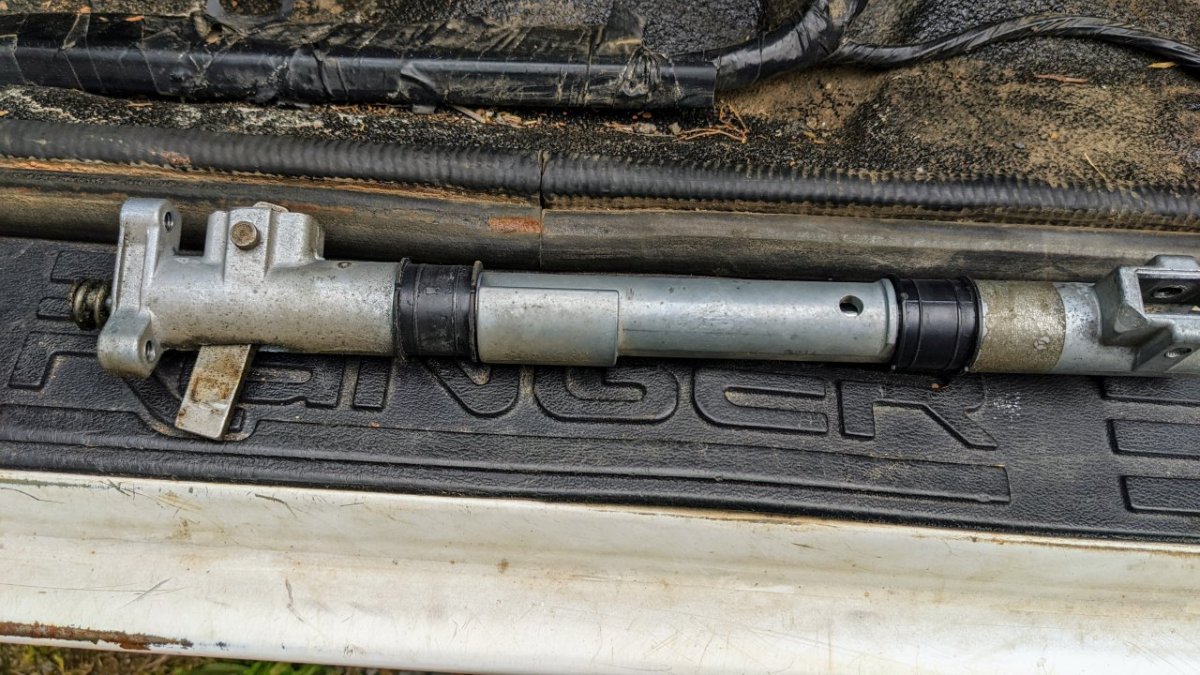
This is not an expensive part, the entire tube+plunger assembly can be purchased aftermarket for $35-50. However, I wanted to use this as an exercise in repairing damaged components.
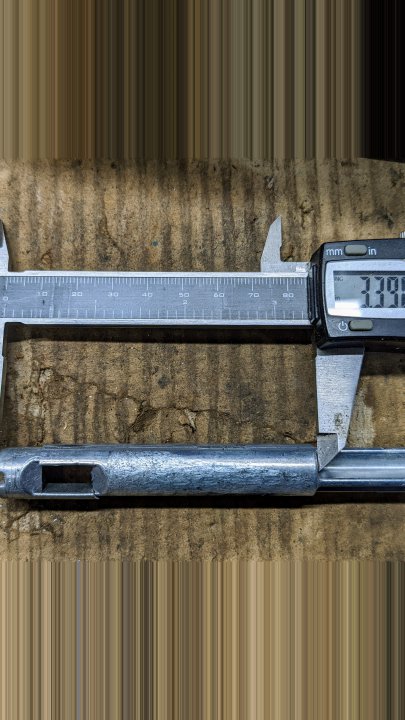
First I took measurements and made a rough sketch of what the overall dimensions should be, as well as the size and location of the slot.
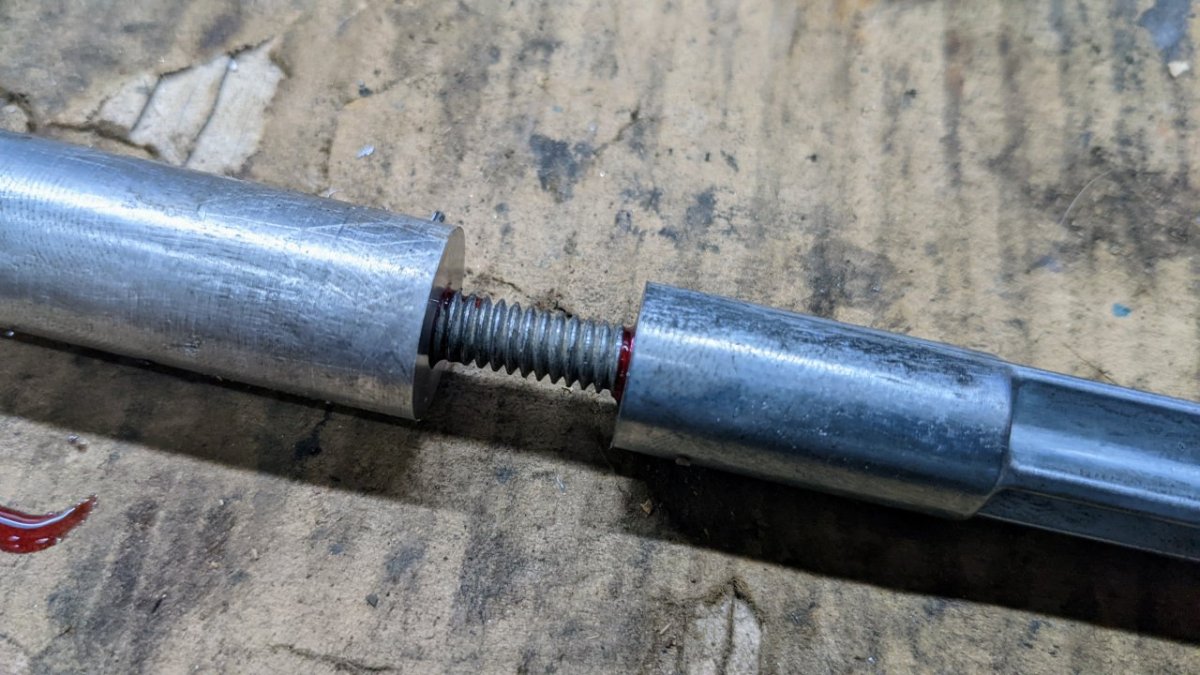
I parted off the end of the plunger approximately in the middle of the solid cast portion, to allow for maximum strength in the repair. Drilled and tapped for 1/4-20 threads.
Then turned a scrap of aluminum round stock down, drilled+tapped for 1/4-20 as well. Cut a spare 1/4-20 bolt down to just 1.25" of threads, and threaded the pieces together with red locktite.
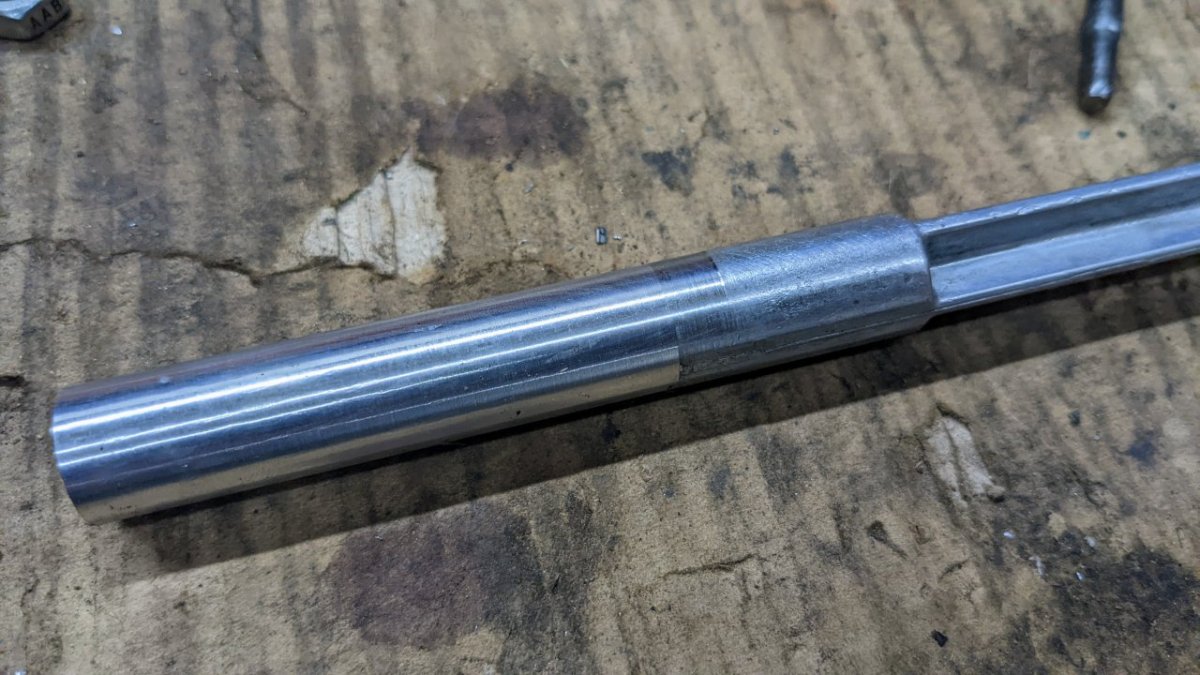
After allowing the locktite to set a bit, I went back to the lathe and turned the new Aluminum end down to the same dimension as the original plunger OD.

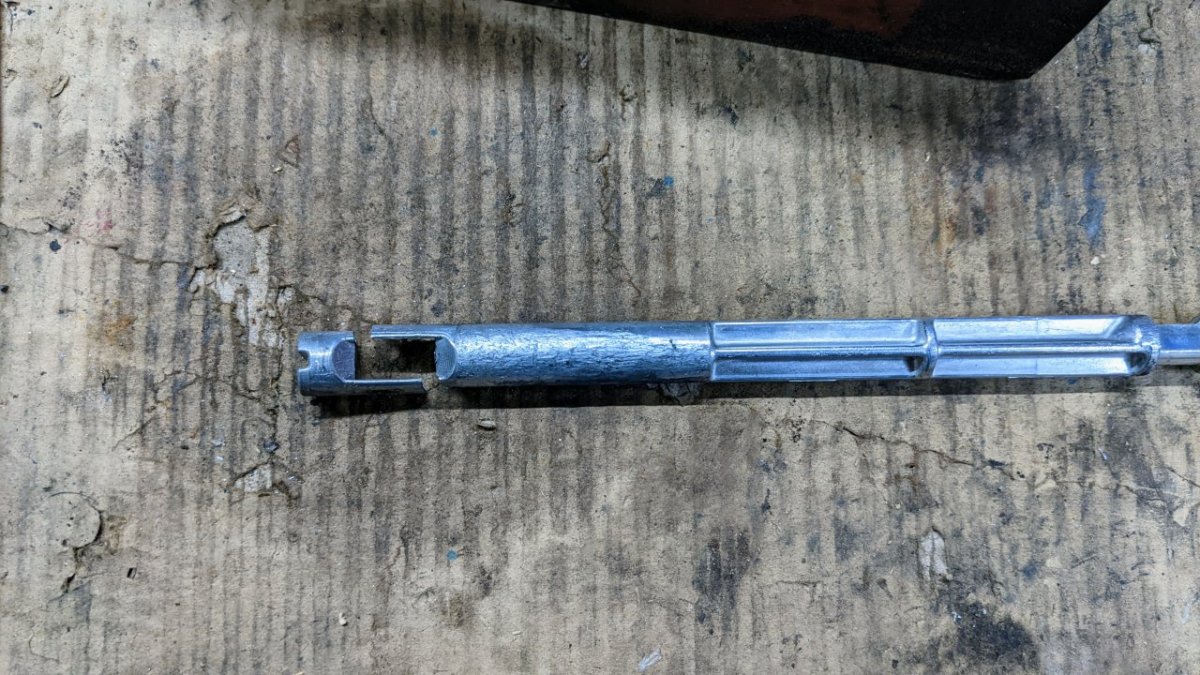
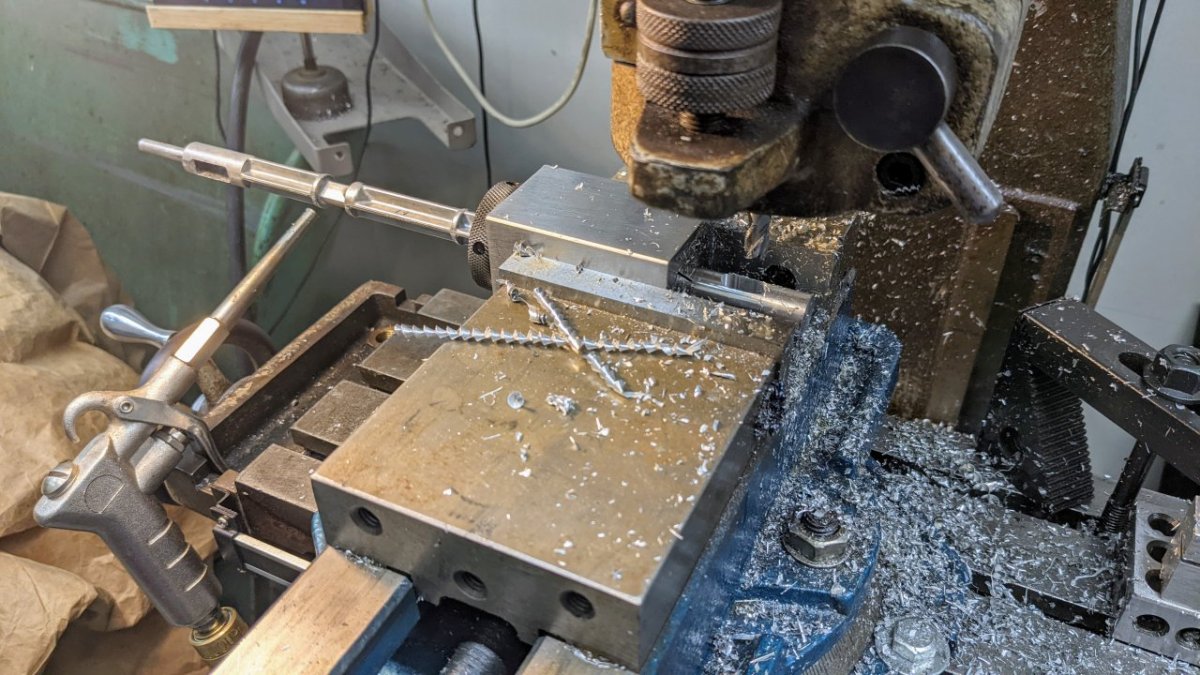
The slot needs to be 90 degrees oriented from a similar slot at the far end that the shift interlock arm+solenoid act upon. To do this I held a parallel through the lower slot with a magnetic-based digital protractor on it, and oriented it in the collet block until it was almost perfectly level (give or take 0.2 degrees).
Milled the slot with a 5/16" end mill, after drilling a pilot hole to plunge the end mill into. I erred on the smaller side for the slot, figuring I would rather have to come back and enlarge it (or file it square) than go too big at first.
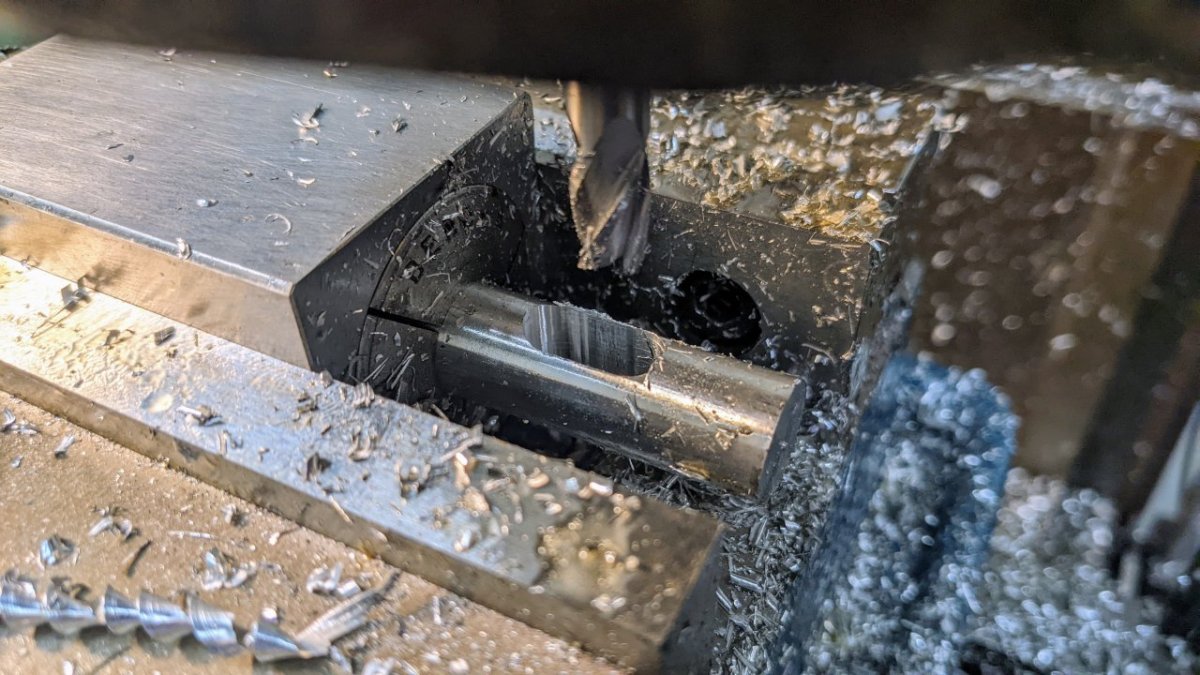
The slot came out plenty clean for this repair.
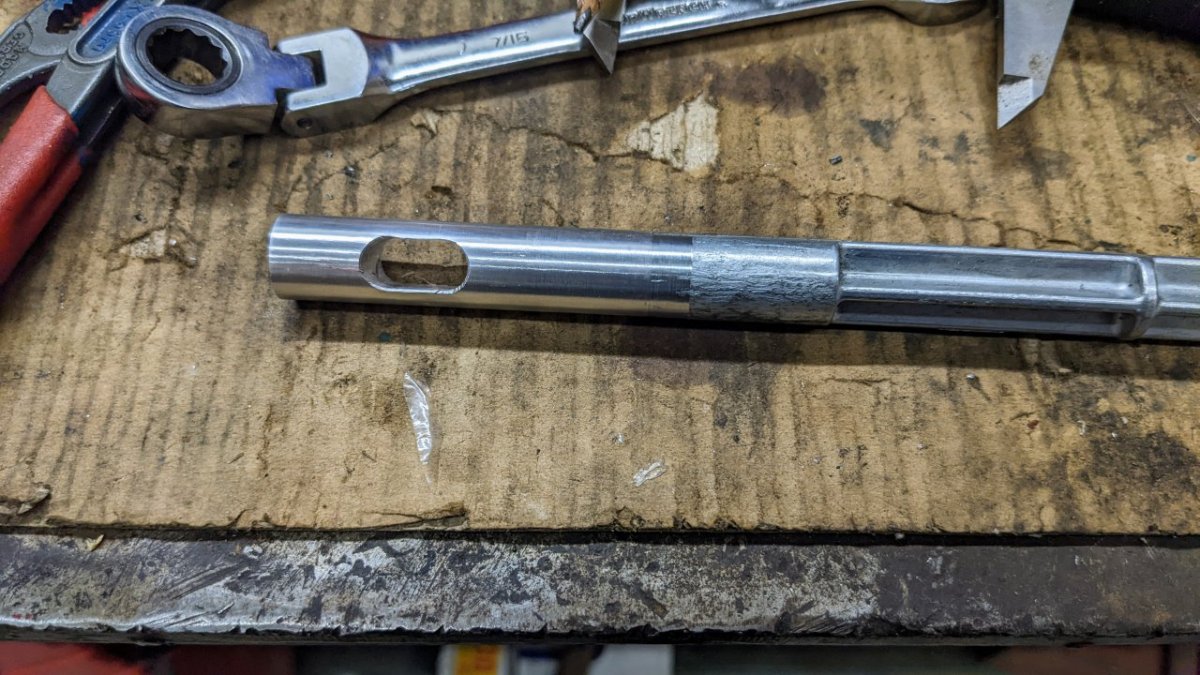
Alignment is pretty good when reassembled. After some dry-fitting, I did need to file the end of the slot square to get proper clearance for the shift lever. When "pulling" the lever towards the operator to unlock the shifter rotation, it was binding at the back of the slot before unlocking the shift rotation, which was the intention from undersizing the oval slot at the mill.
Dry fitting the assembly in the truck, I confirmed that the original retaining pin would not stay in place in the tube. The holes were egged out from wear after the original damage to the plunger, and play in all the parts.
I decided to replace it with an M5 bolt and nylock nut, however these had some play in the egged-out holes. I wanted to do something to take up the slot and prevent further wear, and the risk of breaking through the edge of the casting. In the picture below you can see a pile of zinc swarf in the background, from the years of wear as these parts ground against each other.
I decided to make a pair of small flanged bushings to take up the slop and also act as washers for the new bolt that was a tiny bit too long.
Slightly different dimensions for the top and bottom based on the dimensions of and damage to the casting over time.
Scrap brass from my inherited cutoffs pile. Turned the OD to an arbitrary size near the bolt head diameter to clean it up. Turned the reduced OD to fit the bore in the casting; then C=center drilled, pilot drilled, then used the nearest number drill to get the target ID.
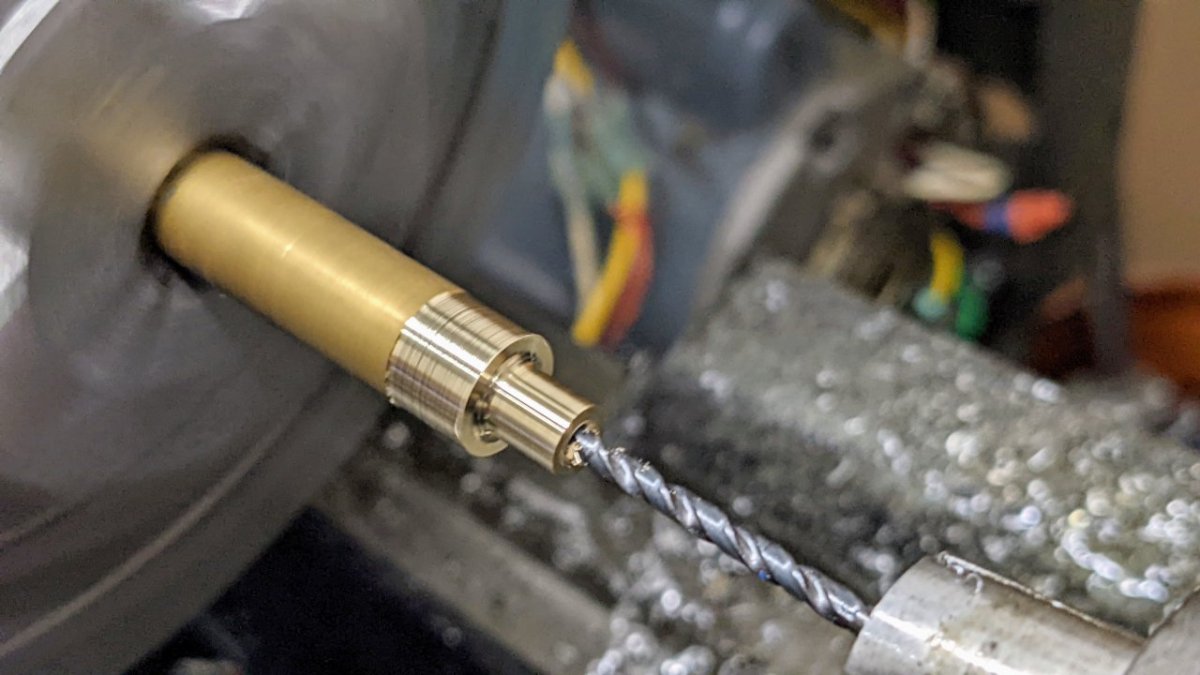
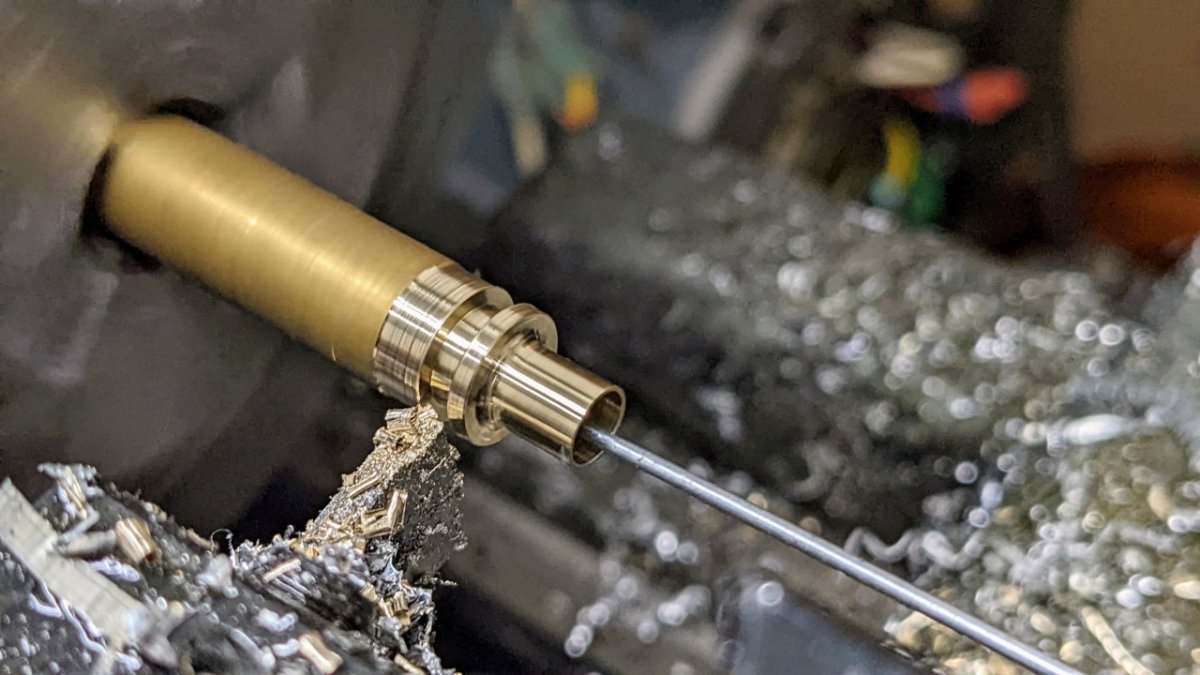
These are some of the smaller parts I have turned to date, and also amongst my favorite. Very thin walls, a reasonable order of operations, and I am fond of small brass parts in general.
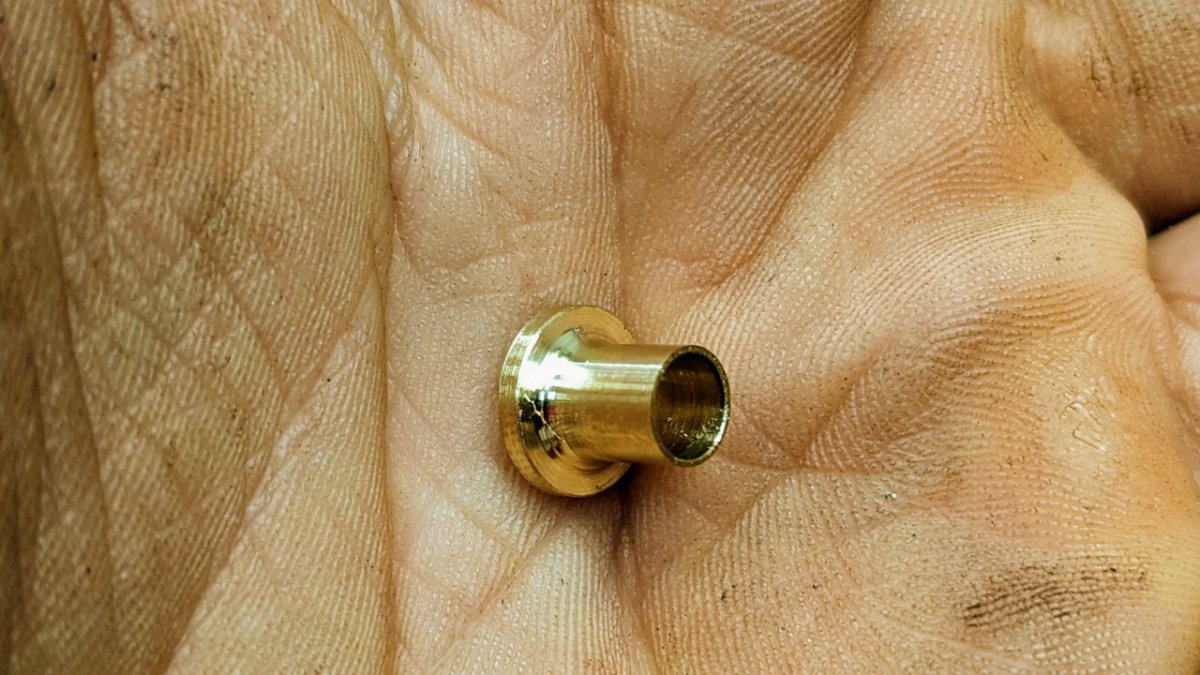
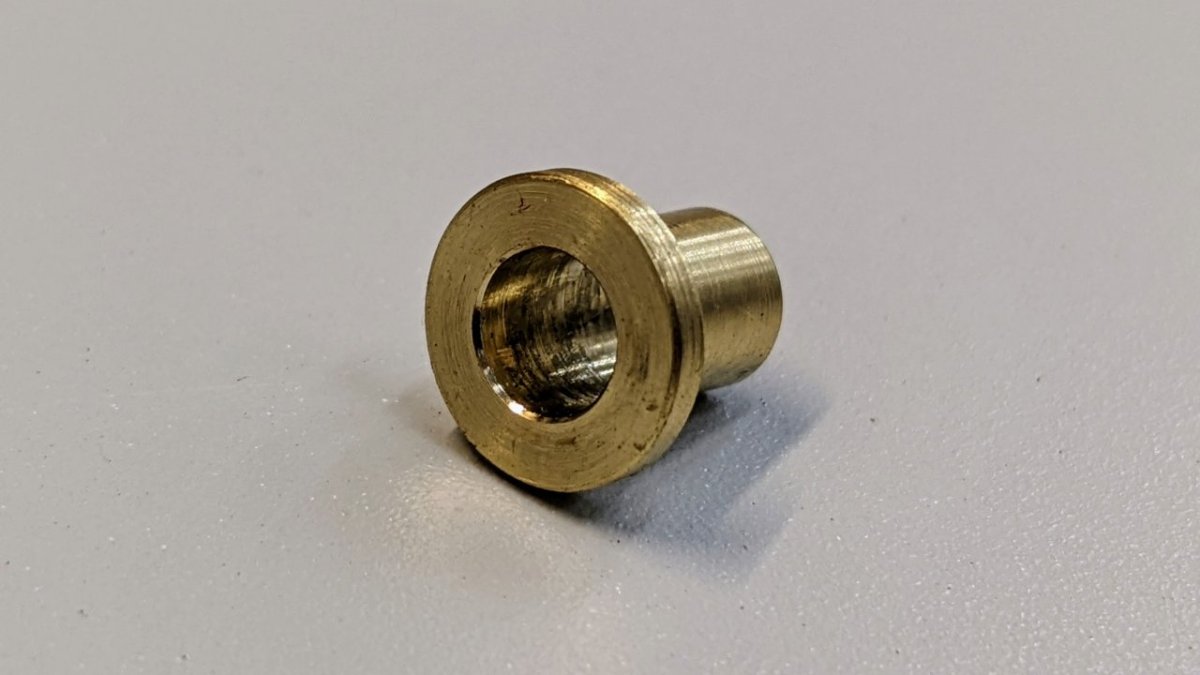
Very happy with the outcome. They were a light press fit, and the bolt was a snug fit on the inside. Probably .0005" interference inside+out, though my machining tolerance was probably .001" at the lathe for this -- I figured being thin brass, it would be forgiving and would push inward or outward depending on how it fit the damaged bore in the casting and the bolt itself.

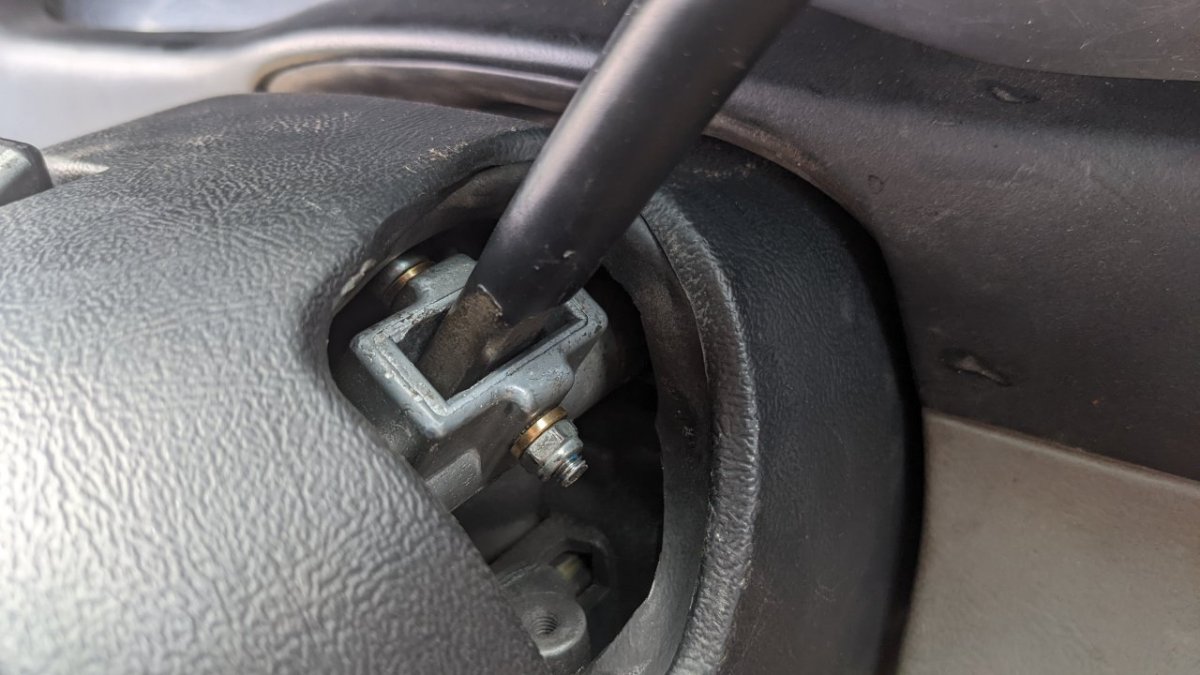
Tightening the nut and bolt drove the bushings in to fully seat
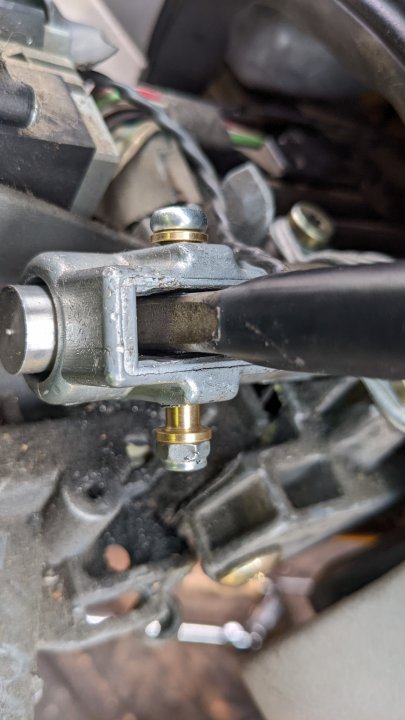
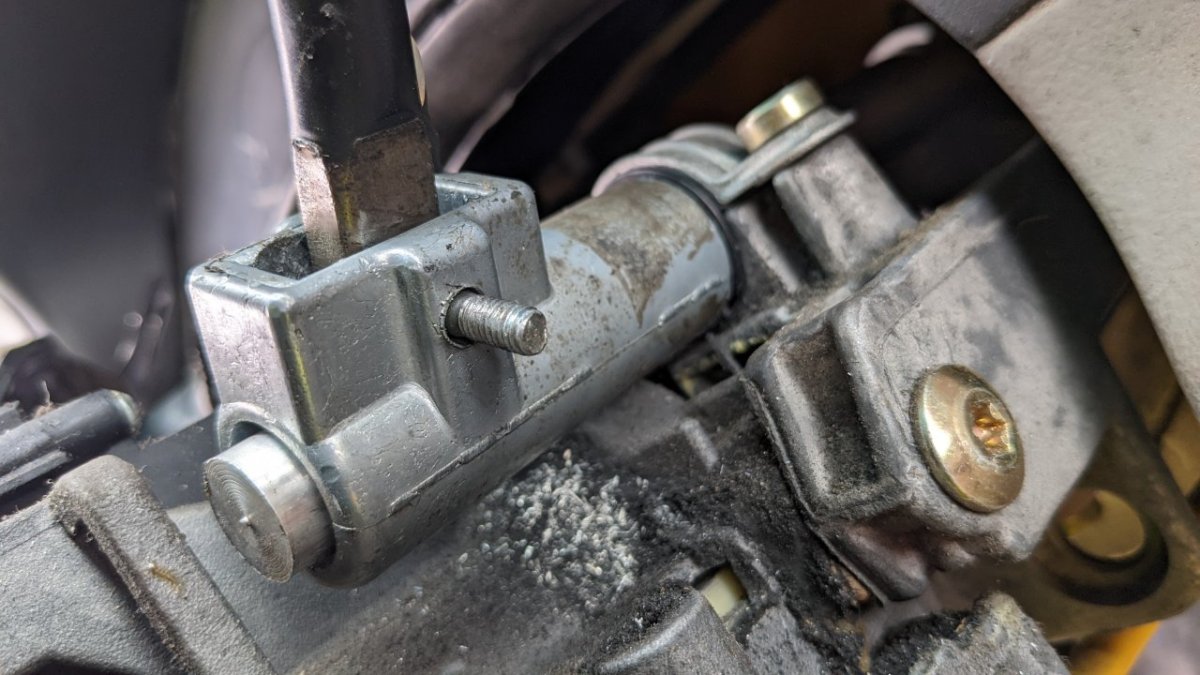
And the final outcome -- visible to the discerning operator, since the rubber boot that is supposed to hide this tore away years ago.
Thanks for reading
Now I am turning my attention to one of the remaining issues, a very floppy/loose shift lever on the steering column.
This Ranger spent over 20 years as a fleet/campus vehicle at a power plant, so everything between the operator and the transmission had atypically high wear from constant shifting park/reverse/drive -- way more shifting action per mile than a typical vehicle. The lever flops forward and back, and has excessive play/lost motion vertically when trying to shift the automatic transmission. There are other parts that needed TLC, such as the transmission range "sensor"/module which had a worn out contact (for the reverse light/beeper circuit).
When I removed the covers for the steering column, I found a broken piece of the "shift plunger" that had fallen out the back of the shift tube. The input lever is supposed to hook into the plunger and push/pull it to unlock and allow rotation of the shift tube to move the cable at the bottom of the shift column, in turn shifting the transmission.
First step was to pull the knee bolster cover and panel, then drop the steering column down to rest on the seat.
This allowed access to the 7x T30 fasteners that hold down the shift tube and the shift interlock solenoid towards the rear.
There are also 2 fasteners that attach the final linkage (from the cable) to the bottom end of the shift tube assembly.
This assembly has the broken plunger inside.
Normally the rectangular slot in the plunger holds the end of the shift lever captive. However with it broken off, various forces from the lever seemed to be acting in less-than-ideal ways. The plunger is galled on one side, the retaining pin holes in the outer tube are all egged out (the pin rattled around loose), etc.
I suspect it is not a coincidence that this zinc (or pot metal) casting broke in the corners of the slot.
This is not an expensive part, the entire tube+plunger assembly can be purchased aftermarket for $35-50. However, I wanted to use this as an exercise in repairing damaged components.
First I took measurements and made a rough sketch of what the overall dimensions should be, as well as the size and location of the slot.
I parted off the end of the plunger approximately in the middle of the solid cast portion, to allow for maximum strength in the repair. Drilled and tapped for 1/4-20 threads.
Then turned a scrap of aluminum round stock down, drilled+tapped for 1/4-20 as well. Cut a spare 1/4-20 bolt down to just 1.25" of threads, and threaded the pieces together with red locktite.
After allowing the locktite to set a bit, I went back to the lathe and turned the new Aluminum end down to the same dimension as the original plunger OD.
The slot needs to be 90 degrees oriented from a similar slot at the far end that the shift interlock arm+solenoid act upon. To do this I held a parallel through the lower slot with a magnetic-based digital protractor on it, and oriented it in the collet block until it was almost perfectly level (give or take 0.2 degrees).
Milled the slot with a 5/16" end mill, after drilling a pilot hole to plunge the end mill into. I erred on the smaller side for the slot, figuring I would rather have to come back and enlarge it (or file it square) than go too big at first.
The slot came out plenty clean for this repair.
Alignment is pretty good when reassembled. After some dry-fitting, I did need to file the end of the slot square to get proper clearance for the shift lever. When "pulling" the lever towards the operator to unlock the shifter rotation, it was binding at the back of the slot before unlocking the shift rotation, which was the intention from undersizing the oval slot at the mill.
Dry fitting the assembly in the truck, I confirmed that the original retaining pin would not stay in place in the tube. The holes were egged out from wear after the original damage to the plunger, and play in all the parts.
I decided to replace it with an M5 bolt and nylock nut, however these had some play in the egged-out holes. I wanted to do something to take up the slot and prevent further wear, and the risk of breaking through the edge of the casting. In the picture below you can see a pile of zinc swarf in the background, from the years of wear as these parts ground against each other.
I decided to make a pair of small flanged bushings to take up the slop and also act as washers for the new bolt that was a tiny bit too long.
Slightly different dimensions for the top and bottom based on the dimensions of and damage to the casting over time.
Scrap brass from my inherited cutoffs pile. Turned the OD to an arbitrary size near the bolt head diameter to clean it up. Turned the reduced OD to fit the bore in the casting; then C=center drilled, pilot drilled, then used the nearest number drill to get the target ID.
These are some of the smaller parts I have turned to date, and also amongst my favorite. Very thin walls, a reasonable order of operations, and I am fond of small brass parts in general.
Very happy with the outcome. They were a light press fit, and the bolt was a snug fit on the inside. Probably .0005" interference inside+out, though my machining tolerance was probably .001" at the lathe for this -- I figured being thin brass, it would be forgiving and would push inward or outward depending on how it fit the damaged bore in the casting and the bolt itself.
Tightening the nut and bolt drove the bushings in to fully seat
And the final outcome -- visible to the discerning operator, since the rubber boot that is supposed to hide this tore away years ago.
Thanks for reading
Last edited:


