• Welcome Visitor! Please take a few seconds and Register for our forum. Even if you don't want to post, you can still 'Like' and react to posts.

Need a metal workers opinion on what to use.


Ramcharger90

Well-Known Member
Article Contributor
V8 Engine Swap
Joined
Feb 11, 2019
Messages
2,953
Reaction score
1,708
Points
113
Location
N/A na
Vehicle Year
1990
Make / Model
Ford Ranger
Engine Type
V8
Engine Size
306, Bcam,
Transmission
Manual
2WD / 4WD
2WD
1 - 16 guage is as thin as I would go. 16 guage is easy to work with but more than strong enough.
18 gauage would be an option IF the mounts your making have alot of bends and folds that will add support.
2 - no need for cold rolled. You only need cold roll if you need to start with cleaner metal (hot rolled has black scale on it) the strength difference between the two is so minuscule it's basically a useless argueing point unless you're a spacecraft engineer.
3 - best way to paint is to clean it to death, use an etching primer, then a normal primer, then pretty much any quality enamel will work fine. I've done frames with rusteoleum enamel that still look good after 15 years. It's all in the prep. If you wanna go nuts add a clear coat for extra chip protection.
Or you could just buy the mountaineer bumper and fog lights/lower valance I got lying around....


Bgunner

Well-Known Member
Supporting Member
Joined
May 14, 2018
Messages
1,776
Reaction score
1,081
Points
113
Location
Western Mass.
Vehicle Year
1994
Make / Model
Ford/Ranger XLT
Engine Type
3.0 V6
Transmission
Manual
2WD / 4WD
2WD
Tire Size
225/70/R15
My credo
If it's not broken Don't Fix It!
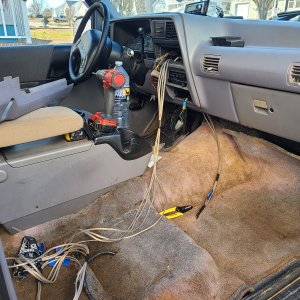
My lights have arrived!! Oh they look really good in those holes with the smoked lens' but I can't make the brackets today. ? Before the rain hit I did manage to get the wiring straitened out, I put a switch in, installed the relay and test it. Since I have already run a amp wire through the fire wall I just used that hole to get the power from my switch to the Yellow wire Pin #24 in the grommet. Sadly because of the rain no pics of this part because its poring out there now. I'll try tomorrow to get some pics and update whats going on with it.
 

Bgunner

Well-Known Member
Supporting Member
Joined
May 14, 2018
Messages
1,776
Reaction score
1,081
Points
113
Location
Western Mass.
Vehicle Year
1994
Make / Model
Ford/Ranger XLT
Engine Type
3.0 V6
Transmission
Manual
2WD / 4WD
2WD
Tire Size
225/70/R15
My credo
If it's not broken Don't Fix It!
Update: Wiring Pictures, I kinda like doing fresh wiring... Odd aye

Here we have the control wire, 14 gauge small red, for the fog light relay going through the fire wall. Brown wire for ground for the lighted switch. I used one of the Parking Brake mechanisms bolts for a quick ground instead of tearing into the wiring harness to find a ground.


Here we have the switch installed. I went with amber since most of the dummy lights are amber to keep the feel of stock-ish.


Because the Lights I ordered came with the mustang wiring connectors, and about 2" too short wires, I used some heat shrink butt connectors along with heat shrink Bullet connectors to lengthen and connect the wires.


Just for timeline clarity, Under Hood/Front wiring was done after the first part of the brackets were drilled and installed.

To allow for adjustment I drilled oblong holes for both the mount to the bumper and the lights. In this next Pic you can see the oblong hole for the bumper bolt.
Because my welder is in the cellar here at my home I can't carry it up the stairs to attach the second part of the bracket. When I can get one of the kids to swing by I'll attach the flat stock and finish paint them.


SO I'm in a holding pattern again... Ugg so close to finishing I can taste it.
 

Bgunner

Well-Known Member
Supporting Member
Joined
May 14, 2018
Messages
1,776
Reaction score
1,081
Points
113
Location
Western Mass.
Vehicle Year
1994
Make / Model
Ford/Ranger XLT
Engine Type
3.0 V6
Transmission
Manual
2WD / 4WD
2WD
Tire Size
225/70/R15
My credo
If it's not broken Don't Fix It!
I was able to get my welder upstairs so I got one bracket welded and finish painted.


Once the paint is fully dry I'll install this one and weld up the other bracket.
 

Sponsored Ad


Sponsored Ad

Staff online

Member & Vendor Upgrades

For a small yearly donation, you can support this forum and receive a 'Supporting Member' banner, or become a 'Supporting Vendor' and promote your products here. Click the banner to find out how.

Latest posts

Truck of The Month


Shran
April Truck of The Month

Recently Featured

Want to see your truck here? Share your photos and details in the forum.

Follow TRS On Instagram

TRS Events

25th Anniversary Sponsors

Check Out The TRS Store


Sponsored Ad


Sponsored Ad

Sponsored Ad


Amazon Deals

Top