By 4X4Junkie
If funds are tight (or you just simply don’t feel like putting up the dough for a regular lift kit) there are a few alternatives that just may let you get that next size up tire under your ride.
Following are some methods that range from free to about $100 or so in materials cost, and will provide anywhere from about 1.5 – 3″ lift depending on the particular vehicle being lifted.
1983-1997 vehicles:
These vehicles with the Twin-Beam suspension can be lifted using a spacer under the front coilsprings. These spacers range in thickness to provide about 1 – 2″ of lift, and fit over the axle stud/bolt that secures the lower spring perch. You can also use large diameter washers as shims to raise it as well. You can stack as many spacers/washers as needed as long as there is sufficient thread length to reattach the spring retainer & washer.
On 2WD vehicles, you can replace the bolt that runs through the axle-beam with a longer one. The stock bolt will only allow you to add about 3/4″ spacer. Be sure to use a grade 8 bolt & nuts.
There are also new coils you can purchase called “leveling” coils that will usually provide a 2″ lift or so. These will vary in the actual amount of lift depending on body type and engine, though. A V6 Supercab will get less lift from new coils than a shortbox 4cyl. They also are more costly than simple spacers, but could add a bit more flex.
4.0L Supercab or Explorer coils can be used on a lighter shortbox Ranger for a little lift, also. This will stiffen the ride considerably (might be good if you play real rough).
Keep in mind however, once you exceed about 2″ of lift (2.5″ on 2WD), you stand a chance of not being able to realign the front-end back to proper specifications. This will vary from vehicle to vehicle. Some vehicles may still be alignable at 2.5″ (3″ on 2WD), however. This will depend on where the setting is currently at on the vehicle you wish to lift. In general, I have found Supercab 4.0L V6 Rangers to have more adjustment range left to allow for more lift than 4cyl or shortbox models.
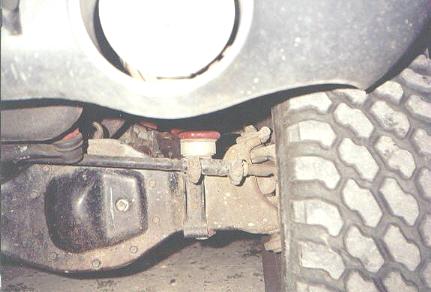
Pictured is a coilspacer on a Twin-Beam 4X4. The 2WD setup is similar. (notice one washer under it. Washers can be combined with the spacer, if needed)

These spacers can be had at most 4×4 shops for around $30-40 for the pair. The Ford dealer also sells a similar item that was intended for use on 2WD F-150s. these can be adapted to function the same as the above pictured spacer.
Ford pt#s for these spacers: (one each, about $15)
F2TZ-5A307-A
F2TZ-5A307-B
(Click HERE for a bit more info on the Ford spacers)
Washers are of course as close as your nearest hardware store.
Whatever you do, avoid those “twist-in” spacer things or anything else sold at auto parts chain stores that goes in between the coil windings. These are actually dangerous as they could pop out and/or damage the coil under the extreme pressures that occur off-road.
Front-end realignment is required after installation of the spacer or new coils on any model prior to ’98. I recommend you find an alignment shop experienced in the off-road field. A 4WD shop should be able to handle the alignment. I have found a fairly large number of “average” alignment places (chains in particular) lack the expertise and/or knowledge when it comes to Ford suspensions that have been slightly modified.
For a bit of extra suspension travel, you can put a 1 – 2″ longer shock on the front. You should consult a shock application guide for the particular brand shock you wish to run and find one with the correct mounts that’s 1-2″ longer extended length than the stock shock.
1998 + Vehicles:
For those of you with ’98 to current 4×4 and Edge/Trailhead models (’95-’01 Explorers), you’re in luck as far as cost goes. These are the easiest and cheapest (free!!) to get that little bit of lift out of.
These vehicles use a torsion bar suspension and the amount of “preload” on the bar is adjustable at the rear end of the bar. All that’s needed is a couple turns with a wrench and wala! You just gained an inch. Don’t overdo it, though. On these models its not good to crank them for more than 1.5-2″ lift, otherwise you will lose most of the suspension’s down travel which will make for a rather rough and jarring ride. Over cranking it can also cause the torsion bar (spring) to sag.
It is recommended you jack the truck up so the weight is not on the suspension while you adjust them. Be sure to adjust both sides equally or you will end up with a leaning Ranger.
A front-end realignment afterward is not required on these models, but is still recommended.
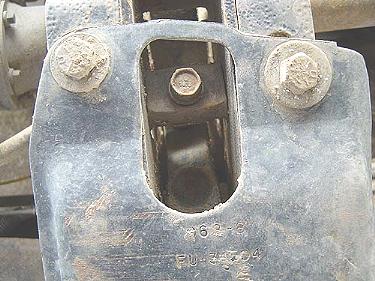
Shown is the torsion bar adjuster.

On ’98 up 2WD non-Edge/Trailhead models with the coilspring A-arm suspension, shimming of the coilsprings similar to as described for ’83-’97 models should be possible for a similar 1-2″ gain, however I have not researched these models to know for sure. Please use your own best judgement if you decide to try it. A coilspring compressor may be needed.
Click HERE for more information on cranking torsion bars)
Lifting the rear:
While a number of people are content with lifting just the front (leveling out that nose-down stance), some of you may wish to raise the rear also so it won’t look like its dragging its butt when hauling a load. There are low-cost alternatives here, too.
One is Lifting Shackles. These longer shackles replace the existing leafspring shackle at the rear of the spring and provide about 1″ of lift for each 2″ over the length of the stock shackle. These run about $40 or so. Some shackles are sold as lowering shackles for Chevrolet fullsize trucks. Because the shackle mount is inverted on a Ranger from what the Chevy is, it will lift the Ranger.
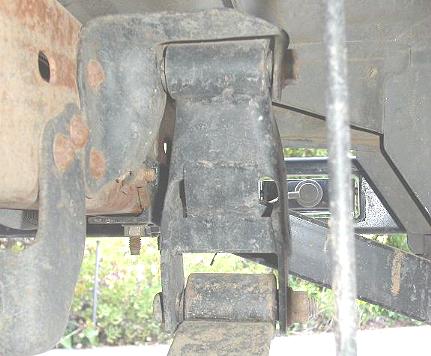
Heres an extended shackle on a Ranger. This particular unit was homemade out of a stock shackle (the ultimate in “cheap”!). A reinforcement was welded to it for lateral stability.
Another option is to put an Add-a-Leaf in the leafspring. This is simply another leaf you add to the stock spring to boost it up a little. The Add-a-Leaf (unlike the shackle) will stiffen up the ride significantly, however it will make for less sag when you throw a heavy load in the back.
If you own a 2WD Ranger, you also have the option of picking up a pair of factory 2″ 4×4 blocks from a Ranger in a junkyard. These will fit a 2WD perfect as there are no differences in the stock suspension other than 4x4s have a block and 2WDs do not. Be sure to also get the axle U-bolts with the blocks. Longer shocks may also be needed. Use shocks for the 4WD application.

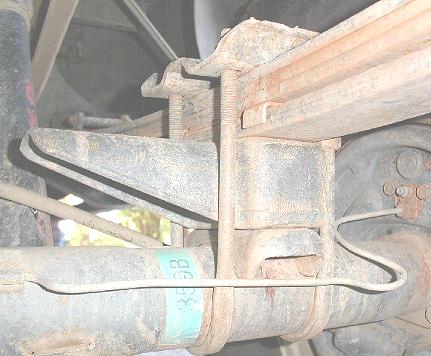
(4×4 block)
Lastly, leafsprings from a Ford Explorer will fit the Ranger. The Explorer spring will provide about a 2″ lift on a Ranger. They are stiffer and will ride similar to using an add-a-leaf. The center pin on the leafpack will need to be turned around, as the Explorer uses a spring-under-axle configuration. Because these pins are usually frozen solid with rust, replacing it with a new one will be best.
Now for tires,
’83-’92 2WD, up to a 235/75R15 (about a 28×8.50R15) will fit with proper wheel offset.
’83-’92 4×4 models can fit a 31X10.50R15.
’93-current 2wds can fit a 265/75R15 (slightly bigger than a 30×9.50R15)
’93-current 4×4 Rangers can fit 32×11.50R15, or 33×10.50R15 tires.
Fitting the above tires requires special attention to wheel size. Stock 15″ alloy wheels from any of the ’90up 4×4 Ranger/Explorer work best. These are 15×7″ with a 4.5″ backspacing (or a 1″ (25mm) positive offset) and shouldn’t rub excessively while off-road. Be sure the wheels you use to replace the 14″ ones on 2WDs are of this size.
In each case the next size smaller tire than mentioned should not rub at all if that’s important.
If you have the 16″ wheels on your ’98up model, you can fit a 265/75R16 (no rubbing) or a 285/75R16 (slight rubbing, may need to remove mudflaps).
Happy lifting, and don’t forget to Tread Lightly!!

