
By Will Wills
DISCLAIMER! THIS MODIFICATION WILL REDUCE THE STREET PERFORMANCE OF YOUR SUSPENSION! IF IT KILLS YOU, IT AIN’T MY FAULT! I AM NOT SELLING YOU ANYTHING, JUST SHOWING YOU WHAT I DID. IT MAY BE LESS SIMPLE THAN IT APPEARS SO BE ADVISED THAT YOU ARE EXPERIMENTING ON YOUR TRUCK AT YOUR OWN RISK!
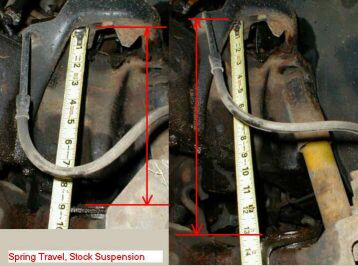
With stock radius arms and brackets, all you can get is 4-inches of spring travel. With the TTB 1.5:1 leveraging effect, that is 6-inches of wheel travel at the center of the tire.
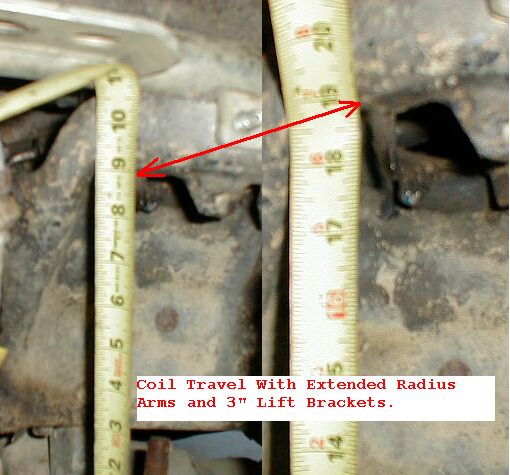
Adding 3-inch or 4-inch drop brackets and extended radius arms will increase your spring travel to 10-inches giving you 15-inches at the center of the tire. This set-up will have your springs at around 12-inches static with most Rangers, giving you 6-inches of droop at the spring and 4-inches of “stuff”. Out at the tire that is 9-inches of droop and 6-inches of “stuff.”
For parts, James Duff is really strong as is Skyjacker Class II. Most other brands have proven weak and dealt the TTB a bad reputation. It isn’t Ford’s fault if you bend up a $400 lift kit. Expect to spend a grand including the radius arms. Most importantly, do not get a kit with an extension plate for the right bracket because with soft springs it WILL bust a hole in your differential! A good kit will replace the entire bracket.
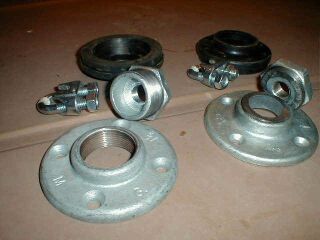
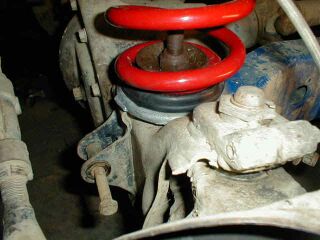
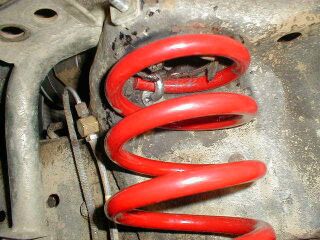
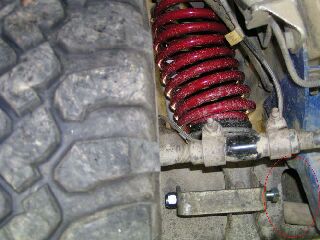
The 3–4-inch drop brackets and extended radius arms leave you with enough room to fit an 18-inch free-length coil. With this set-up, the trick to maxing your flex is to find an 18-inch spring that will absorb the trucks weight in the 6″ of available spring droop. A front corner of a Ranger weighs about 1,000#. To move it 6-inches you need a spring rate of 1,000/6″=167 pounds per inch (PPI). You have to multiply that by the 1.5 TTB factor and you get a 250 PPI spring. The softest spring offered in a Ranger lift kit is about 400 PPI. However, Rancho’s #6423 3-inch lift spring for the Jeep XJ will fit if you turn it upside down and it is rated at 240 PPI. You have to make a simple new spring mount from 1-1/2″ NPT hardware store plumbing, buy stock Jeep spring pads (isolators) and use a J-hook (I used cut-off 5/8″ cable clamps) to hold them at the top. Check out the photos and you can readily see how it is done. Note comparison between rusty stock 500 PPI, blue Duff 400 PPI and red Rancho 240 PPI.

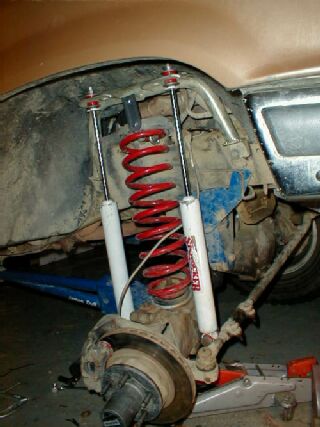
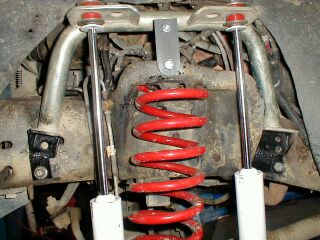
Next, you need to find some shocks with enough travel. These long, soft springs are worthless if you don’t create enough shock travel. With the set-up I am describing, you will need about 11-inches of shock travel. To get this, my truck required 27-inches of distance between the upper and lower shock mounts. The shock hoops must be raised in order to allow the shocks their full range of motion. In my case I needed to raise the hoops 2.5-inches. On the right hoop there is nothing inside the frame, so I just drilled new holes higher up. On the left hoop you can’t drill new holes: the steering box interferes with the front bolt and the anti-lock brake valve interferes with the rear. I welded extensions onto the hoop’s feet and used the existing holes. The shocks shown are Skyjacker’s H7057. Check the shocks at full droop to make sure they don’t interfere with the spring (front) and radius arm (rear). I needed to reposition the front shock’s bottom mount as it was swinging back into the spring at full droop.
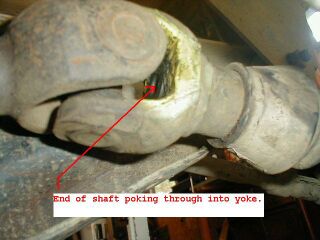
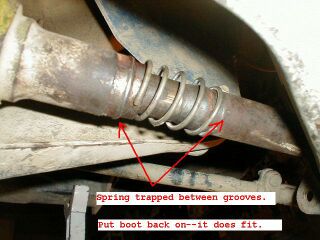
With this much suspension travel you may run into issues with the center slip-joint in the right axle. At full flex, the inside of the axle will poke all the way into the yoke. If you still have an E-clip holding the stub shaft into the differential, there is a little cap that will pop off and end up lost. No big deal. But if you have replaced the E-clip with a spring inside the slip joint (commonly done after a locker install) the spring and cap, welded or not, are coming out. My fix was to put a spring with a 1-3/8 inch inside diameter over the joint. It works great and the boot easily goes over it. The clamps on the boot help keep the spring on, but it doesn’t need them. You may also need to grind clearances into the yoke to prevent the ears from interfering. Cycle the suspension and check it carefully.
Another area requiring attention is in the slot where the right axle shaft passes through the beam. At full droop (about 9-inches) the axle just clears the beam. While stuffing, the axle hits the beam. I ground 1/4″ out of the bottom of the slot and painted it to help show new contact marks, but when I took it out to try it I grenade my rear driveshaft before I got to the bad stuff. Depending on how your truck is set up, you may experience contact at different travel points than I did.
Crbnunit, a TRS forum user with Heim jointed radius arms, reports that his tie-rods ends bind when he cycles his suspension 18-inches. Since I am at 17″ of travel, this means that unless you are prepared to alter your steering (and perform major surgery on your axle beam slot), there may be no point in attempting to adapt to Heim jointed arms or to exceed the travel I have shown here. With proper modifications in these areas though, I believe 20+ inches of travel is achievable with a 22-inch-long spring on a 6-inch lifted truck.
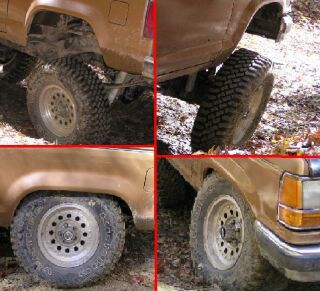
The truck flexes extremely well. Well, enough to max a 20-degree ramp I feel sure. It also drives decently on the road, but it is a bit more tender than before. I am personally willing to accept this for the better crawling capabilities, but I don’t drive that fast. You really need dual front shocks to control these springs on the road. You will probably need hoops anyway to get the long shocks on it.