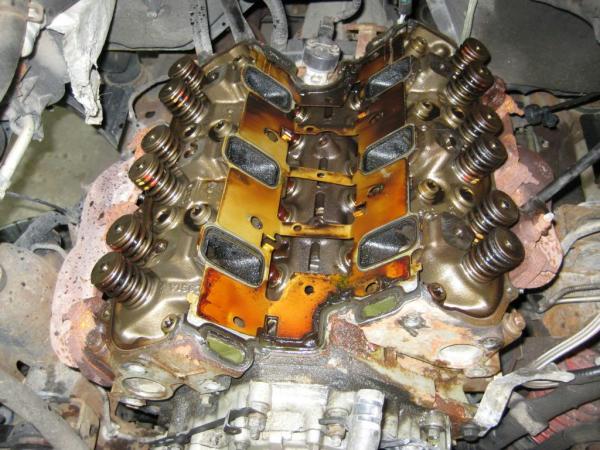
The Ford 4.0L/244 cid is the big brother in a family of Ford V6 engines that were built in Cologne, Germany, and have been used in domestic Fords since the early ’70s. The original 2.6L engine was replaced by the 2.8L, which was upgraded to the 2.9L and then finally bored and stroked to make it into the 4.0L that was used in the Rangers, Aerostars and Explorers starting in 1990. It was replaced by a SOHC engine from this same family at the end of model year 2000.
These pushrod engines are all conventional 60° Vs with cast iron blocks and heads. The 2.6L block that began with a 3.54˝ bore and a 2.63˝ stroke ended up with a 3.952˝ bore and a 3.307˝ stroke by the time it grew into the 4.0L. The block was just about maxed out at this point, so the cylinders ended up pretty close together, and the rods were crowding the pan rail, especially on the 97TM blocks.
Some rebuilders have commented that making the 2.6L into a 4.0L was a lot like making the 265 Chevy into a 400; it’s a good analogy on a slightly different scale.
Ford has made a number of changes and improvements to the 4.0L since it was introduced. Engineers revised the block, changed the heads, played with four different cams and used four different rods, so it would take about 10 short blocks and even more long blocks to rebuild all the combinations exactly the way Ford made them over the last 11 years. With all that in mind, let’s take a look at the 4.0L and see what Ford has done to make life more interesting for the rebuilder.
BLOCKS
There have been three blocks used for the 4.0L. Each one is unique in some way, so none of them can be interchanged.
1990-’94
The first 4.0L block was a 90TM-AB casting. It had six bolt holes on the passenger side and 10 bolt holes on the driver’s side. The dipstick hole measured about 0.380˝ in diameter.
1995-’96
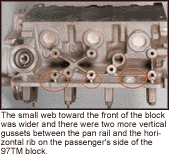
The original block was changed in ’95. The new 95TM-AB casting had two more bolt holes on the passenger side and two more on the driver’s side for a total of eight on the right and 12 on the left (see photos above). The dipstick hole remained the same at 0.380˝.

1997-2000
The block was redesigned again in ’97 to reduce noise, vibration and harshness (NVH). Both of the pan rails on the 97TM-AA casting were wider and there were two more gussets added between the pan rail and the horizontal rib that’s right above it on the passenger side. The dipstick hole on this block was enlarged to about 0.435˝, too.

CRANKS
Ford has used four different cranks with five different casting numbers in the 4.0L. In ’95, the angled slot that was machined in the step at the back of the snout was increased in length. In ’96, the crank came with a full-length keyway and it had another step machined into the raised area at the back of the snout. In ’97, the flange for the flywheel was changed from a six-bolt to an eight-bolt pattern. And, in ’99 the specifications for the bobweights were changed.
1990-’95 and ’96
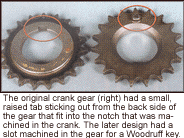
The original crank casting was the 90TM-AB. It was used up through ’95 in some applications, but it was replaced by the 90TM-AA in most of the ’95s. These cranks are easy to spot because they have “4.0” cast in the outer edge of the second counterweight. They both had a six-bolt flange for the flywheel and a short, angled notch machined in the step at the back of the snout, but there was a subtle difference in the length of the notch, depending on the casting. The notch in the original 90TM-AB shaft was 0.420˝ long while the slot in the later 90TM-AA casting was 0.673˝ long. This change occurred sometime during model year ’95, but the big change came even later in the year when the snout was machined for a full-length Woodruff key and a second step was added for an another gear.
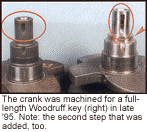

We had always believed that this change took place sometime during model year ’95, but my best sources tell me it was actually made late in calendar year ’95, which means it was a model year ’96 change. The front of the crank had to be modified to accommodate the additional gear that was needed to drive the overhead cam for the SOHC engine that was going to be coming out in ’97, so the change was made during model year ’96 to standardize the process ahead of time.
About 25% of the ’96s were made with the 90TM crank that had the short keyway in the snout and 75% were made with the 96TM cranks that had the long keyway, but we’re told that there were also a few engines built with the 90TM cranks that were machined with the second step and the long keyway, so it’s best to double check all of them before using any of them.
Understanding this mid-year change helps explain the mix of castings that we have seen in these engines, but it really doesn’t make any difference which crank you use in a ’96 as long as you use the matching crank gear. However, it could become an issue when selling a crank kit because the gears are not interchangeable, so you have to know which one the customer has in order to supply the matching crank. Otherwise, you will have to specify the gear that needs to be used with the crank that is actually boxed in the kit. It’s probably a good idea to include the matching gear or some information explaining the differences along with the crank kit in order to avoid any problems in the field.
All of these cranks had a six-bolt flange for the flywheel.
1997-’98
The crank was revised again in ’97. The new 97JM-AC casting came with an additional step, the long keyway and an eight-bolt flange for the flywheel. This was the same casting that was used in the SOHC 4.0L for ’97 and ’98, so the cranks from both engines can be interchanged, in spite of the fact that Ford gave them different part numbers.

1999-2000
The XL2E-BA casting that was introduced in ’99 was used up through 2000 when the OHV engine was discontinued. This crank appears to be the same as the 97JM-AC, but there’s a noticeable difference in the bobweights. The 97JM had 880 grams on all the bobweights while the XL2E used 850 grams for cylinders 1, 2 and 3 and 842 grams for 4, 5, and 6, so there’s an overall difference of 4.3%. Installing the light crank in a ’97 engine with the heavy pistons will overbalance the assembly and add to the vertical imbalance that makes the steering wheel shake, so don’t use this light crank in an engine with heavy pistons.
RODS
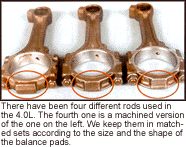
There have been three different rods used in the 4.0L, including the FBOCA, the FBOCB and the 7AE, but the forging numbers don’t tell the whole story because the weights are not consistent with the numbers. These rods vary from a low of 560 grams to a high of 590 grams, so you can end up with a shaker unless you keep them in matched sets by weight. Some rebuilders weigh each rod and others sort them based on the appearance of the weight pads on the bottom of the big end (see photo). Both ways seem to work, so it really doesn’t matter how you go about sorting them as long as you keep them in matched sets.
PISTONS
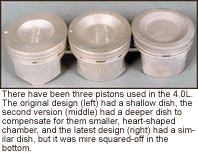
Ford has used three different pistons in this engine over the years. The first one had a small dish, the second one had a bigger dish and the most recent one is a lightweight version of the deep-dish design.
1990-’94 Ranger, Explorer and 1990-’96 Aerostar
The 4.0L originally came with a piston that had a small dish that measured about 2.40˝ in diameter. It was used along with the 90TM/93TM heads that had the oval-shaped chambers, so it was found in the Rangers and Explorers from ’90-’94 and in the Aerostars from ’90-’96. Ford had planned to discontinue the RWD Aerostar shortly after the FWD Windstar was introduced in ’95, but when it was realized that there were a lot of fleets that still liked the Aerostar, the company decided to keep on building it. However, Ford chose to use the early pistons and the early heads with the 97TM block so there was no need to certify a new calibration for just this application.
1995-’97 Ranger, Explorer and ’97 Aerostar
When the head was redesigned in ’95 with the heart-shaped, fast-burn chamber, the piston had to be changed to maintain the same compression ratio with the new, smaller chamber, so the dish was noticeably larger (3.10˝ vs 2.40˝) in diameter. This piston was used along with the 95TM and 97TM heads that were found on the ’95 through ’97 Rangers and Explorers. It was also used in the Aerostar engines in ’97, because Ford finally did go ahead and certify a new calibration for the Aerostar with the fast-burn head, even though it ended up being the last year of production for the old RWD van.
1998-2000 Ranger and Explorer
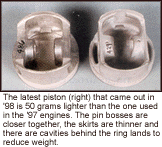
The piston was revised again in ’98. The dish looked a little bit different this time, but the real difference could be seen from the bottom of the piston. The skirts were thinner, the pin bosses were closer together and there were cavities behind the ring lands on both sides, so it weighed 50 grams less than the previous design. The ring grooves were moved closer to the crown to reduce the crevice volume and the rings were narrower, too. It’s a completely new design that shouldn’t be interchanged with the earlier, deep-dish pistons.
CAMS
It really gets interesting when you get to the camshafts. There have been four different cams used over the last 10 years. Each one can be identified by the number of machined rings around the barrel and their proximity to each other, but the applications and possible consolidations can be pretty confusing, so let’s start with the original part numbers along with their applications and go from there. See Chart A for information.
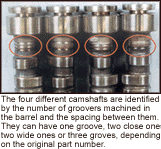
Which cams can you interchange? That all depends on who you ask. Some rebuilders are building every application by the book, some are consolidating the FOTZ-B with the F3TZ-A and keeping the other two applications separate, and others are combining the FOTZ-A and the FOTZ-B with the F3TZ-A and keeping the F3TZ-B separate. All of the aftermarket cam suppliers I have talked to are providing three cams, one to replace the FOTZ-A, one that splits the difference and combines the FOTZ-B with the F3TZ-A, and another that replaces the F3TZ-B.
There’s one more consolidation that seems reasonable based on what we’ve learned:
Throw away all of the FOTZ-B cams and use the FOTZ-A for everything from ’90 through ’92 and for all of the ’93-’96 Aerostars. The FOTZ-B is very similar to the FOTZ-A, except that the timing was advanced 10° to move the torque curve around in order to make it feel a little better with the manual transmission, so the FOTZ-A should work fine with a stick; the difference is so slight that it probably won’t even be noticed. We wouldn’t recommend using the F0TZ-B with an automatic, though, because the extra advance in the cam may affect the way the engine behaves with the torque convertor, so you should throw these cams away if you’re going to consolidate all of these engine applications.
Use the F3TZ-A for the ’93-’95 Rangers and Explorers that don’t have EGR; and
Use the F3TZ-B for the ’93-’95 engines that came with EGR and for all of the 4.0L engines from ’96 through 2000, except the ’96 Aerostar that should still use the FOTZ-A. There were a few Rangers built during these years that came without EGR, but they used the F3TZ-B cam, too. This approach looks good on paper, but you still need to know if the vehicle came with EGR from ’93-’95, and that’s not always predictable based on the year and application, so be sure to ask the customer before selling one of these engines.
Dealing with all of these different cams can be a problem, because there’s no absolute right answer short of rebuilding each engine exactly the way Ford built it, but that creates more applications and more opportunities to sell the wrong engine, so every rebuilder needs to consider the alternatives and do what works best for his shop and his customers. Consider this a disclaimer and make your own decisions based on the information available and your own experience.
HEADS
There have been three distinctly different heads with five different casting numbers installed on the 4.0L since 1990. The combustion chamber was changed in ’95 and the exhaust ports were revised in ’98.

1990-’94 All and ‘95-’96 Aerostar
The original 90TM casting had an oval-shaped chamber that was slightly bigger in diameter on the intake side. It was replaced in ’93 by the 93TM-AA casting that was exactly the same. These heads can be identified by the letter “T” located on the top of the right rear/left front exhaust port.
1995-’97 Ranger, Explorer and ’97 Aerostar
The 95TM-AD casting that came out in ’95 had the heart-shaped, fast-burn chambers that shrouded the intake valves. It was replaced by the 97TM casting in ’97, but it was the same, so they can be used interchangeably. These castings were used on the Ranger and Explorer from ’95 through ’97 and on the Aerostar in ’97. They can be identified by the letter “U” that’s located on the top of the right rear/left front exhaust port.
1998-2000
Ford introduced another new head in ’98. The exhaust ports on the 98TM-AD were much narrower than they were on the earlier castings; they measured 1.40˝ across the port compared to 1.70˝ on the 95TM/97TM castings. According to the engineers I have talked to, the smaller ports increased the velocity of the exhaust gasses so they carried more heat down to the catalytic converter. This helped the converter “light off” sooner, so it did a better job of reducing emissions during the critical start-up and driveaway phase of the EPA emissions test. With that in mind, it’s probably not a good idea to swap these heads back and forth with any of the earlier castings.

All of these heads have the letter “A” cast into the head right above the right rear/left front exhaust port.

That’s the story on all the castings and the major components. Most of the differences are specific to given years or applications or both, so they can’t be consolidated or interchanged. The only exceptions are the rods that can be used in matched sets, no matter when they were made, the 90TM cranks with the notches that can be interchanged with the 90TM/96TM cranks with the long keyway as long as the matching crank gear is used, and the various cam consolidations that are open for discussion.
REBUILDING TIPS
With all this in mind, there are some other things that rebuilders should be aware of when working on these engines:
Rebuilders should not install an engine with the 95TM heads and deep-dish pistons in a ’95 or ’96 Aerostar. All of these engines had the same compression ratio whether they came with the original heads with the open chambers or the newer ones with the heart-shaped chambers, so they would seem to be interchangeable, but the computer calibration that was used for the old-style heads with the open chambers will not work with the newer heads with the fast-burn chambers. In fact, “It will burn the engine down in a few thousand miles,” according to a Ford engineer who worked on this engine program. Ford continued to use the early heads on the ’95 and ‘96 Aerostar because they still came with the early calibration, so rebuilders must do the same.
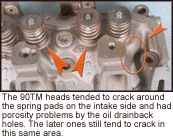
Many of the heads that were produced for the 4.0L in ’89 and ’90 tended to crack around the spring pads on the intake side and had porosity problems down in the corners where the oil drained back into the valley. The cracks on the top can be found by Magnafluxing the heads, but the porosity problems won’t show up unless the head is pressure tested at about 70 psi. Some of the later heads have cracks around the oil drainback holes and quite a few are cracked in the chambers, so they should all be carefully inspected before being rebuilt. The threaded plugs on the top tend to leak, too, so they should be removed and reinstalled with sealer on the threads. Ford says they should be torqued to 80 ft.lbs after resealing them.
Rebuilders should also be aware that there are new aftermarket heads available from several different sources. Some shops have found that it’s cheaper to buy new ones than try to repair the used ones that have a lot of cracks.
All of these engines had four studded mains that were used to hold the windage tray in place under the crank. We recommend installing them in every engine in specific locations according to the diagram so the installer doesn’t end up moving them around and disturbing the torque on the main bolts in the process.
The two steel balls in the lifter valley that are used to plug the oil galleries must be removed in order to clean the block properly. They are almost impossible to remove from the top, but they can be driven out from the bottom by coming up through the oil holes in the mains.
The early crank gear has caused problems for many rebuilders. The crank gear was timed to the crankshaft by the small tab on the back of the gear that fit into the shallow notch that was machined in the step at the back of the snout. There is nothing to hold the gear in place against this step until the damper is installed, so it wants to slide forward and jump out of time during assembly, test and installation. Most rebuilders knurl the shaft or stake the gear in place to try to prevent the gear from moving, but that doesn’t always work, especially if the installer isn’t aware of the possible problem. Be sure to warn your assemblers and your customers so you don’t have to pay somebody to take it apart and do it over again.
Ford solved this timing problem in model year ’96 when they machined the crank and the gear for a full-length Woodruff key that indexed the gear on the crank and held it securely in place. Ford offers this revised gear (p/n F5TZ-6306-A), but it’s readily available in the aftermarket for a lot less money. The key can be a little hard to find because it’s a metric size; it’s available from Ford as well (p/n W702979S300).
The ‘90-’96 crankshafts can be interchanged as long as the matching crank gear is used, but always remember to stake the early gear in place in one way or another whenever using a 90TM crank with the short keyway and the notch in the step.
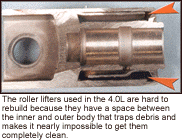
The roller lifters are held perpendicular to the cam by a steel pin in the side of the lifter that slides up and down in the groove that’s machined in the side of the lifter bore. Having this pin in the side of the lifter required a special design that had an inner and an outer body, so there’s some space in between them that can trap a lot of debris. That makes it very difficult to get them clean, so they’re hard to rebuild, and that’s a real problem, because new lifters are very expensive.
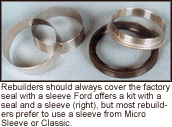
The rear seal on the 4.0L has always been prone to leakage. It appears that the original factory finish on the seal surface was too slick, so the seal just couldn’t control the oil. Ford offers a repair kit that comes with a sleeve and a seal (p/n F5TZ-6701-A), but it costs about $50 at the dealership. Rebuilders should definitely install a sleeve over the factory seal surface, but there are better alternatives in the aftermarket; Micro Sleeve (800-475-3383) and Classic (800-393-0544) both offer sleeves for the 4.0L cranks.
The pushrods and rockers on the 4.0L tend to show a lot of wear, even on engines with low miles. We suspect that there are two reasons for this problem: (1) The material in the rockers appears to be too soft, so they wear on the tip, and; (2) there’s not enough oil getting to the pushrod socket, so it gets worn out, too.

There’s pressurized oil at the rocker shaft to lubricate the rockers, but there’s no direct way for that oil to get to the pushrod sockets. There’s a passage in each rocker that allows oil from around the rocker shaft to migrate out to the small hole in the top of the pushrod socket, but it’s wide open on the outer end so there is no pressure there to feed the oil down into the socket.
Apparently the small hole in the pushrod socket that intersects this passage is supposed to meter oil down into the socket somehow, in spite of all the motion that’s trying to sling the oil out from the open end of the passage in the rocker. It’s hard to believe that any oil can actually get into the sockets, so it’s no wonder they wear out prematurely. Rebuilders should expect to rebuild or replace most of the rockers. The tips can be ground if they’re not worn too badly and the sockets can be repaired by installing a special insert that’s available along with the tooling needed from Silver Seal (800-521-2936) or Goodson (800-533-8010). Or, if you prefer to have someone do them for you, rebuilt rockers are available from Delta Camshaft at 253-383-4152.
You may want to consider flame-hardening the tips, too. Ed Davis at Waterhouse Motors in Tacoma, WA, has been doing this for awhile to eliminate wear on the tips. He found that the wear on the tips was loading the valves so hard to one side that they were wearing out the guides and causing other problems in the process.
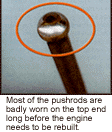
Plan on buying a lot of new pushrods, too. Most of them are scuffed and worn on the tip due to the lack of oil in the socket.
That’s the story on the 4.0L. It’s pretty straightforward if you keep the castings straight and pay attention to the details. This has been a common engine in some of Ford’s most popular vehicles including the Ranger, Explorer and Aerostar, so there are over 3 million of them on the road and plenty of business waiting for the shops who know how to rebuild them and make them live.
You may e-mail Doug Anderson at danderson@automotiverebuilder.com.
