
Introduction
Source: yoyodyne
The factory charging system on early Ford Ranger and Bronco II 2.8L engines uses a low-output alternator with an external voltage regulator. This setup can struggle to keep up with modern electrical demands. A popular and effective upgrade is swapping in a 130-amp Ford 3G alternator.
This guide explains how to install a 130-amp alternator from a 1994–1995 Ford Mustang 3.8L V6 into a 2.8L-equipped 1984 Ford Bronco II or similar Ranger. This swap is simple, cost-effective, and provides a significant improvement in charging performance.
Overview
- Application: 2.8L Ford Ranger / Bronco II
- Upgrade: 130-amp 3G alternator
- Donor Vehicle: 1994–1995 Ford Mustang 3.8L V6
- Alternative Donors: 1993–1996 3.8L Thunderbird/Cougar (alternator only)
- Difficulty: Moderate
Why Do This Upgrade?
- Increased charging capacity (130 amps vs. stock output)
- Improved reliability with an internally regulated alternator
- Better support for modern accessories (lighting, audio, etc.)
- Simplified wiring by eliminating the external voltage regulator
Parts Needed
- 130-amp 3G alternator (1994–1995 Mustang 3.8L)
- Alternator wiring harness from the same Mustang (must include fusible links)
- Stock Ranger/Bronco II V-belt pulley (to swap onto the new alternator)
- Wire, solder, and heat shrink (for splicing)
Note: While 3G alternators were also used in 1993–1996 Thunderbird and Cougar models, those harnesses do not include fusible links. You should use the Mustang harness for proper protection.
Alternator Fitment Notes
- The alternator is a direct bolt-in when using a unit with mounting ears 180 degrees apart
- The lower mounting ear bolts directly to the factory bracket
- Some alternators may require a nut and bolt for the upper mounting ear
- The stock V-belt pulley can be transferred to the 3G alternator
The Process
At the Junkyard
- Locate a 1994–1995 Mustang V6
- Remove the alternator and the attached wiring harness
- Strip the plastic loom from the harness
- Follow the wires to the starter solenoid and remove the eyelet terminal
- The black/orange and yellow/white wires both connect at this point
- Follow the green/red wire into the engine bay and cut as much length as possible
At this point, you should have:
- The alternator
- The harness with plug connectors
- A charge cable with eyelet terminal (black/orange and yellow/white wires)
- A length of green/red wire
Removing the Factory Wiring
- Disconnect the stock alternator harness
- Remove wiring loom back to the firewall
- Cut the wire leading to the carb choke heater where it branches off
- Unplug and remove the external voltage regulator
- Cut the green/red wire at the regulator connector
- Remove the wire running to the small capacitor
- Discard the harness between the regulator and alternator
Next, locate the large black/orange wire from the alternator:
- Trace it back to where it branches from the main harness
- Remove loom and tape as needed
- Cut the ammeter wires (yellow/green and red/orange)
- Remove any remaining regulator wiring
- Cut the alternator charge wire at the splice, leaving other circuits intact
At this stage, the only remaining factory wiring should be:
- The green/red wire from the regulator connector
- The two ammeter wires (left unused)
Installing the New Alternator
- Mount the 3G alternator in place
- Connect the new harness to the alternator
- Attach the main charge cable to the battery side of the starter solenoid
- Splice the green/red wire from the new harness into the factory green/red wire
Important: Solder and heat shrink all connections to ensure reliability.
The carb choke heater wire can also be spliced into the green/red wire if needed.
Re-wrap and loom the wiring harness. The unused ammeter wires can be bundled and left in place.
When completed cleanly, the installation will appear factory.
Results and Notes
- The factory ammeter will no longer function
- Ammeter systems are known to be unreliable and can pose a fire risk
- It is recommended to install a voltmeter to monitor system performance
Schematics

Basic schematic of original 1G charging system
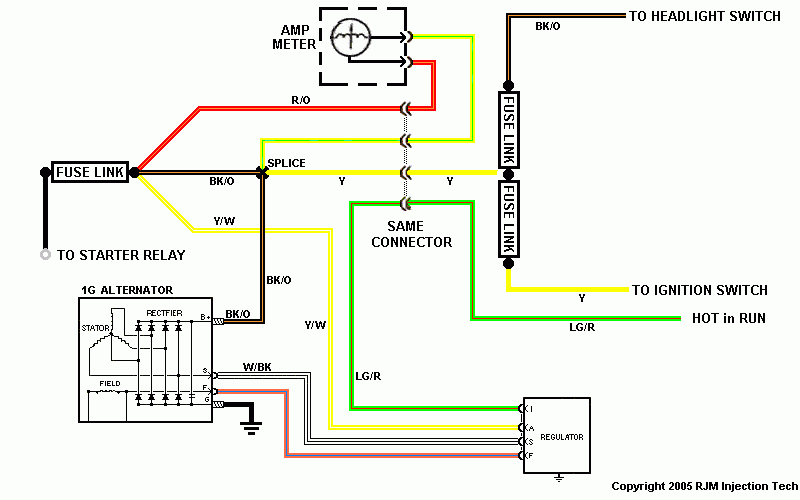
Detailed schematic of original charging system
Basic schematic of upgraded 3G charging system
Detailed schematic showing integration with factory wiring
Additional Resources
2.8L 130 amp alternator swap for $20 (forum thread)
Related Articles
Charging System Troubleshooting
Charging System – Information, Precautions & Checking
How to Install a 130 amp Alternator in Your Ranger
Ford Ranger Alternators (1983-2011)
Last Updated:
About The Author
Jim Oaks is the founder of TheRangerStation.com, the longest-running Ford Ranger resource online since 1999. With over 25 years of hands-on experience building and modifying Ford Rangers — including magazine-featured builds like Project Transformer — Jim has become one of the most trusted authorities in the Ford Ranger off-road and enthusiast space.
Since launching TheRangerStation.com, Jim has documented thousands of real-world Ranger builds, technical repairs, drivetrain swaps, suspension modifications, and off-road adventures contributed by owners worldwide. TheRangerStation.com has been referenced in print, video and online by enthusiasts, mechanics, and off-road builders looking for practical, and experience-based information.