|
|
|
|
Some Bodywork Basics |
|
WARNING: Be sure to wear proper protection for breathing and handling paint and related chemicals. Use a supplied air respirator and wear disposable gloves. Consult the manufacturer’s recommendations regarding the safe handling of these and other related materials. Wear a dust mask while sanding and grinding. Wear a face shield while grinding. One of the most costly things we pay to have done to our trucks is body work. I have paid to have vehicles painted only to end up dissatisfied with the results. I finally decided that it was cheaper to buy the equipment and do the work myself. This article is not going to be a complete how to for bodywork. It will however give you some insight as to what's involved if you're thinking about tackling your own bodywork. Tools: There are some tools you will need to have on hand, but the good thing about that is you will own the tools when your done for probably the same price if not less than if you had a body shop repair and paint your vehicle. When you're looking for reasonably priced body tools, I've found that you can buy tools at a reasonable price from Summit Racing and Harbor Freight. Some of the brands like Campbell Hausfield can be sufficient for the home mechanic that just wants tools for his own use (not a commercial painter) and working with a budget.
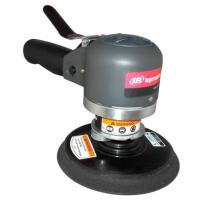
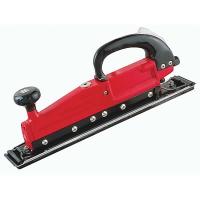
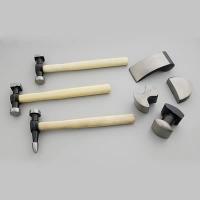
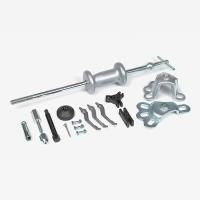
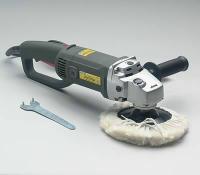
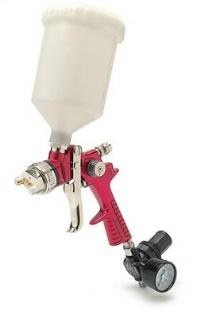
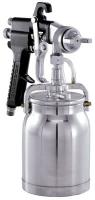
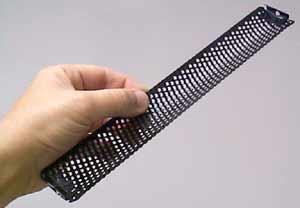
DA Sander - While a normal grinder grinds in a circular pattern, a D/A has the ability to also grind in an epicentric pattern because of its offset output shaft. This old fashioned, slower, jitterbug motion is important when power sanding because it keeps you from digging gouges. This is the sander you'll use for feathering your work. Hammers and Dollies - Work best for dent repair. Their double-sided head's have both small and wide striking surfaces. The small end works well for knocking down sharp ridges and for delicate work. The wide end is especially well suited for smoothing. You want to place the dolly on the low side of the dent and hammer down the high side. Straight Sander/Sanding Boards - Straight sanders and long sanding boards are used for sanding large panels to ensure flatness. A nice thing about using a long sanding board on small areas of repair is that it will sand the area level without having to worry about sanding away too much filler. Sanding Blocks - Are used to create a smooth flat surface and keep you from creating uneven areas with your finger tips. Flexible Sanders - Are used for sanding curved panels. Buffer - Is used after wet sanding to buff the paint to a gloss using rubbing and finishing compounds. Slide Hammer - Is used for pulling out dented panels by either drilling a hole in the panel and screwing the slide hammer in to it or using other attachments that will grab the metal to pull it. Stud Welder - Is used by welding a stud (nail) to the dented panel. A slide hammer that usually comes with the stud welder is then used to pull the dent out. The stud can then be twisted off with pliers and the area ground smooth. This method prevents you from having to weld up the holes created using a normal slide hammer. Air Compressor - Duh! You're going to need air for your sanders and paint gun. If you're buying an air compressor for the first time, check the air requirements on the tools you're buying. There are many sizes of air compressors with different output ratings. If you're going to get something that's just big enough to get the job done, this will help make sure you get one that's big enough. Paint Gun - If you have to ask then................... Gravity Feed vs Conventional Feed Spray Guns: When selecting a spray gun you have a choice between gravity feed (cup on the top) and conventional feed (cup on the bottom). Some people refer to the conventional feed guns as a “siphon feed”. Until the advent of HVLP (high volume low pressure), all conventional feed spray guns were siphon feed. Siphon feed guns require more air pressure to create enough vacuum to pull the paint from the cup. Obviously, gravity feed guns don't require as much pressure because the paint is running down, not being sucked up. Spraying with less air pressure has the advantages of less overspray, less waste and greater control for the painter. These are the reasons why painters have been switching from conventional feed to gravity feed guns. Although HVLP is a requirement in most areas, whether or not you use an HVLP gun, gravity feed offers the advantage over conventional feed because of the lower air pressure requirement.
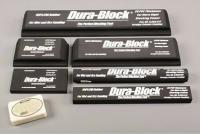
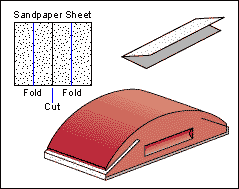
Don’t buy garnet paper from a local hardware store. Garnet paper is for wood. Obtain the real thing from an automotive finish supply house or parts store. The type of sandpaper used in auto body repair is called “free cut” paper. Paper & Grit:
Disassembly: Most people don't properly disassemble their vehicle before painting. Remove items such as marker lights and mask the bulb and or socket so that when you paint, it won't get on the bulbs or in the sockets. Removing everything will allow the paint to flow smoothly around the openings and not stop abruptly at the lenses. If you have seen a vehicle that had parts masked before painting you'll know what I mean. Remove bumpers, taillights, marker lights on the front and sides, mirrors, antennas, emblems, trimming around the windshield, and anything else that can be removed and put back on. If you're painting your Ford Ranger, the best way to do it would be to remove the bed, fenders and hood. Actually, the best way would also include removing the doors, but you may have trouble getting them back on without scratching anything. When you paint you always keep the gun moving, overlapping the last pass by 50% as you go, keeping the gun pointed at the panel (parallel) and not swinging (fanning) in an arc, and starting your spray before the panel and ending the spray after the panel. This means you either have to mask off the bed when you're doing the cab, or really be able to hustle down the side of your truck with a paint gun. What about that gap behind the cab? Do you want people to see the area back there the gun couldn't get? If you disassembled as much as possible, you can paint each panel without worrying about the overspray and masking off other panels. Just make sure the paint has had time to cure before reassembly so you don't damage the paint on reassembly. Remember it takes a few days for paint to fully cure. Prep Work: Bad prep work is the number-one mistake made by do it yourselfers. Painting a vehicle is only 15 percent of the entire process. One of the biggest problems is sanding scratches that show up under the paint because you didn't do a final sanding with 220 or 320 grit paper. Other problems are paint peeling because the surface wasn't properly sanded or cleaned for the paint to adhere to, or a chip or scratch under the paint that was overlooked and not sanded during the prep. Rust: Rust is a general term for a series of iron oxides, usually red oxides, formed by the reaction of iron with oxygen in the presence of water or air moisture. Rusting is the common term for corrosion of iron and its alloys, such as steel. Given sufficient time, oxygen, and water, any iron mass eventually converts entirely to rust and disintegrates. Rust formation can be controlled with coatings, such as paint, that isolate the iron from the environment. Rust is your enemy. You have to completely remove the rust before painting your vehicle. Rust Converters / Coatings: Your local automotive paint store should offer some type of rust converter or coating. Here's a few suggestions: Loctite produces 'Extend' - Extend interacts with existing rust and chemically converts it to a neutral black surface, which also serves as a primer. I have had success with this product. Duplicolor produces 'Rust Fix' - Rust Fix rust treatment destroys rust on contact. It sprays on clear and turns to a black metal-protecting coating to fight future rust from forming. Specially formulated to be used with body filler and fiberglass. Sandable for a smooth, even finish. POR-15 - is a high-tech, high performance rust-preventive coating designed for application directly on rusted or seasoned metal surfaces. It dries to an incredible rock-hard, non-porous finish that won't chip, crack, or peel, and it prevents rust from recurring by protecting metal from further exposure to moisture. Use it to coat rusty frames, floor pans, farm equipment, marine equipment, or even a heavily corroded battery tray. POR-15 is sensitive to UV light (sun) and must be topcoated for prolonged exposure to sunlight. Rust Bullet - is a two-application product that penetrates the porous rust and reaches the metal underneath, producing chemical activity. Basically, the rust becomes intertwined in the resin matrix of Rust Bullet and remains a permanent part of the coating. The second coat of Rust Bullet fills any pinholes in the first coat and forms a nearly impenetrable coating that protects the metal. Silver gray in color, Carl points out that while topcoats aren’t required, conventional paint can be applied over the second coat for appearance. Rust Bullet offers excellent abrasion resistance and is quite difficult to scratch (which makes it excellent for suspension components). If a scratch or chip in the coating does occur, the metal will rust in the breached area, but rust will not proceed beyond the breach. Rust Bullet will not lift, blister, or peel away from its leading edge in any significant degree. Simply reapplying Rust Bullet over the scratch or chip reseals the coating, proving easy, low-cost maintenance. Rust Bullet is said to be better than Por-15. Removing Rust: Hopefully your rust situation isn't so dire that you need to cut up your truck. If the rust is only on the surface and the metal is still in good shape, you can remove the rust and then treat the affected area with a sealer to keep the rust from returning. Rust can be removed various ways. If you're dealing with just a thin covering of surface rust (which is usually a bright orange), you can sand it off using coarse sandpaper on a sanding board, block, or power sander. Some people choose to sandblast rusted panels. You can find inexpensive sandblasting guns that attach to your air compressor with a hose that will siphon sand from a bucket and spray it. If the rust is really deep, you'll need to cut the rusted area out. if you're going to cut out a rusted area and patch it, be sure to cut out at least half an inch beyond the rust hole to make sure you're bonding the patch to uncontaminated metal. Repairing Rust: Filling a rust hole with body filler will not produce a lasting repair. The rust will continue and caused the filler to bubble in a few weeks. To make a permanent repair, the rust needs to be cut out and replaced with new metal. You can use tin snips or a cut off wheel to remove the infected area. You can flange the upper edge with a flanging tool on an air hammer to produce a recessed area so the new metal will fit flush with the surface of the existing body panel. That reduces the amount of filler needed to cover the seam and makes a better overall repair. Hand flangers are also available at autobody stores that do the same thing. You could also lay the edge of the new metal patch over the truck's metal and fill the seam with body filler. Ready-made cab corners and patch panels that fit exactly over rusty panels are available from autobody supply stores for many vehicles. You can also get some flat sheet metal and make your own. You'll need to weld the new panel in place with a wire feed welder. The more flush it fits, the less filler that is required. If you don't have access to a wire-feed welder, you can adhere it with metal adhesive available at bodyshop supply stores. Hold the panel in place with screws until the adhesive dries and remove the screws. Many shops use adhesive these days because it also helps seal moisture from getting into the seam. When welding in a panel, move around the panel with spot welds and avoid long continuous welds. Moving around the edges of the panel with spot welds will minimize the amount of heat placed in the metal and keep it from warping. Continue to work around the panel until it's completely welded.
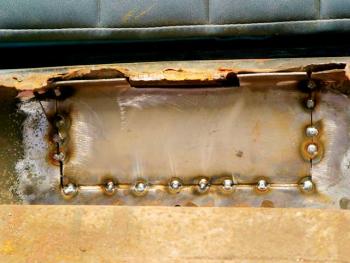
The photo above shows a patch that has been spot welded in place. It was cut to fit in the opening, not overlap it. It would have been difficult to make a flange for it to sit flush in. The welder will continue to do spot welds until the whole thing is welded. You don't want to do a continuous weld because the heat will warp the metal. Once it's all welded up, a grinder will be used to grind down the welds and a lot less filler will be required than if it had been overlapped. Once the panel is welded in place, grind the welds flush to the surface and grind the paint to a few inches around the repair. Check for straightness and hammer any high spots down. One of the most discouraging problems when welding in a panel is rust reoccurring at the seam (moisture accumulates). When that happens, body filler can bubble and the repair looks awful. In order to prevent this, spray some 'self-etching' primer along the repaired seam. Self-etching primer can be found in spray cans in some auto parts stores. After the primer has dried, grind or sand the metal surface again with course sand paper such as 40 grit. Most of the primer will be sanded away and the rough sand scratches will allow the filler to properly adhere. However, a small amount of primer will still be left in the seam where the sandpaper couldn't reach. It will prevent rust from occurring along the seam under the body filler. Now it's time to apply filler. Mix up a batch following the instructions on the can and apply it over the repaired area. Make sure to apply over sanded bare metal. The filler adheres to the sand scratches and pores in the metal. Never apply filler over paint. Make sure your metal surface is relatively flat and correctly contoured before applying any filler. That way a minimal amount of filler will be necessary and will help promote a longer lasting repair. When filler is applied too thick it tends to crack and eventually break leading to rust under the filler (filler absorbs water). 3/16" is about the limit. Apply filler in thin layers rather than heavy coats. Too much filler may require a significant amount of sanding -- and a lot of elbow grease. After the filler has set up and becomes hard, sand it with course sandpaper (36-40 grit) and a sanding block. If sanding a long area use a long sanding board to prevent waves. The long board knocks down any high spots and leaves a smooth, flat surface. Sand the filler using long strokes along the length of the repair. After you have the filler 'roughed out' switch to a finer grit of paper such as 80 grit. It usually takes more than one application to get it right. If so mix up another batch and repeat the sanding process. It generally takes a second coat of filler to fill pinholes and other imperfections in the filler. After you've sanded the filler the first time, check for straightness using a ruler and apply a second coat of filler if necessary where needed. From 80 grit, move up to an even finer sandpaper such as 120. Primer will fill some scratches, but will not fill the deep scratches. Finish sanding the filler with 220 grit paper on a DA sander to remove as many sand scratches as possible and to produce a smooth, flat surface for the primer. The smoother it is, and the fewer sand scratches that are in the repaired surface, the less primer that'll be needed to fill the scratches. You can't produce good results painting directly over filler, it needs to be primed first. Before you can apply primer, you need to feather the edge where the original paint meets the bare metal so you don't get any visible lines where the paint was ground away. Use a DA sander with 320 grit sandpaper. A hand sanding block or wet/dry sandpaper also works fine. Primer and paint won't adhere over smooth paint, it'll just flake off. Double-check your work and scuff any unsanded paint with fine sand paper (220 or 320 grit) or use a scuff pad. Scuff or sand only up to the line where you will finish painting. The fine scratches left behind by the scuff pad or fine sand paper will provide a good surface for the new primer and paint to bite into. Mask off the surrounding area with masking paper. Wipe the paint surface down with a wax and grease remover solution which prevents potential paint problems caused by waxes, oils and products like Armor All. It's a good idea to do this even before you begin any repairs. If you don't have any wax and grease remover, you can also use a rag moistened with a spray cleaner like 409 or lacquer thinner. If you fail to do this, the paint may not stick or will have 'fisheyes' that look like pin holes where the paint hit the contaminated spot and slid back in to the surrounding paint. Don't apply cleaners directly on the filler. They'll absorb the moisture and create problems for you. Apply two coats of etching primer over the bare metal, then two coats of high-build primer over that. High-build primers go on much thicker than spray can primer and doesn't shrink like spray can primer does. After the primer cures, block-sand it to reduce sand scratches and high/low spots to produce a nice, smooth surface for the paint. You can achieve good results on small spot repair jobs using spray can primer. Apply in several light coats. It's a good idea to let spray can primer dry for a couple days before sanding it to allow the thinners to fully come out. Spray can primer shrinks so you want it to shrink before sanding it to minimize sand scratches from appearing after it has been painted. Cab Corner:
When replacing cab corners, only remove as much as necessary to get rid of the rust. Above you can see the inner cab wall where the outer cab corner was cut off at the tape. In the case of this corner, only the bottom third of the new cab corners were used. The new cab corners are positioned, tack-welded, welded, ground smooth, filled (shown), and primed. It's easier (and quicker) said than done.
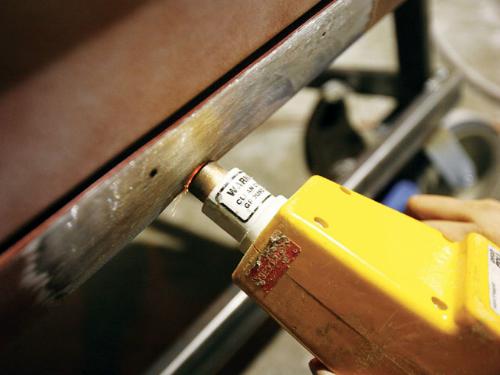
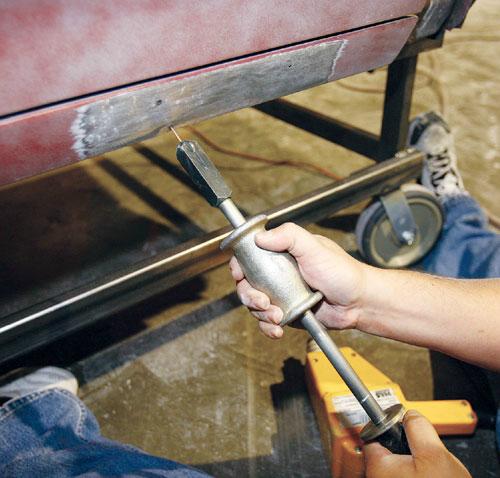
Rebuilding A Cab Corner With Fiberglass: In 1994, my 1983 Ranger cab corners were badly rusted, so I cut out all the rust to repair the corner. You need to clean the area with a grease and wax remover or cleaning agent meant to remove silicone and waxes, otherwise your new work won't stick. After cleaning the area and cutting out the bad corner, I used a sanding disk and drill to sand down the surrounding surface to good metal. Use tack cloths from an automotive paint supply store to clean the sanding dust from the surface. I then coated the surface with Extend rust preventive and let it cure. It will convert any new rust that may be starting to a black oxide. I cut a piece of fiberglass mat large enough to go around the corner and had enough bare metal so it didn't overlap the paint. If you dip the fiberglass in resin and try to apply it, it will fall apart and be a mess before you can get it on the vehicle. It's better to hold it in place on the vehicle and brush the resin on it and let it soak through. After letting it set up I cut a larger piece and overlapped it the same way over the first. After letting it dry and harden in the correct shape, I used Bondo-Glass to smooth out the corner and blend it all in. Bondo-Glass has fiberglass in it and is extremely strong when it hardens. Again, make sure you sanded enough area away so that none of the Bondo and fiberglass is touching paint. You should have spread it on to a smooth thin layer that should need a small amount of sanding. Use 40 grit or 80 grit paper to get the desired shape. Switch to a regular body filler to finish it up and get a smoother surface. The filler should not be more than 1/4 to 3/8 of an inch at a time. If you put filler on too thick, the heat in the reaction will be concentrated and higher in the thick area and could lead to crystallizing the resin in that spot, making it brittle and subject to cracking later on. Also, too thick can mean you won't be able to get all of the air pockets smoothed out. Use 80 grit and then 120 grit sandpaper to smooth it out. Primer will fill some scratches, but will not fill the deep scratches. Block sand it smooth with 200 and 400 grit sandpaper. Once you get it to a smooth finish, clean it with the tack cloth and apply a filler primer. How strong is it? About 7-8 years later I painted the truck again and decided to remove the fiberglass corners and replace them with metal. The fiberglass with Bondo-Glass was very strong. So strong that if I had know how hard they were going to be to remove, I would never have bought the metal replacements. Dents: Bodywork in general can be seriously frustrating and time consuming work. A seemingly small dents can turn into a lot of work if not approached properly. You must remember that the sheetmetal stretches out of shape and it either needs to be shrunk back into shape or worked back out as close to straight as possible. Working out dents is one of the most important steps in the repair process. If the dent is worked out well, less filler will be required. That makes for a longer lasting repair. Take your time. Dent repair is a skill that requires patience and practice. Don't expect to get dents out with a few hammer blows. If the dents are in a front fender, it may be cheaper to purchase an aftermarket replacement fender than to try and repair it. Don't think you're going to fill the dent with Bondo. Filler is intended to smooth out the surface after you've got it as close to the right shape with a hammer and dollie as you can get. Applying filler to think will cause it to crack and allow moisture to seep in under it and rust the panel. Many dents can be popped out with a rubber mallet if the area is accessible from behind the dent. A rubber mallet is the best tool to use, as it is less likely to cause hammer marks. Try to match the mallet to the size of the dent. Use a small mallet for very small dents, and a large diameter mallet for larger dents. Using small hammers or mallets on large dents increases the probability of making hammer-head marks before popping out the dent. To remove the dent using the mallet method, go to the back side of the panel where the dent is located. Hit as close to the center of the dent as you can reach. Tap forcefully, but not so hard you actually dent the area further. You don't want to knock it out to far and have to knock it back in on the other side. If you can't get to it from the inside, then you'll have to use a screw in or stud type dent puller. To use a screw in style dent puller, you have to drill a 1/8 inch hole, screw in the dent puller (slide hammer), and pull the dent out. The best method involves a stud welder. If you drill a hole in your bodywork to pull a dent--you're just making more work for yourself. A stud welder offers low-heat dent removal without all of the bullet holes and burn-through of other methods. Just grind the damaged area down to the bare metal and weld a stud to the damaged area. Then pull the dent with the included slide hammer, trim off the stud, and you're done.
In the photo above, the dented rocker panel has been cleaned and sanded beyond the area of the dent. The stud gun spot-welds the stud to the surface of the metal. If any paint is present, it obviously won't work. The next procedure is to spot weld a stud to the metals surface.
A novice metal worker may be tempted to start at the lowest spot (usually in the middle) in the dent. Any experienced body man will tell you that starting at the outside or edge of the dent is the preferred method. Pulling a dent from the outside in, will avoid any high spots, high spots are the enemy and can literally stretch the metal, making it thinner.
The slide hammer is attached to the stud and a few light raps are all that is needed. The temptation to yank the dent with heavy blows on the slide hammer should be avoided. Resist the urge to try and pull the dent all at once. High spots can occur as a result and that would negate all your hard work. Once that particular area has been worked the stud is removed. Using a pair of needle nose vice grips, twist the stud at its base until it breaks loose. Some guys snip the stud then grind the stump. That requires more work than necessary; it's easier to just twist it off.
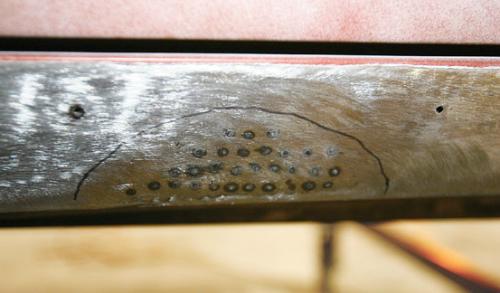
This photo illustrates just one phase of the work that was put into pulling this dent. Notice the black spots? This is where the studs were spot welded and pulled. The black marker illustrates the ridgeline along the outside of where the dent was. A dozen or more rounds with the stud gun and hammer will get it where it needs to be. Using a stir stick as a straight edge, check the progress of the dent pulling adventure. It's not nearly as bad as it used to be. Another dozen rounds or so with the nail gun are repeated and it is finished and on to the next step. Besides using a stir stick to measure your progress, nothing beats using your hands. The human hand is one of the best tools of all. Running your hand across the dent several times after every pull is a sure fire way to figure out the highs and lows while measuring your progress. Apply body filler to the area. Don't apply to much and apply it just past the ridgeline. Once the body filler has set up, it's time to sand it all back down to an acceptable level. One of the biggest problems many people encounter is they tend to sand too much of the filler off. Once again the hand comes into play and feeling where you're at is the only way to do the job.
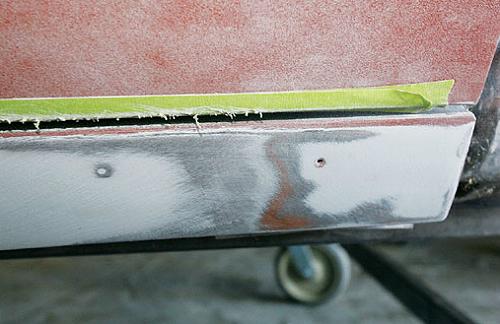
When sanding, you want to achieve an affect known as "feathering". This photo illustrates a feathered body panel. Note how the metal, filler, paint and primer all fade in to each other. Feather or layering will avoid any low spots in the final finish of the dent pull. Once done, it is covered with a high build primer. Body Filler: NOTE - Follow the directions on your can of filler. Sand the area down with 40 grit paper to remove the paint and give the filler a good surface to adhere to before applying filler. Filler needs to be mixed with a hardener to activate it. On a mixing board that you mix your Bondo or filler on, put the amount you are going to mix up in the form of a circle. With your spreader or mixer divide the circle in half, 50%. Divide the half in half, 25%, half again, 12.5%, half again, 6.25% half again, 3.125% (this is the maximum) half again, 1.5% (this is the minimum). Mix the body filler thoroughly using a spreader and mixing board. Do not mix it on cardboard. It can absorb some of the catalyst and weaken the filler. Use enough hardener to achieve a light pinkish color. If you use too much hardener, the mix will harden too fast and you won’t have enough time to work it. Spread it in smooth, even strokes, shaping as you go. The filler should not be more than 1/4 to 3/8 of an inch at a time. If you put filler on too thick, the heat in the reaction will be concentrated and higher in the thick area and could lead to crystallizing the resin in that spot, making it brittle and subject to cracking later on. Also, too thick can mean you won't be able to get all of the air pockets smoothed out. I like to use Bondo-Glass on repairs that I had to form using fiberglass mat. Bondo-Glass is much harder/stronger than traditional Bondo. After grinding and before applying the body filler, use a 6-Inch DA sander with 220 grit paper and feather-edge all the surrounding paint edges. This will make it easier to prep the panel for refinishing by avoiding accidentally gouging the body filler and spoiling any straightening work. Paint is generally harder and more dense than body filler and takes more sanding to feather-edge. By doing this step before applying the body filler, you will achieve a perfect transition between the painted and filled areas when you sand the body filler. Shape And Sand: After applying the body filler, let it set until it is the consistency of soft cheese. Do not wait until it is fully hardened! At this consistency it is easily shaped and sanded. Use a 10-inch half round body file (cheese grater) and gradually shave the excess filler, shaping the panel as you go. Do not remove too much filler or else there won’t be enough for a level surface. You’re still going to be sanding with 40 grit and 80 grit paper which will remove even more filler. Getting this right takes a little practice.
All the shaping is done with the cheese grater. The sandpaper is mainly to smooth out the cheese grater marks. NOTE - I have never used a cheese grater. If you've done good bodywork and you're not trying to 'sculpt' a vehicle out of Bondo, neither will you.
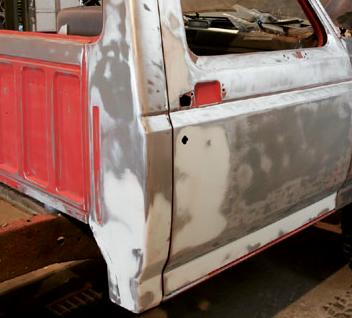
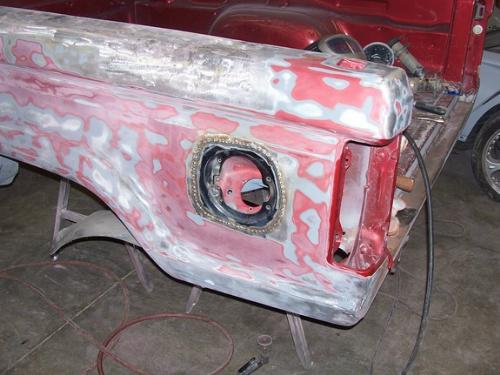
Next, while the filler is still setting, obtain a sanding block and two different grits of sandpaper. Don’t buy garnet paper from a local hardware store. Garnet paper is for wood. Obtain the real thing from an automotive finish supply house or parts store. The type of sandpaper used in auto body repair is called “free cut” paper. Buy both 40 grit and 80 grit paper. Setup the sanding block by tearing a sheet of 40 grit sandpaper in half. Fold one of the half sheets in half once again and wrap this around the sanding block. Use the 40 grit on the soft body filler and gently smooth out the cheese grater marks. Don’t over sand because you will need to feather-edge the filler into the bare metal. Always use sanding blocks when you sand. Sanding blocks can be found at most hardware stores cheap. This will ensure a flat surface and smooth finish. Now let the filler set until it is fully hardened. The panel should be straight and smooth. When the filler is fully hardened prepare the sanding block (or air file) with a sheet of 80 grit paper. Use this grit to smooth out all the remaining sandpaper marks from the 40 grit paper. At this point, all the marks left from the 80 grit paper can be filled with primer-surfacer. Sanding Tips: After you have primered any bare metal and before you start with 150 grit paper, it's helpful to spray on a mist of black paint. This is called a "guide coat" because it serves as a guide when block sanding. When sanding, this will leave the black paint in any lower areas. This makes it easier for you to tell how smooth the panel is. When block sanding, don't just saw back and forth. Use your block to create an X-shaped pattern. For example, sand first from upper left to lower right. Then after a number of stokes, sand from lower left to upper right. This prevents from digging grooves and the cross hatch pattern offers good adhesion. Additionally, this method enables the block to make better contact. Very few vehicles have exactly flat panels. This method prevents you from creating vertical waves. To make sure you get a good, smooth surface without waves, sanding boards are a must. Removing Decals: Generally, decals can be removed with a heat gun or hair dryer if you're patient. Otherwise, they'll have to be ground down with a D/A sander. Decals can be deceptive. Often block sanding isn't sufficient because the paint around the decals has weathered to a different thickness. As a rule of thumb, if you've sanded and can still see where a decal was, take it down to bare metal. Otherwise, letters have a tendency to "come back", showing through the new paint. Primer: When primering, it is important to distinguish between an adhesive type primer and a filler type primer. When primering bare metal, us an adhesive type primer. This is sometimes referred to as a primer/sealer. It contrasts with a filler type primer which is sometimes referred to as a primer/surfacer. Filler type primers are not designed for getting a good bite on bare metal or paint. Never "load" up primers. Over priming can create a host of problems, even interacting with the old paint underneath creating wrinkles or lifting. Three light coats of primer are better than one heavy coat. As a general rule with both primer and paint, lighter is better than heavier. That applies to anything involving solvent. Paint Prep: Don't remove any paint that is in good condition. If it stood the test of time without peeling then let it be. Even if it has oxidized, it's still in good condition if it has good adhesion. A light scuff with 320-grit paper or with special scuffing pads will rough up the surface enough for the paint to bite. The most common misconception is that you must primer the whole vehicle before painting. To much primer can be a bad thing, and if you take it to a body shop for paint they may be skeptical because they don't know what's under the primer. You should only be priming bare metal and fresh body work. An exception is when you're changing to a new color or not sure if the top coat will be compatible with the bottom coat. I painted a red Ranger white. The bodywork was similar to the photo below with some red still showing. I sealed it with primer so the red wouldn't bleed in to the white. I repainted the vehicle again several years later. This time I used the same paint as I did the last time so I just used a scuff pad on the old paint so the new paint would stick to it. At this stage of the repair apply medium coats of primer-surfacer to fill the sand scratches left by the 80 grit paper. Don’t apply the coats too heavily because that will trap the solvents and prolong drying time. Apply primer only to sanded areas of the panel where either the paint was feather-edged or where there is body filler. Do not spray primer-surfacer on unsanded paint. It will not adhere properly.
The photo above shows a lot of feathering. If you could zoom in, you would see how the bare metal, primer and paint all fade in to one another. It doesn't go straight from bare metal to paint. The shiny areas is the bare metal and the gray areas is the primer that was under the paint. The more the paint is sanded, the lighter it appears in this photo.
The gas door area is being added in this bed and isn't finished yet. They will spot weld around the area a little at a time until it is complete. If they tried to do a continuous weld it would apply to much heat in to the surrounding sheetmetal and warp it. Don’t buy spray cans of primer from your local hardware store because plain primer does not contain the heavy solids needed to fill the sand scratches. Obtain the real thing from an automotive finish supply house. If you do use spray cans, some people recommend Eastwood's self-etching primer to cover up repair work. The self-etching formula bonds better to bare metals, and covers repairs better than other aerosol primers. It is also a single-stage formula, which requires no catalyst, making it even easier to use. Applying Surfacer Primer: Use either a siphon feed gun or a gravity feed gun. Use a tip size between 2.0 and 2.4 mm because primer-surfacer contains heavy solids and requires a larger nozzle orifice than the topcoat. Keep applying coats of primer-surfacer until there is enough buildup to sand smooth. Sanding With A DA Sander: Allow the primer-surfacer to dry thoroughly. Using a 6-Inch DA sander with 220 grit paper, sand the primer smooth removing all the 80 grit scratches. The great thing about using a DA with 220 grit paper is that this is the fastest way to prepare the panel for finishing. Some people prefer 180 grit paper to make the job go faster, but 220 grit will give you a smoother surface and less chance of sand scratches showing through the finish. Reapply Primer-Surfacer: Normally, you would have sanded completely through the primer into the bare metal areas or into the body filler. At this point reapply more coats of primer-surfacer. Remember to apply primer only to sanded areas of the panel and not to areas of unsanded paint. Repeat the process of applying primer-surfacer and sanding with the DA until you have: 1. A perfectly
smooth surface, and Fill Pinholes With Spot Putty: At this point it is normal that you will discover pinholes in the primer. This is caused by bubbles in the body filler when mixing the catalyst (hardener) into the body filler. The way to correct this is with spot putty. Using a rubber squeegee, apply a thin coat of spot putty in each pinhole. Wait for the spot putty to dry thoroughly, then use either the DA with 220 grit sandpaper or wet-sand the areas with a sanding block using 600 grit wet-or-dry sandpaper and lots of water. Using 220 grit with a DA is different from wet-sanding with 220 grit paper. The DA disperses the sanding motion and doesn’t leave scratches. Wet sanding tends to leave scratches even when using 600 grit paper unless you sand very lightly with lots of water. Applying The Finish Coat: Once the bodywork is done, you can either have the vehicle painted by a body shop, a friend who can paint vehicles, or paint it yourself. More Information: For more articles on painting, click below:
|
|
|