|
|
|
|
Charging System - General Information, Precautions & Checking |
|
Charging System - General Information The charging system includes the alternator, either an internal or an external voltage regulator, an ammeter or charge indicator light, the battery, a fusible link and the wiring between all the components. The charging system supplies electrical power for the ignition system, the lights, the radio, etc. The alternator is driven by a drivebelt at the front of the engine. The purpose of the voltage regulator is to limit the alternator's voltage to a preset value. This prevents power surges, circuit overloads, etc., during peak voltage output. On EVR (external voltage regulator) systems, the regulator is mounted on the right fender apron of the vehicle. On IAR (integral alternator/regulator) systems, a solid-state regulator is housed inside the alternator itself. The fusible link is a short length of insulated wire integral with the engine compartment wiring harness. The link is four wire gauges smaller in diameter than the circuit it protects. Production fusible links and their identification flags are identified by the flag color.
The charging system doesn't ordinarily require periodic maintenance. However, the drivebelt, battery and wires and connections should be inspected at regular intervals. Be very careful when making electrical circuit connections to the vehicle and note the following: a) When reconnecting wires to the alternator from the battery, be sure to note the polarity. b) Before using arc welding equipment to repair any part of the vehicle, disconnect the wires from the alternator and the battery terminals. c) Never start the engine with a battery charger connected. d) Always disconnect both battery leads before using a battery charger. e) The alternator is turned by the engine drivebelt which could cause serious injury if your hands or clothes become entangled in it with the engine running. f) Because the alternator is connected directly to the battery, it could arc or cause a fire if overloaded or shorted out. g) Wrap a plastic bag over the alternator and secure it with rubber bands before steam cleaning the engine. Charging system - check
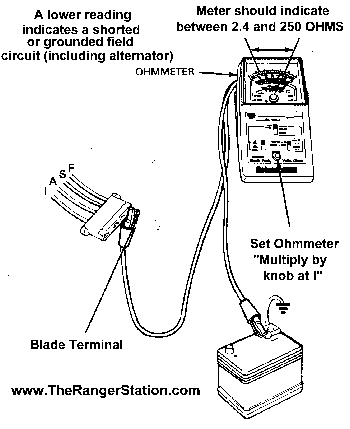
(Illustration CHS1) Temporarily install a blade terminal in the wiring harness F terminal, then measure resistance between the F terminal and ground with an ohmmeter. General
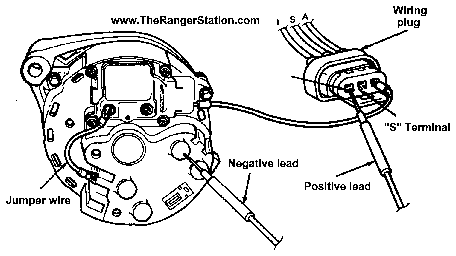
Test a) Check the drivebelt tension and condition. Replace if it's worn or deteriorated. b) Make sure the alternator mounting and adjustment bolts are tight. c) Inspect the alternator wiring harness and the electrical connectors at the alternator and voltage regulator (if external). They must be in good condition and tight. d) Check the fusible link (if equipped) located between the starter relay and the alternator. If it's burned, determine the cause, repair the circuit and replace the link (The vehicle won't start and/or the the accessories won't work if the fusible link blows). Sometimes a fusible link may look good, but still be bad. If in doubt, remove it and check for continuity. e) Start the engine and check the alternator for abnormal noises (a shrieking or squealing sound indicates a bad bearing). f) Check the specific gravity of the battery electrolyte. If it's low, charge the battery (doesn't apply to maintenance free batteries) g) Make sure the battery is fully charged (one bad cell in a battery can cause overcharging by the alternator). h) Disconnect the battery cables (negative first, then positive). Inspect the battery posts and the cable clamps for corrosion. Clean them thoroughly if necessary. Reconnect the cable to the positive terminal. i) With the key off, connect a test light between the negative battery post and the disconnected negative cable clamp. 1) If the test light does not come on, reattach the clamp and proceed to the next Step. 2) If the test light comes on, there is a short (drain) in the electrical system of the vehicle. The short must be repaired before the charging system can be checked. 3) Disconnect the alternator wiring harness. (a) If the light goes out, the alternator is bad. (b) If the light stays on, pull each fuse until the light goes out (this will tell you which component is shorted). 2. Using a voltmeter, check the battery voltage with the engine off. It should be approximately 12-volts. 3. (NO LOAD TEST) Run the engine at a fast idle (approximately 1500 rpm) and check the battery voltage again after the voltage stops rising. This may take a few minutes. It should now be higher than battery voltage, but not more than 2 volts higher (external voltage regulator) or 2.5 volts higher (integral voltage regulator). 4. If the voltage reading is less than the specified charging voltage, perform the Under-voltage test. If it is higher, perform the over-voltage test. 5. (LOAD TEST) Turn on the high beam headlights and turn the heater or air conditioner blower to its highest setting. Run the engine at 2,000 rpm and check the voltage reading. It should now be at least 0.5 volt higher than battery voltage. If not, perform the appropriate Under-voltage test. 6. If the voltage readings are correct in the preceding steps, the charging system is working properly. Under-Voltage Test - External Voltage Regulator 7. Unplug the electrical connector from the regulator. Temporarily install a blade terminal in the wiring harness F terminal, then measure resistance between the F terminal and ground with an ohmmeter. It should read 2.4 ohms or more. a) If it is less than specified, repair the shorted or grounded field circuit in the alternator or wiring harness, then repeat the load test. (Step 5) b) If the ohmmeter reading is correct, proceed with Step 8. 8. Remove the blade terminal. Connect a jumper wire between terminals A and F.
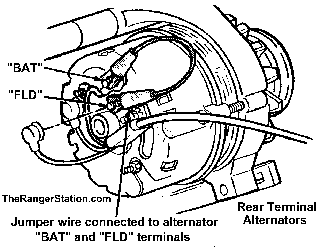
(Illustration CHS2) 9. Repeat the load test (Step 5) with the jumper wire connected. a) If the reading is more than 0.5-volt above battery voltage, the problem is in the wiring or regulator. Perform the S circuit test (ammeter equipped models) or S and I circuit tests (indicator light equipped models) to isolate the problem. b) If the reading is still too low, continue with Step 10. 10. Remove the jumper wire from the electrical connector, but leave the connector unplugged for now. 11. Disconnect the FLD terminal wire at the back of the alternator. Pull back the cover from the BAT terminal and connect a jumper wire between the FLD and BAT terminals (see illustration CHS3).
(Illustration CHS3) 12. Repeat the load test (Step5). a) If voltage is now 0.5 volt or more above battery voltage, perform the S or S and I circuit test below. b) If voltage is still too low, proceed to Step 13. 13. Turn off the engine and move the positive voltmeter lead to the BAT terminal on the alternator. a) If the voltmeter now indicates battery voltage, replace the alternator. b) If the voltmeter indicates zero, check the wire between the alternator and starter relay for breaks or bad connections and repair as needed. Over-Voltage Test - External Voltage Regulator 14. Start this test with the regulator electrical connector plugged in. 15. Connect a jumper wire between the base of the voltage regulator and the alternator frame casting. 16. Repeat the no-load test (Step 3). a) If the voltage reading drops to within the specified range, check for a poor ground at the alternator, at the regulator, between the engine and firewall, or at either end of the negative battery cable. b) If the voltage is still too high, perform Step 17. 17. Unplug the electrical connector from the voltage regulator and repeat the no-load test (Step 3). a) If the voltage reading is now correct, replace the voltage regulator. b) If the voltage reading is still too high, check for a short between the A and F circuits. S Circuit Test (Ammeter-Equipped Vehicles) - External Voltage Regulator 18. Unplug the electrical connector from the voltage regulator. Connect the voltmeter positive lead to the S terminal in the connector. Connect the negative lead to the battery negative terminal. 19. Check the voltmeter reading with the engine off. It should be zero. 20. Turn the ignition key to the On position, but don't start the engine. The voltmeter should indicate battery voltage. a) If there is no voltage with the key On, check the S wire between the ignition switch and electrical connector for a break or bad connection. b) If the voltage readings are as specified, replace the voltage regulator. 21. Repeat the load test (Step 5). S And I Circuit Test (Indicator Light-Equipped Vehicles) - External Voltage Regulator 22. Unplug the electrical connector from the regulator, then connect a jumper wire between the A and F terminals. 23. Connect the voltmeter negative lead to battery negative terminal. 24. Start the engine and let it idle. 25. Connect the voltmeter positive lead to the S terminal, then the I terminal in the regulator connector. The I terminal voltage reading should be approximately twice as high as the S terminal voltage reading. a) If the voltage readings are correct, replace the voltage regulator. b) If there is no voltage, check the S and I circuit wiring for breaks or bad connections). Remove the jumper wire. Under-Voltage Test - Integral Voltage Regulator
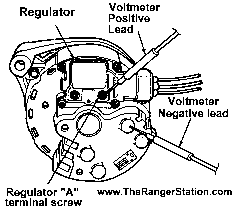
(Illustration CHS4) 26. Unplug the electrical connector from the regulator. Connect an ohmmeter between the A and F terminal screws. The ohmmeter should indicate at least 2.4 ohms. a) If the ohmmeter reading is too low, the regulator is defective. Caution: The regulator failure may have been caused by a shorted rotor or field circuit. These must be checked before replacing the regulator or the new regulator may fail as well. Checking the rotor and field circuit requires disassembly of the alternator and should be done by a dealer or electrical shop. It may be less expensive to replace the alternator with a rebuilt unit. b) If the ohmmeter reading is within specifications, reconnect the electrical connector to the regulator and perform Step 27. 27. Connect the voltmeter negative lead to the alternator rear housing
(Illustration CHS6) 28. If the voltmeter indicates battery voltage in Step 27, place the ignition key in the Off position. 29. Connect the voltmeter negative lead to the alternator frame and the positive lead to the F terminal screw. a) If the voltmeter indicates no voltage, replace the alternator. b) If the voltmeter indicates battery voltage, proceed to Step 30.
(Illustration CHS7) 30. Turn the ignition key to the Run position, but don't start the engine. Touch the voltmeter negative lead to the rear of the alternator and the positive lead to the F terminal screw on the regulator. a) If the voltmeter indicates more than 1.5 volts, perform the S and I circuit test - integral regulator. b) If the voltmeter indicates 1.5 volts or less, proceed to Step 31.
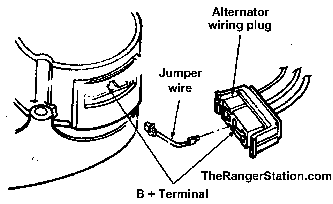
(Illustration CHS5) 31. Disconnect the alternator electrical connector. Connect a 12-gauge jumper wire between the alternator B+ terminal and its corresponding terminal in the electrical connector. Perform the load test (Step 5) with the voltmeter positive terminal connected to one of the B+ jumper wire terminals. a) If voltage increases to more than 0.5-volt above battery voltage, check the wiring from alternator to starter relay for breaks or bad connections. b) If the voltage does not increase to more than O.5 volt above battery voltage, perform Step 32. 32. Connect a jumper wire between the alternator rear housing and the regulator F terminal screw (see Illustration CHS7). Repeat the load test (Step 5) with the voltmeter positive lead connected to one of the B+ jumper wire terminals. a) If voltage increases by more than 0.5 volt, replace the regulator. b) lf voltage doesn't increase by more than O.5 volt, replace the alternator. Over-Voltage Test - Integral Voltage Regulator 33. Turn the key to the On position but leave the engine off. 34. Connect the voltmeter negative lead to the alternator rear housing, then connect the positive lead to the A terminal screw and a regulator grounding screw in turn (see Illustration CHS6). If the voltage readings differ by more than 0.5 volt, check the A circuit for breaks or bad connections. 35. Check for loose regulator grounding screws and tighten as needed. 36. If the voltage reading is still too high, place the ignition key in the Off position. Connect the voltmeter negative lead to the alternator frame. Connect the voltmeter positive lead to the A terminal screw, then to the F terminal screw (see Illustration CHS6). a) If the voltage readings at the two screw heads are different, replace the alternator. b) If the voltage readings at the two screw heads are the same, replace the regulator. S And I Circuit Test - Integral Voltage Regulator 37. Disconnect the alternator electrical connector. 38. Connect one jumper wire from the alternator A terminal to its corresponding terminal in the electrical connector. Connect another jumper wire from the regulator F screw to the alternator housing.
(Illustration CHS8) 39. Start the engine and let it idle. 40. Connect the voltmeter negative lead to the alternator housing. Connect the positive lead to the connector S terminal and I terminal in turn (see Illustration CHS8). Voltage at the I terminal should be approximately double the reading at the S terminal. a) If the readings are as specified, replace the regulator. b) If there is no voltage, check the wiring for breaks or bad connections. If the wiring is good, replace the alternator.
|
|
|