
ludicrouspeed69
New Member
- Joined
- Dec 5, 2023
- Messages
- 1
- Reaction score
- 2
- Points
- 3
- Location
- Washington
- Vehicle Year
- 1993
- Make / Model
- Ford Ranger
- Engine Type
- 2.3 (4 Cylinder)
- Transmission
- Manual
- 2WD / 4WD
- 2WD
- Total Lift
- 4"
- Tire Size
- 32
Jim Oaks's excellent article helped me out a lot when I finished installing my 4" Rough Country lift and found that the stock brake lines were stretched too tight to even drive around while I waited for skyjacker lines to come in the mail.
These lines are what I picked up from Autozone:
However, they don't simply install exactly like the stock ones. 5 items follow:
1. On both sides, you need to grind a tiny bit off the body which the banjo bolt goes through, as the flat mating surface of the 1993 Ranger Backing plate is larger than the Chevy K2500 ones these lines are for. Here is a drawing of what I mean:
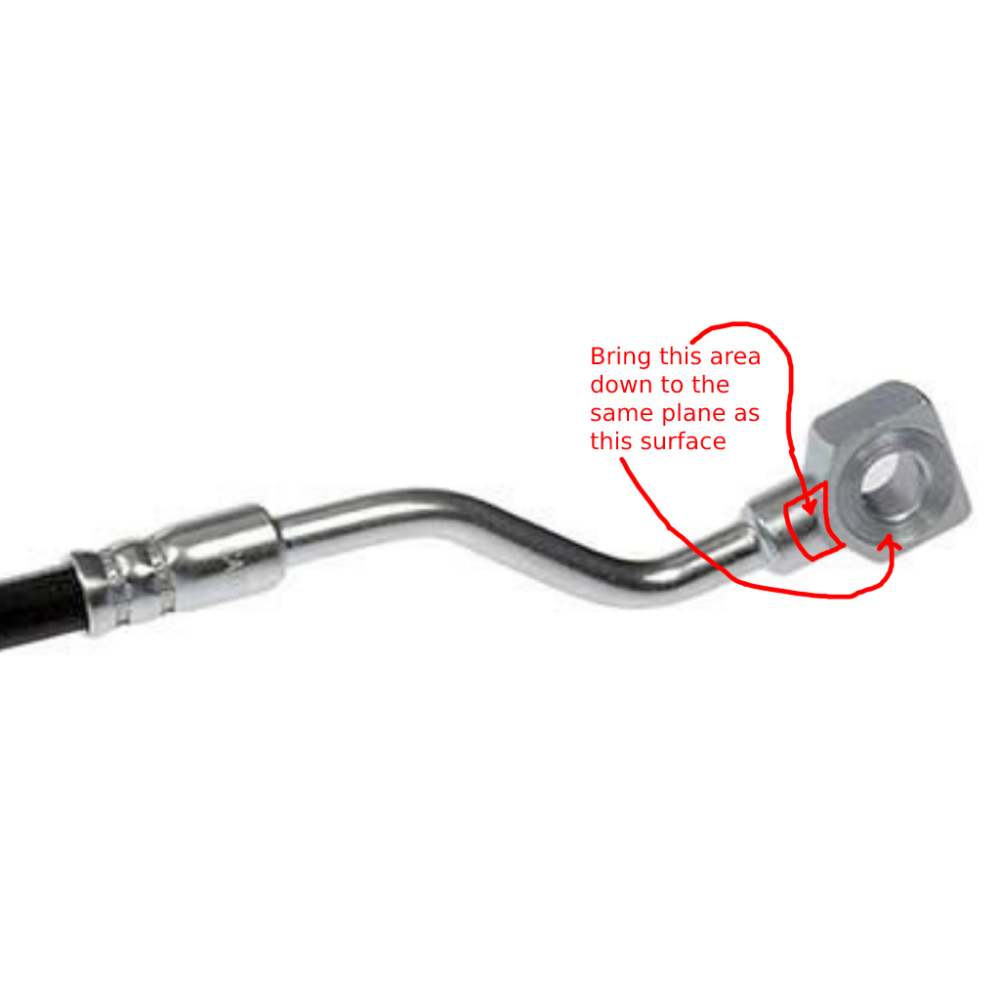
I used a cutoff wheel to carefully take off only the absolute minimum material necessary, since you really don't want to mess with wall thickness of any parts in a hydraulic system.
2. The thickness of this banjo bolt body on the passenger side is slightly thinner on the Brakeware line than the stock line. This means you need to use 2 THICKER copper washers on either side of it to ensure the banjo bolt ends up clocked with the hole aligning to the brake line hole when fully tightened. For me, this meant stealing the copper washers from the driver's side line (for some reason a few thousandths thicker). Use a paint pen to mark the head of the banjo bolt on the corner under which the hole lives!! Then do test-fits until your washer situation results in correct clocking when fully installed and tightened (AKA the paint pen mark lines up with the metal line's angle).
3. The Brakeware lines' holes in the banjo bolt bodies are not halfway down the thickness of the body, as the holes in the stock ones are. This means, if you use the stock banjo bolts, the fluid passage is going to be restricted. My solution was to use a tiny dremel bit to adjust the stock banjo bolt side holes into ovals, whose top edges lined up with the new lines' banjo bolt body holes.
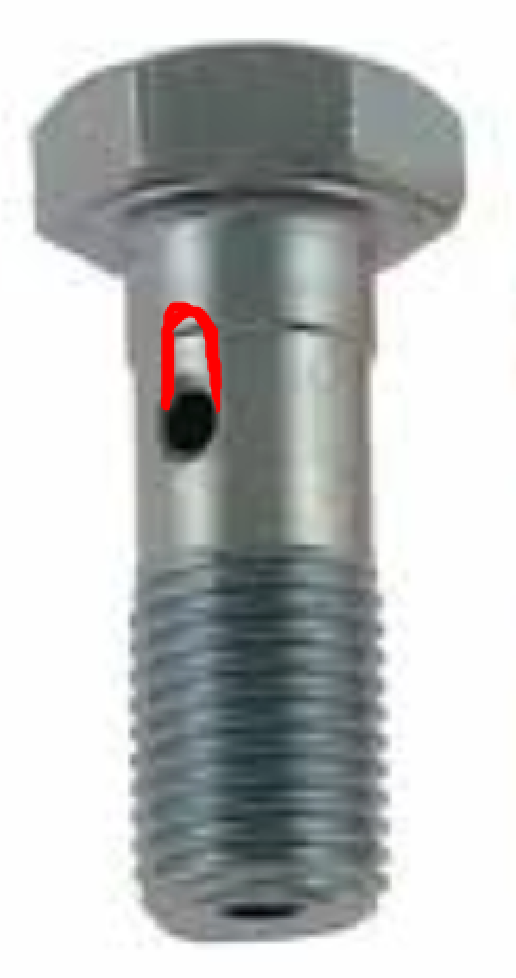
Use calipers to measure very carefully! The more graceful solution is to buy 1995 Chevy K2500 banjo bolts, which will obviously line up without modification. DISCLAIMER: I could not find the thread pattern for those Chevy banjo bolts - if they're not 3/8"-24TPI, you will in fact have to use the stock Ford ones.
4. The big headache: The brakeware lines both have female fittings on the other end. For the passenger side, this is no problem. It just accepts the hardline flare nut no problem.
The driver's side, however, has a tee fitting here (I think one from the ABS module and one straight from the master cylinder). That tee fitting has two 3/8"-24TPI female ports, and one 1/4" OD hardline "port" which the stock flexible hose is mated to (see the image below).
The issue is that the new flexible line must attach to this tee at the spot where it has a hardline coming out.
Final remarks:
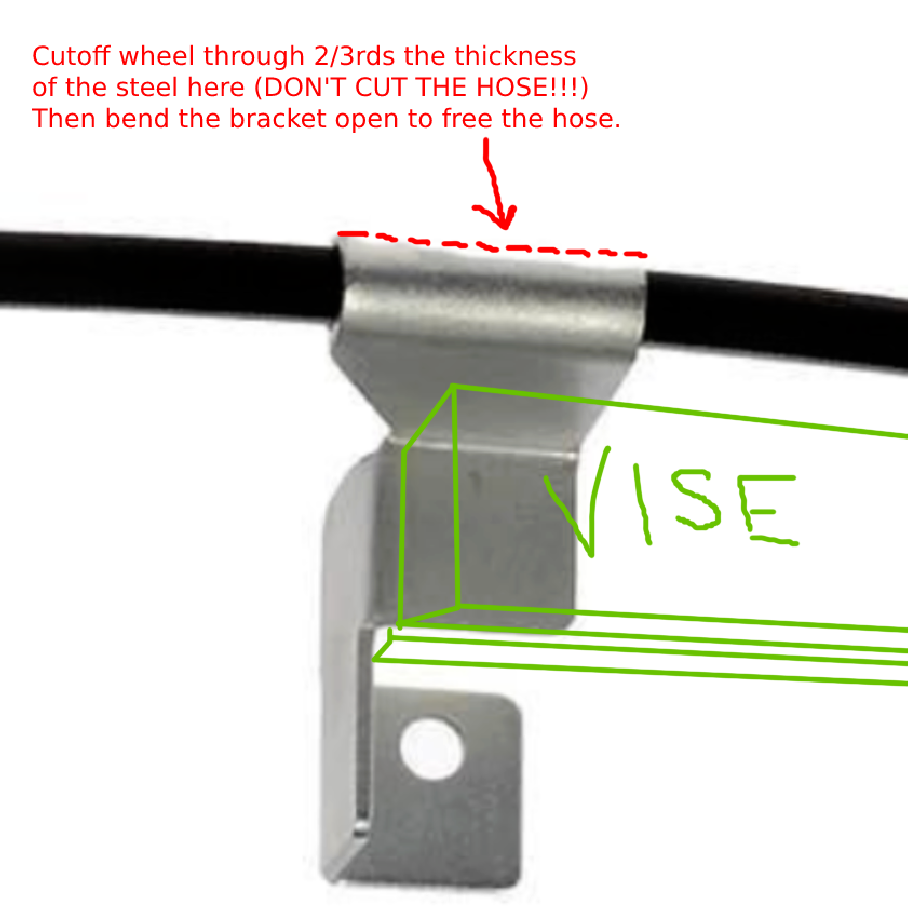
I hate the stock "clips" that hold the fittings in place at the shock tower pass-through hole. They are very hard to reuse as you must bend them to remove. I just grabbed some big 5/8 ID fender washers and used those instead when reassembling.
All this cost me about 70 bucks and I could grab everything from parts/hardware stores in town. Pretty good when a set of skyjacker lines will run you $160!
These lines are what I picked up from Autozone:
| Duralast | 70053 | Duralast | 70054 |
1. On both sides, you need to grind a tiny bit off the body which the banjo bolt goes through, as the flat mating surface of the 1993 Ranger Backing plate is larger than the Chevy K2500 ones these lines are for. Here is a drawing of what I mean:
I used a cutoff wheel to carefully take off only the absolute minimum material necessary, since you really don't want to mess with wall thickness of any parts in a hydraulic system.
2. The thickness of this banjo bolt body on the passenger side is slightly thinner on the Brakeware line than the stock line. This means you need to use 2 THICKER copper washers on either side of it to ensure the banjo bolt ends up clocked with the hole aligning to the brake line hole when fully tightened. For me, this meant stealing the copper washers from the driver's side line (for some reason a few thousandths thicker). Use a paint pen to mark the head of the banjo bolt on the corner under which the hole lives!! Then do test-fits until your washer situation results in correct clocking when fully installed and tightened (AKA the paint pen mark lines up with the metal line's angle).
3. The Brakeware lines' holes in the banjo bolt bodies are not halfway down the thickness of the body, as the holes in the stock ones are. This means, if you use the stock banjo bolts, the fluid passage is going to be restricted. My solution was to use a tiny dremel bit to adjust the stock banjo bolt side holes into ovals, whose top edges lined up with the new lines' banjo bolt body holes.
Use calipers to measure very carefully! The more graceful solution is to buy 1995 Chevy K2500 banjo bolts, which will obviously line up without modification. DISCLAIMER: I could not find the thread pattern for those Chevy banjo bolts - if they're not 3/8"-24TPI, you will in fact have to use the stock Ford ones.
4. The big headache: The brakeware lines both have female fittings on the other end. For the passenger side, this is no problem. It just accepts the hardline flare nut no problem.
The driver's side, however, has a tee fitting here (I think one from the ABS module and one straight from the master cylinder). That tee fitting has two 3/8"-24TPI female ports, and one 1/4" OD hardline "port" which the stock flexible hose is mated to (see the image below).
The issue is that the new flexible line must attach to this tee at the spot where it has a hardline coming out.
- Graceful solution: order this part from Speedway (literally the only source for this spec I could find
 no parts-store solution afaik). Thread the new line onto the male side. Pop it on the truck and thread in the hardlines behind the shock tower. Done!
- Quick and dirty solution (s*** I need to finish this today): pick up a 3/8"-24TPI bolt at least 3/4" long. Using a vise to hold it by the head, progressively sized bits, and lots of cutting oil, drill out the middle to 5/32". Go slow and stay straight.
Cut off the head with a cutoff wheel, run a die over the cut end.
Take the stock brake line and cut off the hardline extension from the Tee block, flush with the bottom of the block. Drill out the hole where it was attached, to 21/64" or a Q bit. Then tap the hole with a 3/8"-24TPI tap.
Take your new Brakeware line, your doctored bolt, and your doctored Tee block, and tighten them together. The material of the tee block here is quite soft (may be copper not brass; I couldn't tell, but I was accordingly gentle to ensure my new threads didn't strip).
Please ignore the gunk in my wheel well. I recently fixed a power steering leak that had turned all the mud on the drivers' side into indestructable clay lol.
Final remarks:
I hate the stock "clips" that hold the fittings in place at the shock tower pass-through hole. They are very hard to reuse as you must bend them to remove. I just grabbed some big 5/8 ID fender washers and used those instead when reassembling.
All this cost me about 70 bucks and I could grab everything from parts/hardware stores in town. Pretty good when a set of skyjacker lines will run you $160!


