|
Trucks Of The Month
|
By
Jim Allen
(From
Off-Road Adventures
Magazine)
The
Mojave Heater from Flex-a-lite is a simple hot water heater with a blower
fan. It works well as a replacement heater or as an auxiliary unit.
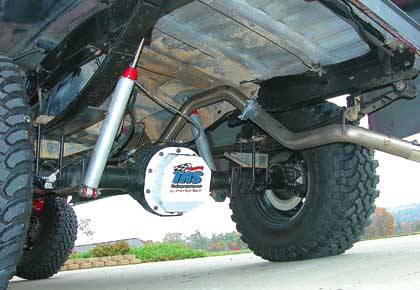
We
round up the third element of the trail performance equation, namely
traction, in this installment. We’ll cover the installation of lockers
and new gearing in both axles. Oaks decided on 4.56:1 gear ratios and the
simplicity of Detroit Lockers in both the front Dana 35 TTB and the rear
Ford 8.8. We used Genuine Gear ring and pinions, as well as their
installation kits. Master Gearhead John Steinbinder at Steinbinder’s
Service did the setup work on the front Dana 35. With sweaty palms, Oaks
tackled the rear 8.8 himself, to show that ring and pinion changes don’t
have to be done in shops.
Buy
Detroit
Lockers and Genuine
Gear Master Installation Kits from www.4wheelparts.com.
We’re
showing you these operations in an unusual way. The basic operations for
both axles are similar, even though the units look different. We will have
a picture of the operation from each axle “point of view” under a
single caption.
Bear
in mind that this is an overview and does not cover every detail. Our
premise starts with a vehicle whose axles are working and properly set up.
If you are starting from a pile of parts, the methods outlined here would
lead to a lot of trial and error. A case like that would necessitate the
use of a pinion depth tool to save hours (if not decades) of trial and
error. Best advice; if you are a novice and are faced with unusual
situations or basket case axles, consider having a pro do it.
In
addition to the Detroit Locker, 4.56 Genuine Gear ring and pinion and all
new bearings and seals, our Ranger’s D35 got new axle u-joints, new
brake rotors and new front wheel bearings. The rear 8.8 got new axle
bearings and seals, a large volume heavy duty cover and one used axle
shaft to replace one with a damaged bearing surface.
The
eagle-eyed among you may notice that the 8.8 gear swap is being done on an
Explorer axle. Though it’s similar to the Ranger 8.8, it’s beefier.
We’ll show you why and how it was swapped into a Ranger in the next
installment.
Next
Time: Warn Manual Hubs and Explorer 8.8 Conversion
Dana
35 and Ford 8.8 Rebuild Specs
|
|
Dana
35
|
Ford
8.8
|
|
Pinion
Nut Torque
|
170-500
lbs-ft
|
150-450
lbs-ft
|
|
Carrier
Cap Bolts
|
40-50
lbs-ft
|
60-80
lbs-ft
|
|
Ring
Gear Bolts
|
70-90
lbs-ft
|
70-85
lbs-ft
|
|
Pinion
Preload (New)
|
15-30
in-lbs
|
17-22
in-lbs
|
|
Pinion
Preload (Used)
|
7-8
in-lbs
|
6-8
in-lbs
|
|
Backlash
|
.006-.010-in.
|
.008-015-in.
|
|
Approx.
Lube Cap.
|
3.5
pts.
|
5.4
pts.
|
Tools
Required:
Wrench
Rating:
Ratings
Explanation
|
|

Twin
Detroits: The Detroit Locker is one of the founding fathers in man’s
quest for traction. These are both C-Lockers, meaning they were built
to work with c-clip type axles. Detroits are known as “speed
sensing” traction aids. They try to keep both wheels turning at the
same speeds at all times. If one wheel speeds up when it looses
traction, the Detroit locks the two axles together. This means they
can transfer all the available torque to just one wheel if only one
wheel has traction. Under light torque loads, such as coasting around
a turn, the locker allows one wheel to slow down by ratcheting, but as
soon as you apply a little power, the unit will try to lock up. The
newer generation Detroits are also so-called “SofLockers,” meaning
they have some design features that make them a lot smoother on the
street.
|
|

What
Parts? Obviously, you need matching ratio ring and pinions front and
rear, as well as the new lockers. In addition, it’s good practice to
buy the complete installation kits. They usually include all the
bearings, seals, gaskets, shims and ring gear bolts needed for the
job. Anything missing you can source outside the kit, but those are
the essentials. Don’t forget RTV sealant, Locktite and 90wt gear
oil.
|
|
|
|

|
|

|
|
Remove
Axles: Note that the long side axle shaft stays with the D35 diff unit
when removed from the beam and it’s held in with a clip. To remove,
drive out the spider pin retainer, remove the spider pin and spiders,
push the shaft in slightly and remove the clip with a screwdriver. On
the 8.8, the pin comes out and the axle can be pushed in slightly and
the shafts withdrawn
|
|

|
|

|
|
Remove
Carrier: After marking the carrier bearing caps left and right, remove
them and pry out the carrier. Take care to capture the carrier bearing
shims and keep them oriented the way they were originally installed.
You will measure them and reinstall the same shim thicknesses as a
starting point for the new setup. You mix these shims up and you’ll
be starting from scratch!
|
|

Cleanup:
Think cleaning isn’t important? The axle vent tube was completely
blocked with rust and crud. It took a drill to get this stuff broken
loose! Clean up the housing well.
|
|
|
|

|
|

|
|
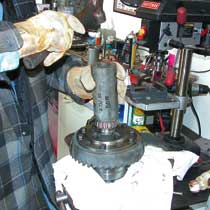
Pinion:
Even though you are starting with a new pinion and bearings, you’ll
still have to measure the pinion depth shim, which also doubles as an
oil slinger in the case of a Dana 35. You will use this dimension as a
starting point for setting the pinion depth. Because this is a reverse
cut, high pinion differential, the large shim is vital for the
lubrication of the pinion bearings. After installing the shim, press
the new inner pinion bearing onto the pinion. You can install bearings
without a press by using hot and cold. Put the pinion in the freezer
for a few hours. Put the bearing onto a hotplate and warm it up. You
don’t want it sizzling hot, but too hot to touch with your bare
hands. The actual Timken spec is 300 degrees max, but you don’t need
it that hot. When you put the hot, expanded bearing onto the cold,
contracted pinion, the bearing usually slips on with only a couple of
minor taps. This homemade driver was built from a piece of steel
tubing.
|
|

|
|

|
|
Pinion
Bearing Cups: Driving the old bearing cups out is straightforward,
though you will want to use a punch with a good edge. Sometimes there
isn’t much of a lip to drive against. Here’s a tip for driving the
cups back in... put them in the freezer for a while. If you can warm
the housing a bit, so much the better. Best to use seal and cup
drivers, but you can do it with a punch or an improvised driver if you
are careful not to nick the cup.
|
|

General
Tip: It’s important to prelube the bearings with 90wt gear oil,
especially the pinion bearings. When checking the preload of these
bearings, the readings can be skewed if another type of lubricant is
used. Install the pinion and set the preload to spec, similar to the
D35 above.
|
|

Pinion
Installation/Setup: Install the pinion, the crush sleeve, the outer
pinion bearing, the pinion seal and the pinion yoke into the diff
housing. Because the D-35 is essentially a removable carrier, you can
use a workbench vice to aid in assembly. You need to crush the crush
sleeve and set the pinion bearing preload with a beam type inch pounds
torque wrench. Steinbinder and his dad demonstrate that getting the
sleeve to crush can be tough. Once you get that initial crush, it goes
easier. Continue to tighten the nut in increments, periodically
checking the preload with a beam type, inch pounds torque wrench until
the correct value is achieved. You can do the same thing with an air
impact wrench, but you need to be careful not to overdo it. Once you
go past, you can’t back up and must replace the crush sleeve.
|
|

|
|

|
|
Install
Ring Gear: Install the ring gear and torque the bolts to spec after
applying high strength (red) Locktite. You’ll need to clamp the
carrier in a vice. Or, if you are using a press for the carrier
bearings, when the unit is clamped in the press, torque them at that
time.
|
|

|
|
|
|
Install
Carrier Bearings: The carrier bearings go on next and are most easily
installed in a press. Or, you can use the hotplate and a driver. Some
Dana axles have their backlash/preload shims under the carrier
bearings, but not the Dana 35. This makes setup much easier.
|
|

|
|

|
|
Install
Carrier: The carrier and shims should not just slip in. Start with the
same shim thickness used with the original setup. To preload the
bearings, the dimension of the carrier, bearings and shims is slightly
wider that the dimension of the case (by about .005-inch). That means
you will have to use a rubber mallet to drive the unit in. If you wail
away and it simply won’t go in, reduce the shim thickness slightly
(equally on both sides). If it just plunks in, add a few thousands of
shim thickness (again equally on both sides) until it’s a very tight
fit. Once you reach the “wedgie” point, then you start with the
mallet, tapping the unit down evenly until it’s fully seated into
the bearing saddles. There are special drivers that will allow you to
drive in the big thick shims one at a time, but don’t try it with a
hammer... the shims often crack.
|
Read
the Pattern
Among
the key things to remember is that it’s almost impossible to get a
perfect pattern. Focus on getting the most perfect pattern possible on the
drive side and that means having the pattern centered face to flank (the
bottom and the top edges of the tooth). The heel to toe pattern (the outer
and inner ends of the tooth) are less easy to correct and less important
to new ring gears as long as backlash is correct.
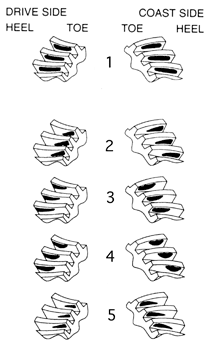
1-
A perfect pattern. Hard to achieve, especially on both the drive and coast
sides at the same time. Note how the pattern is oval and rounded on the
face and flank sides.
2-
Pinion too deep. Needs a thinner shim. Note how the pattern is biased
towards the flank and kind of sharp-edged there.
3-
Pinion not deep enough. Needs a thicker shim. Note how the pattern is
biased towards the face.
4-
Too much backlash. If the backlash is within the specification, a few
thousands either way won’t necessarily help this.
5-
Not enough backlash. If the backlash is within the specification, a few
thousands either way won’t necessarily help this.
|

|
|

|
|
Check
Backlash: After reinstalling the carrier bearing caps and torqueing
them to spec, check the backlash with a dial indicator. It should fall
into the range specified. If it doesn’t, the carrier shim thickness
must be altered. If you have too little backlash, transfer shim
thickness from the side away from the ring gear to the ring gear side.
If backlash is too great, do the opposite. Do this a few thousands at
a time until the correct value is obtained. The marking compound
already on the 8.8 ring gear is evidence that we had to remove the
unit for adjustments.
|
|

|
|

|
|
Check
Gear Pattern: The final step is to paint three or four teeth on the
ring gear in three places around the circumference and “read” the
pattern. The sidebar below tells you what to look for, how to
interpret it and how to correct it.
|
Breaking
In New Gears
Too
much heat is what kills a new set of gears. They will run hotter than
normal as they break in and that takes at least 100 miles and up to 500.
Those first 100 miles are crucial.
For
the rear axle, drive only in short spurts and with a light load (no
towing!). After the first 10 miles or so, go under and feel the cover. If
it’s too hot to touch, let it cool and drive another 10 miles and check.
It should gradually get cooler. Don’t drive more than about 20 miles at
a stretch for the first 100 miles. Those warm-up/cool-off cycles are
actually important to “work hardening” the gears. You can probably do
light towing at 500 miles, but wait to at least 1000 miles for hard towing
and change the oil before you do.
A
full-time rig will break in the front and rear simultaneously, so follow
the guidelines above. Part time rigs are tougher unless you can drive the
first 100 miles on a dirt road in the same short intervals as a rear.
Definitely do not drive on the street in 4wd with the hubs locked. You can
do a “quick-n-dirty” front axle break-in on a part-time rig by leaving
the hubs unlocked but engaging 4-wheel high and driving about 25 miles at
moderate speeds, stopping to check for high temps. Then disengage 4wd and
just lock in the hubs and drive another 25 miles. These operations should
set you up for moderate use on the trail. A few easy trail trips and you
can probably call it safe to ‘wheel hard.
|

|
|

|
|
Stalling
Future Trouble: It is wise to replace anything that might be a problem
later on. Needless to say, all seals are replaced. In the case of the
Dana 35, that could include the axle support bearing that’s pressed
into the right side of the housing. For the 8.8, it could, and did,
include the wheel bearings and seals. We found a bad bearing and a
scored axle shaft in our used Explorer axle. A slide hammer with
internal jaws will make short work of the roller bearings in both
situations.
|
|

General
Tip: Before installing the axle shafts, add a little gear oil to the
bearing. That will give them the initial lubrication they need to get
started until more oil comes from the diff.
|
|
|
|

|
|

|
|
Install
Axles/Detroit Lockers: Reinstall the axle shaft and clip. The only
special step with regards to the Detroit Locker is this center pin.
Insert it and, after applying Locktite, tighten the Allen bolt on the
right.
|
|

|
|

|
|
Sealing
Covers: After cleaning the mounting flange of the TTB arm, apply an
unbroken bead of RTV. This is actually an example of how not to do it.
There are several thin areas and a break in the bead. In fact, this
leaked after installation. You need a solid, consistent and unbroken
bead of RTV inside the bolt holes. Do what we say and not what we do,
eh? The rear 8.8 got a custom made high volume cover and it didn’t
leak.
|
Sources:
-
Steinbinder’s
Service
-
Dept
ORA
-
50502
SR 154
-
Negley,
OH 44441
-
330-426-9489
Be
sure to completely read supplied manufacturer’s instructions prior to
installing this product kit.
Check
Out:
Check
Out Off-Road
Adventures Magazine.
|


