• Welcome Visitor! Please take a few seconds and Register for our forum. Even if you don't want to post, you can still 'Like' and react to posts.

AJE Ranger K-Member Who's Done It!?


ndmp40

New Member
Joined
Apr 2, 2023
Messages
16
Reaction score
16
Points
3
Location
michigan
Vehicle Year
1986
Make / Model
Ranger
Transmission
Manual
Don't want to divert this great thread or hijack it, so sorry in advance.
I am 90% sure I am going with the AJE front on my 86 Ranger, and want to make sure my planning is good. I plan on using a fox strut assembly, but not sure what spindle to use- fox or SN95? I thought using 13" cobra brakes would be perfect, so that points to SN95 spindles, correct?
The truck has manual steering now, and want to go to power. Is this feasible? What rack should I plan to use?
Anything else I should be thinking about in advance?
Thanks to all, this is a great thread.
 

Yotaismygame

Active Member
Joined
Oct 15, 2020
Messages
221
Reaction score
196
Points
43
Location
Oregon
Vehicle Year
1995
Make / Model
Splash 2wd
Transmission
Manual
Don't want to divert this great thread or hijack it, so sorry in advance.
I am 90% sure I am going with the AJE front on my 86 Ranger, and want to make sure my planning is good. I plan on using a fox strut assembly, but not sure what spindle to use- fox or SN95? I thought using 13" cobra brakes would be perfect, so that points to SN95 spindles, correct?
The truck has manual steering now, and want to go to power. Is this feasible? What rack should I plan to use?
Anything else I should be thinking about in advance?
Thanks to all, this is a great thread.
oh you fine. Although most if not all the info has already been posted in this thread.

Most everything you want to use should be SN95. Most people like to use sn95 power racks with fox inner tie rods. SN95 inner tie rods are too long. Might have to trim down the fox ones as is. SN95's cant be cut down enough. Not sure if or how the fox racks are different. Fox struts allow more drop and travel but either can be used. SN95 spindles only. Front sway bar you can stick with ranger parts. Supposedly 2001 ish explorer bars work too. I have a 1.5" explorer bar coming today so will be able to confirm that
 

clippii

Member
Joined
Sep 6, 2021
Messages
25
Reaction score
41
Points
13
Location
New York
Vehicle Year
1993
Make / Model
Ford Ranger
Engine Type
4.0 V6
Transmission
Manual
2WD / 4WD
2WD
She's finally in the garage. My 1993 Ranger. I'm grateful to be able to use my friends shop that has a 2 post lift in it as this would be an endeavor without it.

20200606_152015 (1).jpg

Above is what the truck looked like circa 2019; It was sitting on 3" drop in the front and then an axle flip in the rear, probably about 4" in the rear.
and here's what she looks like now. Just pulled her into the shop yesterday and took off the bed. I've got a fiberglass bed cover which adds about 200 pounds so it wasn't fun with just 2 people helping. About 4 years ago I stripped the bed off; refinished the rear frame and rewired the entire back of the truck along with all the suspension components so it's cool to see its nice and clean under there still.
P_20230611_203345.jpg


Unfortunately the truck was in a flood in late 2021; the water in the headlight is a good indication as to how high it got up.

P_20230611_203335.jpg


P_20230611_203329.jpg


P_20230611_203322.jpg


This week my plans are to gut as much of the stock drivetrain as I can, so probably will have another update on Thursday. Thanks for reading hopefully will be posting often as I get going on this thing!

Don't want to divert this great thread or hijack it, so sorry in advance.
I am 90% sure I am going with the AJE front on my 86 Ranger, and want to make sure my planning is good. I plan on using a fox strut assembly, but not sure what spindle to use- fox or SN95? I thought using 13" cobra brakes would be perfect, so that points to SN95 spindles, correct?
The truck has manual steering now, and want to go to power. Is this feasible? What rack should I plan to use?
Anything else I should be thinking about in advance?
Thanks to all, this is a great thread.
If you're in need of a set of SN95 spindles I have a spare set of spindles/hubs that I did not use as I went with Racecraft 2" drop spindles. What motor/trans combo are you thinking about running?
 

ndmp40

New Member
Joined
Apr 2, 2023
Messages
16
Reaction score
16
Points
3
Location
michigan
Vehicle Year
1986
Make / Model
Ranger
Transmission
Manual
My truck is 302 swapped with a T5. Stock suspension now.
1986 Ford Ranger.jpg
 

Yotaismygame

Active Member
Joined
Oct 15, 2020
Messages
221
Reaction score
196
Points
43
Location
Oregon
Vehicle Year
1995
Make / Model
Splash 2wd
Transmission
Manual
Few Updates: Went back to the track and ran a 12.33 at 120mph. I think the way the truck sits I could get that down to 11.5 or slower. Need a little better starts and more wastegate spring to hold boost on the top end. Keep in mind this is on street tires and a manual.

Also finally got a decent front sway bar under this thing. Turns out explorer bars or newer ranger bars will not work. Found this out the hard way. I do not recommended buying from SDtrucksprings. They took almost a month to get me the explorer bar that didn't fit and also sent the wrong mounts with it. Now I'm trying to return it but they take days to respond.

Ended up ordering the Belltech 5445 bar 1.25" from Summit and even though it was a drop ship item still got it in four days!. Fits almost perfect and you'll just need end links. I used some off amazon for a dodge ram. They are almost perfect too. Kina pricey though. They could be maybe half inch shorter. Which would be easy to do. Just shorten the sleeve and grab a shorter bolt.

I do have a complaint with the AJE mounts on the LCA. They're too narrow. To get the end links to be verticle I would need to cut them off and move them out about an inch. This was an issue with the stock sway bar also. Someday ill get around too that.
sway.jpg
sway2.jpg
sway3.jpg
sway4.jpg
sway5.png
 

clippii

Member
Joined
Sep 6, 2021
Messages
25
Reaction score
41
Points
13
Location
New York
Vehicle Year
1993
Make / Model
Ford Ranger
Engine Type
4.0 V6
Transmission
Manual
2WD / 4WD
2WD
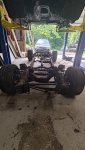
Update #2. Cab is off!

Disconnected everything that was connecting the body to the frame. Wiring harnesses, steering shaft, speedometer cable, parking brake brake, battery, clutch master, intake, radiator, condenser. Cut out all the things I knew I wasn't going to re-use and saved the rest.

P_20230614_203407.jpg


Next was the fun part of undoing the cab/frame bolts. Let's just say there was a LOT of rust on the mounts. More than I was expecting. This truck has been in NY/NJ for its entire life so I'm not entirely surprised. The front 2 radiator bolts came out with my 1/2 air impact; but the rear 4 cab mounts wouldn't break free at all. Had to have a buddy give me a hand with a breaker bar and a 4ft cheater bar and finally broke half of them. I've got new duff poly bushings/hardware going in.

P_20230620_193049.jpg


The next few pictures are of the cab mounts/bushings, well what's left of them. I'm going to have to repair/replace 5 out of 6 of them. I can't seem to find anything but the 2 rearmost ones available for sale. The mid ones are riveted in; so new ones could be bolt in; but I can't seem to find any online. If anyone's got any insight to this that would be great; if not I'll just have to cut out the rust and repair as I can.

P_20230620_193335.jpg


Mid-Passenger Below

P_20230620_193422.jpg


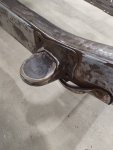
Below are the front radiator ones; these are going to need to be completely rebuilt as they're welded in; and the rust is BAD. Will repair but the hard part is going to be finding out where the center of the hole was supposed to be. Not much in the way of reference points left. This the the passenger side and the drivers side wasn't much better. Might have to have someone measure another ranger to get some comparisons.

P_20230620_193330.jpg


Below is the passenger rear. The 1 good mount! I didn't take a picture of it but this was the one corner where the bushing that was COMPLETLY uncompressed. The other bushings must have started failing and the cab was leaning letting off all the pressure from this one. My guess it's been like this a long time like this to not have any rust on this corner.

P_20230620_193434.jpg


As well I'm going to need a new radiator core support. I've been looking on/off for the last 18 months knowing I needed one from the visible rust I could see from the top and it's been out of stock EVERYWHERE. 93/94 is different than every other year; and of course that's the one that's out of stock. I check once a month every single site I know of to get replacement new autobody parts. I checked Rock Auto last night for the heck of it after finally getting the cab off; and sure enough they have one back in stock! I couldn't believe it. What great timing! $75 for the part and $150 for the shipping but it'll be well worth it. Will be much easier to modify the new one to accommodate the twin turbo setup anyways.

P_20230620_193321.jpg

P_20230620_193444.jpg


Getting the motor/trans out was actually quite simple compared to the rest of this. 2 motor mount bolts and 2 trans mount bolts. Undid the power steering lines, the header bolts and she's out.

P_20230621_165708.jpg


Above is how it sits right now. Currently 16 hours in. Going to keep track of the time I work on it since it might be a neat thing to know. I tried to use a cheap plasma cutter that I bought on amazon and it was DOA so have to return that and get a new one for next week.

Next update I'll be removing the fuel tank, brake lines, chassis wiring harness and removing/cutting out all the unneeded front suspension bracketry. Will also try and mock up the AJE kit to see how it looks over what I cut out. Overall the frame itself is very solid, as is the underside of the cab thankfully nothing major, just some surface rust which I'll clean up and paint to protect against future corrosion before putting the cab back down.

Shame the truck has all brand new front suspension. Dream beams, new springs/tie rods/bushings; mostly moog. Converted to the 95-97 spindles with EBC pads/rotors. Everything all with less than 1000 miles, some surface rust since it was in a flood; but everything still solid. Might post it up on the classifieds if someone wants it who's local rather than just sending it to the scrap.

If anyone has any suggestions/complaints for the format of these posts I'm making feedback is welcome. If not, cya in the next update; hopefully another week or two away!
 

Attachments

Yotaismygame

Active Member
Joined
Oct 15, 2020
Messages
221
Reaction score
196
Points
43
Location
Oregon
Vehicle Year
1995
Make / Model
Splash 2wd
Transmission
Manual
My body mounts weren't that rusted but still a pain in the ass to replace. I went with a poly kit and it was anything but a complete kit. Air chisel is your friend when it comes to removing the factory rivets. I don't recommend putting weight on the suspension(AJE) without the crossbar on fyi.
 

clippii

Member
Joined
Sep 6, 2021
Messages
25
Reaction score
41
Points
13
Location
New York
Vehicle Year
1993
Make / Model
Ford Ranger
Engine Type
4.0 V6
Transmission
Manual
2WD / 4WD
2WD
Well no going back! Plasma cutter worked excellent and those rivets are no joke. Air chisel, sledge and a drill all needed. The 3rd picture shows rust that was building up behind the passenger side spring mount. You can see how uneven it is and where some daylight is showing through. Going to have to cut and weld in a patch and re-drill any needed holes. So far so good though. Hopefully going to cut out the rest of the unneeded crossmember and do a mock up next week. Also ordered in all the steel to box the frame so that'll be another adventure.
P_20230705_180911.jpg

P_20230705_180918.jpg

P_20230705_180923.jpg
 

clippii

Member
Joined
Sep 6, 2021
Messages
25
Reaction score
41
Points
13
Location
New York
Vehicle Year
1993
Make / Model
Ford Ranger
Engine Type
4.0 V6
Transmission
Manual
2WD / 4WD
2WD
So I'm running into a few issues;

I think my frame is missing both the rear mounting holes for the K-member; I think earlier in the thread I read that there's only 1 that's there and then you drill the other one I don't see either on my frame as shown in the attached photo that I took before I removed my spring perches, Maybe @Yotaismygame @n2xlr8n @That_One_Dude_97 can confirm. I grabbed a photo from one of you guys' trucks you posted earlier in the thread and these are the mounting spots I'm talking about and I'm looking at that elongated hole for reference on the passenger side there's nothing rearward of that on mine and then the driver side is it one of these smaller 2 holes because these also seem out of place?

EDIT: I'm an idiot:
Ok so maybe think I misread the earlier part of the thread; neither hole is there and those are the only 2 holes you drill on EACH side? So then the question becomes how do you set the height of it? If I could get a measurement of what the frontside is from the frame to the tubular section from one of you guys that would be super helpful but that still brings me to my next problem

frontside frame bracket.png


Secondly I think my K-member rear mounts seems narrower than my frame there by a substantial amount. I know that one of you guys had the issue where you got a defective K-member and I hope that's not the case as I bought mine nearly 18 months ago and am finally now installing it; I'm going to take a LOT more measurements tomorrow night If I can figure out exactly where it's to mount and measure my frame again but just trying to chuck it up there to see where it would fit it didn't seem like it wanted to go up at all; by at least 1/2 inch. Another thing I noticed is that the rear uprights of the k-member mounts are slightly bowed inwards at the top compared to the bottom; by almost 1/4 of an inch. I don't wanna start stretching it out or messing with it just quite yet.

Gonna take a bunch of measurements tomorrow but hope one of you guys can point me in the right direction.

r3yQ8Crrte.jpg
chrome_8EFVvE87oR.png
 
Last edited:

Yotaismygame

Active Member
Joined
Oct 15, 2020
Messages
221
Reaction score
196
Points
43
Location
Oregon
Vehicle Year
1995
Make / Model
Splash 2wd
Transmission
Manual
I just bolted mine up in the front then marked the rear holes. I took pics of some measurements to help set it. On here somewhere. I want to say the rear mount was very tight. I didn't need to hold the rear up at all
 

Yotaismygame

Active Member
Joined
Oct 15, 2020
Messages
221
Reaction score
196
Points
43
Location
Oregon
Vehicle Year
1995
Make / Model
Splash 2wd
Transmission
Manual
Any updates?
 

clippii

Member
Joined
Sep 6, 2021
Messages
25
Reaction score
41
Points
13
Location
New York
Vehicle Year
1993
Make / Model
Ford Ranger
Engine Type
4.0 V6
Transmission
Manual
2WD / 4WD
2WD
I didn't take any pictures of it; but I got it up there. I spent about 40 mins of the phone with Jim? from AJE and he was super helpful. Answered all my questions; explained a lot and the why certain things are they way they are on the kit. Great support.

I was able to force it up there, but was holding itself up there with zero hardware just from how snug it was. My frame did not have 1 of the 2 holes and even Jim said that that it may just be because of year. He recommended making it parallel with the frame rails as that is how it is on the fox that it was modeled and mocked up after. I've got a friend with a bone stock foxboxy that I can take angle dimensions off of and confirm that angle. I didn't drill anything yet because I'm going to wait until it's mocked up and lined up properly before anything. I welded 4/6 of the rusty body mounts with 1/8th plate on top of them and enlarged the hole underneath so the whole truck will have a 1/8th body lift. The rear 2 cab mounts I can buy new and I'll replace those soon as well. I've been grinding and sanding away at the frame to prep it to box it from the front to just behind the cab.

Will try and post a few pictures this week with some of the progress I've made but it's slowly coming along. I'm only able to spend about 10 hours a week on it and it's a lot to do.
 

tubbyb23

New Member
Joined
May 29, 2012
Messages
10
Reaction score
5
Points
3
Vehicle Year
94
Make / Model
mazda
Transmission
Automatic
Doesn't seem to be hardly any info out there on this. Without saying too much I'm currently building a 95 2wd splash as a track oriented street truck. Why? ...Why not! The kit is a bit expensive but when you take into what all it upgrades on your truck it isn't too bad. Steering, suspension, drop in engine mounts, tons of brake options. All things I want for my build. Originally planned on coil-overs, beams etc etc to get the truck low enough and to handle decent. I wanted to upgrade the brakes too. Figured I would have to come up with something on my own for that.

The AJE kit would solve all and bolt in. Truck will be v8 turbo, triangulated 4-link in the rear with a 8.8.
I just ordered this kit for mine. We'll see how it goes
 

clippii

Member
Joined
Sep 6, 2021
Messages
25
Reaction score
41
Points
13
Location
New York
Vehicle Year
1993
Make / Model
Ford Ranger
Engine Type
4.0 V6
Transmission
Manual
2WD / 4WD
2WD
Alright big update. Finally was able to make some meaningful progress so I figured I'd post where I'm at. Only able to put a few hours a week if that into it, so it's taking time.

I cut and welded a patch into the frame where the damaged section was, not the prettiest welds but she's sturdy and functional. Welded both sides, as well as an internal gusset to reinforce it. I cut out the rest of that vertical section that remained of the factory crossmember, and put a new gusset there. Can't see it any of these photos but it ties it in just like the original section did.

P_20230712_175228.jpg
P_20230712_202459.jpg

Didn't re-drill any of the holes yet for the k-member yet because I want to wait until the frame is fully boxed in and I'm able to measure and square everything properly.

The next project was fixing the cab mounts which I posted about previously. I was able to grinder out all of the thin damaged sections to make room for the bushing to fit on the interior then just welded 1/8th in plate over the top of it on all 4 of the mounts that I repaired. The 2 front's as well as the 2 mids. The old mounts were so ovalized and worn out that I don't know exactly where to re-drill the bushing holes yet so I'll take some measurements from the cab holes to decide where they go, Again a problem for future me.
P_20230719_175558.jpg
P_20230719_175606.jpg
P_20230719_175615.jpg


Here's one of the rear ones, I was able to get a replacement Dorman one I just buzzed off the rivets and here's what the new one looks like in comparison. Pretty much all of the mounts that I repaired looked like the one on the left. During final assembly I'll add a 1/8th in washer on this one as well to give the entire body a 1/8th lift to level and square it all up.

P_20230920_193825.jpg
P_20230920_193835.jpg


Next up comes the most time consuming part. I cleaned and sanded the entire frame down to bare metal to both inside and out from the rear cab mount forward. This was an exhausting process of lots of grinding wheels, sanding discs, ect. I then began tracing out and making sections of 1/8th in plate to box in the frame from that rear cab mount forward. Each side is made up of 3 sections of roughly 3ft each. I currently have the drivers side tacked up there now. Still have to make the passenger side up and weld in some temporary supports before fully welding it in place. On the rearmost section I left it large around the factory crossmember and I'll lay over a more exact plate to tie it in fully afterwards. I beveled the edges of the frame as well as the plate for the weld to lay into. Clamped each section in and hammered and formed it into the curves of the existing frame as I went along. I also used weld thru primer on back side of the plates however I left the majority of the frame bare as I'll be using Eastwood Internal frame coating that will apply to bare metal as well as some surface rust that's still remaining on the frame.

Here's what all the sections look like as I clamped and tacked them in place.

P_20231004_153958.jpg
P_20231004_154005.jpg

P_20231004_160908.jpg
P_20231004_192911.jpg
P_20231004_194729.jpg
P_20231004_194734.jpg


And that's where I left off as of yesterday. Plan is to continue to make the rest of the passenger box plates, and tack them in, fully weld everything in, paint the internal of the frame and then begin assembling the k-member kit into place. A while back I did take a few photos of me getting the k-member into place when I was speaking with Jim from AJE and seeing that some of the holes weren't on my frame, but everything seems to line up well enough that when it comes time I'll be able to drill those out.

Cleaning the frame up and doing these box in sections has been the most time consuming. These factory frames are so flexible you can lift 1 corner of the frame up near 3-4 inches and the other 3 corners will stay on the jack stands before another corner lifts. It was quite amusing to just lift and handle this frame with nothing on it as I was pressure washing it, degreasing and sanding it. Something that probably wasn't necessary but I wanted to do as this truck is probably going to have a stupid amount of power and anything I can do to stiffen it up, the better.

Thanks for reading!

P_20230716_183529.jpg

P_20230716_181510.jpg
 

Attachments


Sponsored Ad


Sponsored Ad

Members online

Member & Vendor Upgrades

For a small yearly donation, you can support this forum and receive a 'Supporting Member' banner, or become a 'Supporting Vendor' and promote your products here. Click the banner to find out how.

Latest posts

Truck of The Month


Shran
April Truck of The Month

Recently Featured

Want to see your truck here? Share your photos and details in the forum.

Follow TRS On Instagram

TRS Events

25th Anniversary Sponsors

Check Out The TRS Store


Sponsored Ad


Sponsored Ad

Sponsored Ad


Amazon Deals

Top