• Welcome Visitor! Please take a few seconds and Register for our forum. Even if you don't want to post, you can still 'Like' and react to posts.

The Lone Ranger – Kage’s ’94 X-Cab Leaf SAS and Bed Bob


Kage

March 2012 OTOTM Winner
OTOTM Winner
Solid Axle Swap
Joined
Oct 10, 2010
Messages
781
Reaction score
16
Points
18
Location
Near St. Louis MO on the IL side
Vehicle Year
1994
Make / Model
Ford
Engine Size
4.0
Transmission
Manual
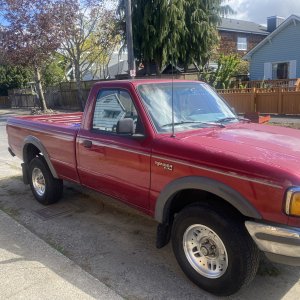
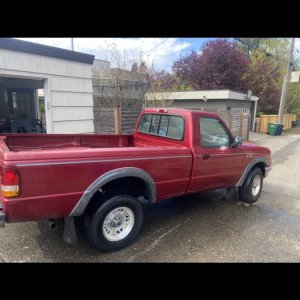
im wanking it to that picture of it on all 4's
Dude.....that is entirely too much information.........:icon_rofl::icon_rofl::icon_rofl:

does look really good though......

l8r, John
Yeah, remind me not to ever camp next to that guy :icon_twisted::icon_rofl:

look's awsome on it weight!!! so from the sy shot it look's like it musta been loud and metal must have been flyin SWEEEEEETTTTT!!!!!!!
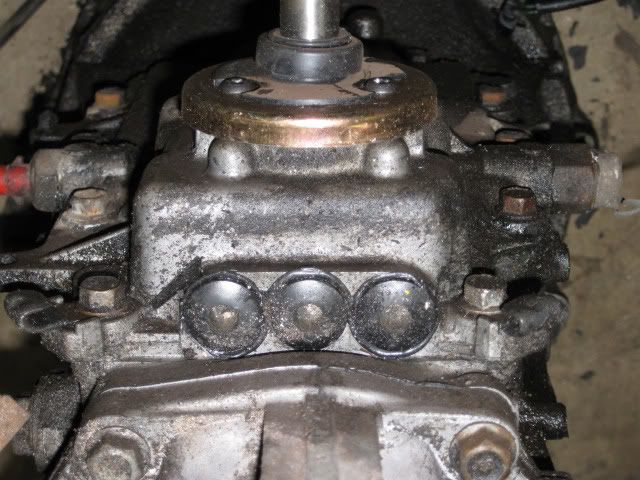
Thanks, he's got another cut to make before he starts to stitch it back together again. It looks like the final cut is going to be 14 1/2" removed from that front section. I'll do a full post on that later once its completed.

one thing i find funny, is when you were looking for a base point to set the front up i almost always use the oem hanger bolts, usually using two long allthread rods to make a fixture. i was sure you would do that, and now the rear hanger setup ending up like it did adds to that.

i am quite impressed with your approach/solutions :icon_thumby:
Well we were on the same page, I was just lacking material to go that route. Add to that, ever dang hole I was trying to use as a reference (in the front) kept being too far out of spec for me (1/16 to 1/8" out). So its possible that the front is just ever so slightly tweaked.

Thanks for the compliment!

Mmmmm, looks like love on wheels.
Thanks! Getting it back on all four was a happy moment :icon_bounceblue: Its looking like I'll be attacking the doubler setup this weekend, so look for a post on that next week.

Thanks again for the comments guys!


Josh40601

Active Member
U.S. Military - Veteran
OTOTM Winner
MTOTM Winner
Solid Axle Swap
Joined
Jul 28, 2009
Messages
3,807
Reaction score
12
Points
38
Location
San Diego
Vehicle Year
1991/2001
Make / Model
Ford
Transmission
Automatic

Andres629

New Member
Article Contributor
Solid Axle Swap
Joined
Feb 24, 2009
Messages
2,367
Reaction score
11
Points
0
Age
35
Location
Saskatchewan!
Vehicle Year
1985/91
Make / Model
Ford
Engine Size
2.9 screamer
Transmission
Automatic
Where are you getting the sector shaft done for the doubler??
 

Kage

March 2012 OTOTM Winner
OTOTM Winner
Solid Axle Swap
Joined
Oct 10, 2010
Messages
781
Reaction score
16
Points
18
Location
Near St. Louis MO on the IL side
Vehicle Year
1994
Make / Model
Ford
Engine Size
4.0
Transmission
Manual
It's amazing how the simple jobs always turn out to be a nightmare

I got the trans pulled Saturday, that went pretty smoothly other than whoever did the last clutch job on this guy thought that every bolt needed to be torqued to 300 ft/lbs…:annoyed:


Unfortunately, I broke the four bolts off the collectors. After grinding down the leftover bolts, I was sadly surprised to find that I can’t drill the dang things out while they’re on the truck. So several hours (and many new curse words later) I got the manifolds off: (Acetone/ATF mix 4tw)


It looks like I nicked the sealing surface pretty good with the grinding wheel earlier. So I might be on the hunt for some new manifolds here. Anyone have any suggestions? If I'm going to replace them, I need to get them orderd ASAP. I don't expect to get any power gains off a set, but if they're close to the same price as the stock stuff "why not"?


Things were rolling along so smoothly too….
 

86 slo-vo

02/2011 OTOTM Winner
OTOTM Winner
TRS Banner 2010-2011
Joined
Jan 5, 2009
Messages
4,510
Reaction score
36
Points
0
Location
owensboro, KY
Vehicle Year
1994
Make / Model
ford
Engine Size
4.0
Transmission
Manual
ive been happy with my headman headers on mine, could deffinantly tell a difference
 

Andres629

New Member
Article Contributor
Solid Axle Swap
Joined
Feb 24, 2009
Messages
2,367
Reaction score
11
Points
0
Age
35
Location
Saskatchewan!
Vehicle Year
1985/91
Make / Model
Ford
Engine Size
2.9 screamer
Transmission
Automatic
All I can say is that a buddy of mine is running Pacesetters on his 2.9 and they keep leaking and coming loose. I dunno if it's just 2.9 Pacesetters or what, but maybe stay away from them? :dunno:
 

bobbywalter

TRS Technical Staff
TRS Event Staff
V8 Engine Swap
TRS Technical Advisor
TRS Banner 2012-2015
TRS 20th Anniversary
Ugly Truck of Month
TRS Event Participant
Joined
Aug 9, 2007
Messages
23,470
Reaction score
4,668
Points
113
Location
woodhaven mi
Vehicle Year
1988
Make / Model
FORD mostly
Engine Type
V8
Engine Size
BIGGER
Transmission
Automatic
2WD / 4WD
4WD
Total Lift
sawzall?
Tire Size
33-44
My credo
it is easier to fix and understand than "her"
just drill em or quick clamp them bro:icon_thumby:


i do clamps with no issues so far....its ugly but works fine till you get the 351 in there


maybe not this year.....maybe not the next.....


but


you know your gonna end up with a 351 or big block or something....:thefinger:
 

Kage

March 2012 OTOTM Winner
OTOTM Winner
Solid Axle Swap
Joined
Oct 10, 2010
Messages
781
Reaction score
16
Points
18
Location
Near St. Louis MO on the IL side
Vehicle Year
1994
Make / Model
Ford
Engine Size
4.0
Transmission
Manual
ive been happy with my headman headers on mine, could deffinantly tell a difference
All I can say is that a buddy of mine is running Pacesetters on his 2.9 and they keep leaking and coming loose. I dunno if it's just 2.9 Pacesetters or what, but maybe stay away from them? :dunno:
Thanks guys! I've been hearing mixed reviews on both the headman's and the Pacesetters. But after stepping away from it for a bit, I'm just going to grab some stockers to get it going faster (and cheaper) again. And after pricing the aftermarket guys, I'm thinking that money might be better spend elsewhere (like drive shafts :icon_twisted:)

just drill em or quick clamp them bro:icon_thumby:


i do clamps with no issues so far....its ugly but works fine
I'd forgotten about the clamps, but I've never had much luck with them either. As for drilling them out, I've allready goofed up one manifold when I was drilling it out on the truck, so I'm boned there too.


...till you get the 351 in there...maybe not this year.....maybe not the next.....but...you know your gonna end up with a 351 or big block or something....:thefinger:
GET OUT OF MY HEAD :thefinger:

...I figured if I had broke off some of the bolts holding the mainfolds on I would have to pull the motor to drill them out. And since I was going to have the 4.0 out, why not just slap a 5.0 in it?

Thankfully It doesn't look like I have to pull that motor out any time soon :icon_twisted:
 

86 slo-vo

02/2011 OTOTM Winner
OTOTM Winner
TRS Banner 2010-2011
Joined
Jan 5, 2009
Messages
4,510
Reaction score
36
Points
0
Location
owensboro, KY
Vehicle Year
1994
Make / Model
ford
Engine Size
4.0
Transmission
Manual
you were luckier then me then...i broke all 3 uppers on the driver side manifold

luckily they could just be drilled out and put a nut on the backside
 

Kage

March 2012 OTOTM Winner
OTOTM Winner
Solid Axle Swap
Joined
Oct 10, 2010
Messages
781
Reaction score
16
Points
18
Location
Near St. Louis MO on the IL side
Vehicle Year
1994
Make / Model
Ford
Engine Size
4.0
Transmission
Manual
I feel as though I’ve been slacking, and I suppose I have. I took last Sunday and Monday off from working on the truck to hang out with the wife for a bit. With it being so nice on Tuesday, I decided to get caught up on my yard work (boo!). But I did mage to get some things done.

Got the fly wheel back from the machine shop (The pilot bearing was waaaay dead):


Got my “new” exhaust manifolds (they’re loosely sitting in the truck now):


I hope to have the tranny and the doubler stabbed in the truck by the end of this weekend. I’ve got two more quick updates coming here shortly….
 

Kage

March 2012 OTOTM Winner
OTOTM Winner
Solid Axle Swap
Joined
Oct 10, 2010
Messages
781
Reaction score
16
Points
18
Location
Near St. Louis MO on the IL side
Vehicle Year
1994
Make / Model
Ford
Engine Size
4.0
Transmission
Manual
M50D Maintenance

Before I pulled the truck apart, I had already replaced the non-existent shifter bushings in my 5 gear. By referring to this article in the tech library (linky) it was a pretty easy process.

At the same time that I did that repair, I resealed the rubber plugs on the shift rail by following this write up in the tech library (linky). While that slowed the leaks down quite a bit, they still wept some.

So here’s the offenders:


Pulled them out and slapped some freeze plugs in there:


Now that should solve the leaking problem for good!
 

Kage

March 2012 OTOTM Winner
OTOTM Winner
Solid Axle Swap
Joined
Oct 10, 2010
Messages
781
Reaction score
16
Points
18
Location
Near St. Louis MO on the IL side
Vehicle Year
1994
Make / Model
Ford
Engine Size
4.0
Transmission
Manual
1350/1354 Doubler Build

This is my first foray into any transfer case. Thankfully it turns out that they’re quite a bit simpler than I thought they would be. I don’t know if the gear driven cases are any more complicated, but my guess is that they’re even simpler.

I’m using the D&D Machine kit from Duffy (he also makes the “Box For Rocks” kits for the Jeep stuff as well). The kit really is quite simple to put together (heck, even a goofball like me managed to get it done without too much of an issue). If you really had to hammer though it, you could probably knock this project out in a day easy (day + plus whatever time you need for the form-a-gasket to cure).

Duffy’s kit comes with the adapter plates, block off plates, all the bolts needed, shorter shift rail, and the all important splined shaft.


Once you have the kit, you’ll need a BW1354 (either an E or M will work as this is the rear case):


And also a BW1350 (Manual) case for the front:


Rear case portion of this is stupid simple to put together (BW1354 case). But before you can slap it together, you’ll need to do something about the breather as it will be in the way of the dobuler adapter plate. Either drill and tap a new one, or make a 90° elbow work as I did.

Remove the stock breather and do a little clearance grinding on the case:


Then grind your 90° elbow to allow it to spin onto the case, and stick your old breather vent into the 90° elbow to finish this part off:


Once that’s done, you get to move to the first portion of your doubler build. That being, slapping on the rear adapter plate. Don’t forget to seal it up!


Now its time to start tearing the BW1350 apart to prep it for cutting. I started out with the Box + Tranny adapter:


Ditched the adapter:


Unbolt the case halves and everything just falls apart (Note: if you pull the Rear yoke off, it is a little easier to split the case. I got lazy and just did it this way):


Once the case is split, lay the adapter plate on top of the BW1350 and mark a cut line. Make sure you leave some “fluff” that you can clean up with a grinder later:


Remove the snap ring holding the front yoke on, and pull the planetary gear set out (bolts on the front of the BW1350), and get cutting!:


Slap the adapter plate back on to check your cut line and grind to your liking (Note: the vent shown was not supplied in Duffy’s kit, I picked that one up at Home Depot, more on that later):


After you’ve done some grinding to get rid of the excess T-case stock, you get to start trimming the block off plates to fit. This is the one spot I’m a little disappointed in the kit. It would have been nice to have the plates a little closer to the right size (minor complaint, I realize that).After whacking off about 3/8” off the plates, and doing some rough grinding:


Finish grinding:


You can either have these welded on, or just use some form-a-gasket to seal them off. I opted for the latter as this is just an Aluminum transfer case, I want to be able to pop these blocks off in the future if something were to happen the doubler case.

Once the blocks fit to your liking, its time to clean out the case and swap the shift rails out:


Seal up the adapter and block off plates, don’t forget to tighten up the screw for the new shift rail!:


After the sealant has set on the front case, slap some sealant on the surface between the adapter plates and screw them together. This is my only other complaint about this kit. Instead of having the shift rail screwed to the back side of the adapter plate (another place to possibly leak). It would have been nice to have the rail ‘float’ instead which would allow you to pull the shift fork out while tightening down these screws. Getting under the shift fork is a pain for folks with big hands! TIP: Drill a hole in the sift fork to allow you to get to the allen bolt underneath it (I forgot to do that, it would have made life easy). This is also the point in which you get to decide to clock the rear case if you want. I left mine stock at this point to keep from having to clearance the cab too much:


Plop the shaft in and slide the planetary set back into the front of the case (It helps to rotate it as you insert it). Don’t force it! It will slide in easily once everything lines up. Give everything a spin to makes sure it feels good while you’re at it. (And yes, you’re allowed to giggle as you make it spin in double low while its on the bench).


Now you just need to address the vent tube for the front case. In the latest revision of this kit, Duffy put a tapped hole on the adapter plate to be used for a vent. Since that hole sits higher than the stock vent, it’s wise to just plug up the stock vent tube hole:


For the Main vents, I made them “T” into each other to less the amount of lines running around under my truck. At this point I think I’m going to run the vent line out back behind the cab, but that’s subject to change once I get the doubler under the truck.:


Fill it up with fluid (about ¾ of a quart) and slap it in the truck (I don’t have it in my truck yet so no pics). It looks like I’m going to get lucky with the linkage as my case came with the 1350 linkage for the AL4D. So it should work with my M5OD tranny and make life simple. If not, I’ll make it work.

As a side note, when looking at the guts of the 1350 and the diagram of the 1354E. I’m thinking it might be possible to take the mechanical linkage out of a 1350 and make it work in the 1354E case to lose the electric shift motor. If I come across a couple of cheap cases in the future, I might have to give this a try.

As another side note, If you have a spare 1354 laying around, you can pull the Planetary, shift fork, and slide gear to upgrade form the 4 gear set to the 6 gear set (1993+ 1354’s). I didn’t have that luxury, so I’ll just rock the 4 gear set. If it breaks, I’ll worry about it then.

Edit: The doubler add 6.75" to your driveline
 
Last edited:

86 slo-vo

02/2011 OTOTM Winner
OTOTM Winner
TRS Banner 2010-2011
Joined
Jan 5, 2009
Messages
4,510
Reaction score
36
Points
0
Location
owensboro, KY
Vehicle Year
1994
Make / Model
ford
Engine Size
4.0
Transmission
Manual
nice write-up...been looking at his kits myself for a while...
 

Sasquatch_Ryda

Well-Known Member
Ford Technician
OTOTM Winner
Solid Axle Swap
Forum Staff - Retired
TRS Banner 2012-2015
Joined
Aug 8, 2007
Messages
7,916
Reaction score
108
Points
63
Age
36
Location
Terrace, BC, Canada
Vehicle Year
1991
Make / Model
Ford
Engine Type
4.0 V6
Engine Size
4.0L
Transmission
Automatic
2WD / 4WD
Solid Axle Swap 4x4
Tire Size
40s
PS. The 63" 2wd 3 leaf pack with the overload removed will flex juuuuuust fine the way you got it set up!


If you open up the clamps that hold the leafs together so that they are open on the tops the leafs will fan out more giving more droop as well. I haven't gotten around to doing that yet but I will soon...
 

Sponsored Ad


Sponsored Ad

Staff online

Member & Vendor Upgrades

For a small yearly donation, you can support this forum and receive a 'Supporting Member' banner, or become a 'Supporting Vendor' and promote your products here. Click the banner to find out how.

Truck of The Month


Mudtruggy
May Truck of The Month

Recently Featured

Want to see your truck here? Share your photos and details in the forum.

Follow TRS On Instagram

TRS Events

25th Anniversary Sponsors

Check Out The TRS Store


Sponsored Ad


Sponsored Ad

Sponsored Ad


Amazon Deals

Top