
- Joined
- Nov 30, 2020
- Messages
- 327
- Reaction score
- 566
- Points
- 93
- Location
- MA, USA
- Vehicle Year
- 1989
- Make / Model
- Ford Bronco II
- Engine Type
- 4.0 V6
- Transmission
- Manual
- 2WD / 4WD
- 4WD
- Total Lift
- 5"
- Tire Size
- 31
- My credo
- Giving my truck more money than it deserves.
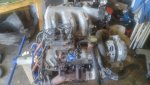
The 1994 federal emissions Explorer that donated an engine to my Bronco II had a lot of complex features that perish quickly in the northeast climate and rarely translate during swaps. The one I’m focusing on today is the vehicle intake before the throttle body. It has a lot of smart design choices that I think deserve a writeup.
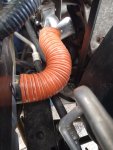
Starting at the throttle body working back is the intake tube. Nothing special is going on here other than me repairing vacuum leaks in the pleats with electrical tape. The rubber seals between the air filter box and throttle body are perished and temporarily fixed with RTV. These are actually pretty hard to find in my area. (If you have one for sale in good shame DM me.)
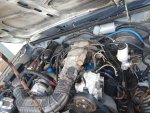
Next we have the air box. On the lid is a vacuum tee with a reference to the inside of the box after the filter. This passes vacuum to a diaphragm described later. I believe this fitting is here in the lid is to check that the air filter is flowing enough air. If it is getting clogged it cuts off vacuum.
Originally this is where I was getting air from. The box has a hole in the bottom of it and I was just pulling in air from the engine bay. This is warm air that passes through the radiator. It is helpful for fuel economy because the air is less dense. It never really gets as cold as ambient and consequently robs power if you want it. Most “cold air intake” kits actually grab air from here. If your stock intake air system is in place as described below, installing a CAI will actually harm your fuel economy and reduce engine power.
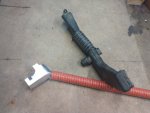
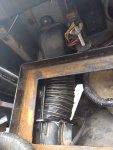
I fitted the old snorkel back to the hole in the air box. This runs under the battery tray to a vane connected to the vacuum line mentioned above. When there is no vacuum applied, air continues through a duct to a cutout in the firewall. I made this by taking round duct and squashing it rectangular with a 2x4. This lets ambient air go directly into the engine from the front grille. The original ducting had torn and the structural wire inside rotted away. The replacement duct was grabbed from McMaster and I chose a size ½” too big. This doesn’t need to be air tight, but its an unfortunate error on my part.
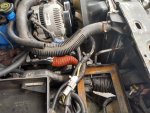
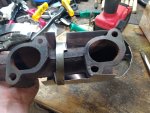
When the engine is under vacuum, the vane directs air from the side of the snorkel to the passenger side exhaust manifold. This tube was completely missing when I got the Explorer. My only hint of what was going on was a severely corroded heat shield on the manifold. This pulled hot air off the exhaust into the engine to reduce its density and fuel consumption under light loads.
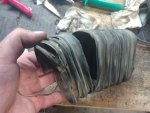
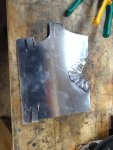
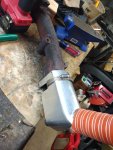
I bought some thin aluminum and tried to recreate this heat shield. The aluminum was cut into shape and bent over a couple of 2x4 sections glued together. I pop riveted the front and tried to do some complex geometry to make a flange for the ducting. The image below was actually the penultimate design but highlights what I was doing. I drilled a hole in the top to align with a hole above the exhaust port in the head. To hold the rear part closer and prevent rattling, I found a Ford hose clamp and screwed it tight. I did not succeed to get it contour the manifold as tightly as factory, but I think it will be an improvement over my old system.
Overall, I’m happy with how this went. I don’t have any fuel economy numbers yet, but I will post updates.
Starting at the throttle body working back is the intake tube. Nothing special is going on here other than me repairing vacuum leaks in the pleats with electrical tape. The rubber seals between the air filter box and throttle body are perished and temporarily fixed with RTV. These are actually pretty hard to find in my area. (If you have one for sale in good shame DM me.)
Next we have the air box. On the lid is a vacuum tee with a reference to the inside of the box after the filter. This passes vacuum to a diaphragm described later. I believe this fitting is here in the lid is to check that the air filter is flowing enough air. If it is getting clogged it cuts off vacuum.
Originally this is where I was getting air from. The box has a hole in the bottom of it and I was just pulling in air from the engine bay. This is warm air that passes through the radiator. It is helpful for fuel economy because the air is less dense. It never really gets as cold as ambient and consequently robs power if you want it. Most “cold air intake” kits actually grab air from here. If your stock intake air system is in place as described below, installing a CAI will actually harm your fuel economy and reduce engine power.
I fitted the old snorkel back to the hole in the air box. This runs under the battery tray to a vane connected to the vacuum line mentioned above. When there is no vacuum applied, air continues through a duct to a cutout in the firewall. I made this by taking round duct and squashing it rectangular with a 2x4. This lets ambient air go directly into the engine from the front grille. The original ducting had torn and the structural wire inside rotted away. The replacement duct was grabbed from McMaster and I chose a size ½” too big. This doesn’t need to be air tight, but its an unfortunate error on my part.
When the engine is under vacuum, the vane directs air from the side of the snorkel to the passenger side exhaust manifold. This tube was completely missing when I got the Explorer. My only hint of what was going on was a severely corroded heat shield on the manifold. This pulled hot air off the exhaust into the engine to reduce its density and fuel consumption under light loads.
I bought some thin aluminum and tried to recreate this heat shield. The aluminum was cut into shape and bent over a couple of 2x4 sections glued together. I pop riveted the front and tried to do some complex geometry to make a flange for the ducting. The image below was actually the penultimate design but highlights what I was doing. I drilled a hole in the top to align with a hole above the exhaust port in the head. To hold the rear part closer and prevent rattling, I found a Ford hose clamp and screwed it tight. I did not succeed to get it contour the manifold as tightly as factory, but I think it will be an improvement over my old system.
Overall, I’m happy with how this went. I don’t have any fuel economy numbers yet, but I will post updates.


